Still waiting for my carburetor to get back from the plater's. Driving home from the grocery store today, it occurred to me that I couldn't remember how the rear vacuum break (RVB) aka, secondary vacuum break, solenoid was energized during start up. Also, how many people really don't understand how the Quadrajet choke system works. I mean, really works. What does what and when type of things. I truly believe that most carburetor issues are misadjusted linkages and lack of ANY type of maintenance on the carb.
So...breaking out the overhead projector again, lets go over a few things on a G-body Oldsmobile E4MC Quadrajet choke system. Again, this may be old hat to some of y'all who's messed with these carbs, or it could be brand new info for you. Maybe someone could learn a little about it and quit ripping the carburetors off along with the CCC system at the first sign of trouble.
Let's start off with the basic setup of the E4MC Olds Quadrajet choke system. Once again, I stress I am not an expert, but I do understand the functionality of most of the carburetor and supporting cast.
For the most part, all 80s G-body E4MC Quadrajets tend to have 4 main pieces to the choke system, besides the all important choke butterfly itself.
Those pieces are:
Primary choke pulloff
Choke housing/spring/fast idle cam assembly
Rear Vacuum Break, aka Secondary choke pulloff
RVB solenoid controlled from the ECM (not shown)
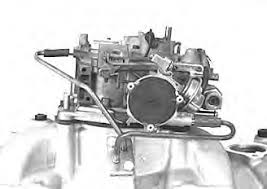
Here's a typical E4MC Oldsmobile style Quadrajet. Not all carburetors have a rear vacuum break, but most Oldsmobiles do. Pretty sure all the 307s do.
Red arrow- Primary Choke pulloff
Yellow arrow- Choke housing with main spring
Blue arrow- Rear Vacuum Break
View attachment 200242
Let's go over the choke housing first. This is where the main party takes place during the choke operation when the engine is cold. Note the black circle that's held on with phillips head screws (factory used rivets). It is attached to a bi-metallic coil spring that when cold, wraps itself up tight and attempts to close the choke butterfly via the linkage. After shutting off the car when warm, the choke spring is loose, allowing the choke butterfly to stay open, and your fast idle cam isn't even playing in the sandbox at this point as it's on the low step. So your curb idle screw is the only thing in play at this point (on driver side of carb). When the engine/carb cools off, the choke spring tries to close the choke, but it won't because of the fast idle adjustment screw keeps it on the low step on the fast idle cam. The choke needs to be set the next time you start the car when it's cold. This is done by pressing the gas pedal ONCE. When the primary throttle blades open, the fast idle cam adjustment step is pulled away from the choke linkage allowing the fast idle link/weight to release. This allows the choke spring to wind up and close the choke. This gas pedal action also squirts fuel into the intake via the accelerator pump shot.
Once the engine starts, filtered air is pulled through the back of the carbuetor air horn through the 1/4" tube. It connects to a heat stove (u-tube arrangement bolted to the intake into the cross-over port). Heated air is pulled from the heat stove tube into the choke spring housing. A small hole in the choke housing is routed to the intake via the main body of the carb. This way, hot air is pulled through the choke spring housing as long as the engine is running, keeping the spring loose allowing the choke butterfly to open, then stay open once the spring is hot.
This isn't an Olds hot air choke setup, but it's similar and works the same. I'm just using it as an illustration about how it needs the tubing to work. A note about the choke disc- early Quadrajets used an adjustable spring, while the E4MC used on the 307s had a fixed position. There's a notch in the black plastic disc that fits into a lug in the choke housing. Only one way to place it.
So that takes care of the choke housing. Most Chevies used an E4ME carb. Pretty much the same, but with an electronic choke. It didn't need the hot air tubes. Just a 12V source that when the ignition is on, the choke starts to heat up. That said, almost any hot air choke can be modified to be an electric choke, but obviously you need to block off the vacuum port in the choke housing to the carb, otherwise you'd have a useless vacuum leak.
Now on to the primary choke pulloff. Nobody ever thinks about this thing much until the diaphragm blows. More on that in a minute. First, let's take a couple of steps back to the point where you pressed the gas pedal once to set the choke and squirt some fuel into the intake. Now, the engine is cranked at this point, and assuming the rest of the engine components and systems are in working order, the engine reaches about 200 rpm and starts pulling more fuel from the carb into the intake. Choke is closed, so it will try and suck the eyes out of a parrot at this point and pull whatever it can from wherever it can. So if it can't suck air, it's going to suck gas. So now you have a super-rich environment as the engine is cranking, and that should give you enough fuel to vaporize and ignite in the combustion chamber, starting the engine. Vrroom! The engine comes to life!
You're now on the fast idle cam step keeping rpm up, and the engine is going to want some air to keep running. So what happens? The primary choke pulloff almost instantly reacts to the increased vacuum signal, and draws in the diaphragm, moving the extension rod toward the front. An adjustable actuator on the extension rod pulls forward, touching the choke linkage in a manner which opens the choke butterfly slightly as the engine starts allowing some air to help lean out the mixture into the engine and keep the engine running. This is an important aspect of the primary pulloff, because if the diaphragm is damaged, or the hose splits, the pulloff is inoperable, and will NOT open the choke butterfly at all. This will be exhibited by a super-rich conditions where once the engine starts, it will belch black smoke out the exhaust and stumble and most likely die quickly because it isn't getting any air. Super simple to change out if yours breaks, but also super simple to check with a mity vac or other vacuum tool. As with all pulloff diaphragm pods like this, vacuum applied should hold for 20 seconds, or the pod needs to be replaced.
Note on this carb, it also has a secondary link going to the secondary air valve. Wait, this is a PRIMARY pulloff, wtf? Yep, when the engine is running with high vacuum, the link rod is pulled to the front of the slot on the secondary air valves keeping them from opening, which would not be good for your engine. Once you get ready to go and the choke is off, once you floor it, the engine vacuum drops and the primary pulloff loses vacuum and returns to its idle state, which allows a more controlled opening of the secondaries. You don't have the air valves just flapping open immediately all at once.
A note on primary and secondary pulloffs. On this particular carburetor, the pulloffs do not have a bleed hole in them, nor are they readily adjustable. Some are, but in this case, no. So when testing ones that have a bleed hole, you'll need to tape the hole first. Just throwing that out there.
Now, on to the last thing, and that's the rear vacuum break. Has NOTHING to do with the secondaries at all. This one is a bit tough to explain on paper. Its vacuum signal is ECM controlled, via the RVB solenoid, which on the 5.0L Olds V8s is on the driver side rear of the engine. The vacuum signal comes from the small port on the back of the carb via about 40 feet of spaghetti vacuum hose, and under certain cold conditions, will open the choke butterfly slightly wider than the primary choke pulloff. This is a bit tougher to explain, because the RVB solenoid is normally de-energized allowing vacuum to pass through it. However, when the engine starts, the ECM sends a signal to energize the RVB solenoid effectively keeping it from operating for the first 30 seconds. By this time, if the engine is running right and it isn't 150 degrees below zero, the choke spring will start to loosen and open the choke more in that 30 seconds. If it's TOO cold out, the spring will still be tighter, the choke is still not opening as quickly. Once the 30 seconds is up, the ECM de-energizes the RVB solenoid allowing vacuum to pull the actuating rod connected to the choke butterfly linkage to open it slightly more than the primary pulloff would to help with atomization at the lower temperatures. Again, if the choke is already open to this point, the RVB operates like it's supposed to, but doesn't do anything.
View attachment 200245
There are people out there saying that the RVB is totally useless anyway, and you don't need it. Most of the time it's likely true. If you live in, say, Houston, or L.A., you probably won't get it cold enough to need the RVB. But in Manitoba during the cold winter, you just might. It doesn't hurt to have it, but if it doesn't work and you're in a warm climate, well, it likely won't be missed. But you do you. All I'm saying here is that now you know what it's supposed to do, and hopefully not just dismiss it out of hand.
When I go through the carburetor, I'll show you how all this junk gets adjusted. You'd be surprised how out of whack these things can be.
Hope I didn't leave anything out. If you got any questions, feel free to ask. I'll do what I can. Again, I'm not an expert. Cliff Ruggles is an expert.