79 Cutlass Wagon G-machine build

Status
Not open for further replies.
SRD art said:
Lol! Thanks a lot, that means a lot to me. I've been playing with building fast street motors since I was 16 in '86 and have done some minor suspension upgrades and such but nothing ever like this. Ever since Troy Trepanier at a fairly young age started showing up in mags (remember that mint green 59 impala? I loved that car!) I wanted to do this but I never thought I'd be worthy. A couple years back Hot Rod featured some articles about what it would take to work in this industry. I had been laid off and I was looking for another job in design when I read that article at Wal Mart. I had to buy it and take it home and study it again and again. I took a gamble and put life on hold for us to go back to school and I feel like this is a talent I should've tapped into a LONG time ago but I didn't have the self confidence to think I would ever succeed.

I don't say this to pat myself on the back but rather to inspire everyone else. I look at so many people who work all their life doing something they don't enjoy or what isn't their greatest avenue of success, my dad and myself included. That's really a bit unfortunate, I always believed God, or the universe depending on how you view things, has provided us with everything we need to be successful and enjoy life if we exercise enough faith to go for it and then be humble enough to ask for help along the way. I believe this even more now.
========================================================================================================
Ben,
I give you a lot of credit for following your vision and pursuing it . Many guys (and gals) dream about doing what you're doing but are unable to follow through. I would have have enjoyed doing what you're doing. But at my age, it's more about retirement than pursuing another career. I'm sure one day we'll all read about you in various car mags.
Keep up the good work...you have the talent.

Jack
 
Thanks Jack- seeing my name or a car of mine in a magazine to me is like the ultimate honor. I hope that I can achieve that level one day.

clean8485 said:
Maybe its just an optical illusion for me, but the cross sectional area of the frame rails where you notched them looks alot narrower. I'm just wondering if they have the same strength in that area, or if the extra bracing that you've fabricated and installed helps out with that. I did ask before but I guess you missed it-did you see the build on MCSS.com with the new G body frame from Schwartz Performance? Just wondering what your impressions of that are. Also, you mentioned reading the book that you got from SC&C. I went over to their site and checked. Is that the "How to Make Your Muscle Car Handle" book? Please keep up the good work, and the updates. Thanks.

It is a lot narrower in that area now. I'm no engineer but it would seem to me that the front to back strength wouldn't change at all. The side to side might but remember the body is bolted to the frame in front of the arch and behind, so really the strength in this area is within the body. Before doing this mod I looked at several examples on the web and it's very common, just like I did it. Most of these cars are drag cars that run fast enough times to require larger slicks. One car I saw did huge wheelies and ran low 10's I believe. One site someone said there's no major structural purpose of the rear frame rails (past the rear axle) outside of holding the back of the body up. Makes sense to me. As far as I've seen no one else has done any extra bracing after doing this mod. I did it because I want an ultra stiff frame for autocross racing and because the body was off and easy access gave me an opportunity to get some welding and fabrication practice in.

I have read a lot to somehow tie the two frame rails together back by the bumper, that's why I did the trailer hitch.

That Schwartz frame is a beauty and nice to see it for a g-body. Pretty much any car I've seen that has an aftermarket frame like that is a high dollar build car. If I read it correctly the Schwartz g-body frame costs about the same as my overall budget for my entire car. I sure wonder how many they will sell, seems most g-body owners are budget minded folks and that's why we own g-bodies rather than high dollar 69 Camaros or 57 Chevys like the other frames they sell. There's prolly plenty of hours of fab work in each frame, and to the right crowd worth spending the cash on them.

Yes that's the right book. My brain leans more toward the creative side so designing and creating hot rod renderings comes easy to me. Math and quantum mechanics doesn't :blam: . With that in mind Marcus gives good clear and understandable explanations about the handling aspect of old cars, because of a very busy schedule I'm only about 1/3 through but have enjoyed every page. I say it's worth it if you want to make your car handle. On the phone Marcus said that the mid 60s A bodies (Chevelles etc) had pretty decent cornering geometry for their day. Then with the new frame in 68 GM went backwards and although straight line was good cornering geometry got worse. In 73 with the big cars it got better, but in 78 when the G-body came out it got worse again. He said doing basic mods like lowering, slapping on cheap tubular upper arms, heavier rate springs, and fat sway bars is like using a band aid when you cut your arm off, it doesn't address the original problem of lousy geometry. I don't think the parts he sells are the only ones that attempt to correct the geometry but I'd say after his many years of research on his own and client's cars he has found the parts he sells do the best job. The ones I bought were over $700 (ouch!) just for the front upper arms and ball joints, but if he says they work better than what I originally wanted then that's what I needed.
 
Ben,
Good things happen to those that "do", instead of those who "wait", so go ahead and pat yourself on the back! I too bought Mark Savitske's book (How to Make Your Muscle Car Handle) as well as a book by Fred Puhn (How to Make Your Car Handle)! I liked them both!
Keep up the good work and the best to you and your family in the new chapter in your lives!

Doug

Don't "burn any bridges behind you", always remember where you've come from :lol: !
 
So far my professor is doing well, he had a new heart valve and part of his aorta replaced, is bored out of his mind not being in a car shop and he's going to try to make it back for the final exam day to say goodbye to everyone.

Today's Friday March 30th. Last day of classes is May 19th, so I have roughly 3 weeks, or around +/- 52 hours to get a car that's completely disassembled back to a driveable vehicle. I'm scheduled to head to Georgia around May 15th, so I have a couple weeks at home to finalize things but I have a ton of other stuff to do to get ready for the move so really not a lot of car time. My hope is to get it to the point that last day of school everything will be ready to hop in and drive cross country, only the alignment needing to be set will be left for outside of school. I'll trailer it from school to a friend's garage where he'll knock out the alignment and then I'll start driving it a bunch around here to make sure everything is working the way it should. The countdown begins Monday...

My latest updates are with getting the frame and associated parts sandblasted, FINALLY! Cost was $198 for 2 hours of blasting. Spendy but worth it, the frame was pretty rusty and a bit scaly before. Now I get to start with a clean slate. I first coated the frame with gray POR 15 undercoat. Most folks like black but I figured if I did gray, I could see if I missed any spots when I top coat. It worked out perfectly and helped ensure everything was coated. My professor swears by Rustoleum for frames, so following POR's top coat directions I saved the cost of of their top coat by using 3 rattle cans of Rustoleum semi-gloss black. It turned out really nice.

frameparts01.jpg


Next was the sway bars and chassis bracing. I had just a little black Por-15 left over from another project so I painted all these items with it. A little paint goes a long way.

frameparts02.jpg


Once they set up I sprayed them with the VHT "Burnt Copper". This paint is metallic but also has a semi-gloss sheen. This is the closest rattle paint I could find to the Dodge Toxic Orange. The end result looks great and on the black frame they look way cool! Pics of the complete frame coming soon...

frameparts03.jpg


Finally a few more parts I will be painting at home next weekend, the bumper mounts, hitch, and rad support. More soon...

frameparts04.jpg
 
SRD art said:
So far my professor is doing well, he had a new heart valve and part of his aorta replaced, is bored out of his mind not being in a car shop and he's going to try to make it back for the final exam day to say goodbye to everyone.

Today's Friday March 30th. Last day of classes is May 19th, so I have roughly 3 weeks, or around +/- 52 hours to get a car that's completely disassembled back to a driveable vehicle. I'm scheduled to head to Georgia around May 15th, so I have a couple weeks at home to finalize things but I have a ton of other stuff to do to get ready for the move so really not a lot of car time. My hope is to get it to the point that last day of school everything will be ready to hop in and drive cross country, only the alignment needing to be set will be left for outside of school. I'll trailer it from school to a friend's garage where he'll knock out the alignment and then I'll start driving it a bunch around here to make sure everything is working the way it should. The countdown begins Monday...

My latest updates are with getting the frame and associated parts sandblasted, FINALLY! Cost was $198 for 2 hours of blasting. Spendy but worth it, the frame was pretty rusty and a bit scaly before. Now I get to start with a clean slate. I first coated the frame with gray POR 15 undercoat. Most folks like black but I figured if I did gray, I could see if I missed any spots when I top coat. It worked out perfectly and helped ensure everything was coated. My professor swears by Rustoleum for frames, so following POR's top coat directions I saved the cost of of their top coat by using 3 rattle cans of Rustoleum semi-gloss black. It turned out really nice.

frameparts01.jpg


Next was the sway bars and chassis bracing. I had just a little black Por-15 left over from another project so I painted all these items with it. A little paint goes a long way.

frameparts02.jpg


Once they set up I sprayed them with the VHT "Burnt Copper". This paint is metallic but also has a semi-gloss sheen. This is the closest rattle paint I could find to the Dodge Toxic Orange. The end result looks great and on the black frame they look way cool! Pics of the complete frame coming soon...

frameparts03.jpg


Finally a few more parts I will be painting at home next weekend, the bumper mounts, hitch, and rad support. More soon...

frameparts04.jpg
looking real nice frame came out really nice and the color on those sway bars shuold look super clean next to the black frame
 
Hey Ben,
Ironically, I was thinking about you today and wondering how the project has been going. Everything look super. Rustoleum makes some decent products. I've used their rattle can industrial, or professional satin black paint. Pretty nice stuff.
I've used Valspar tractor and implement enamel in low-gloss black also using their hardener/catalyst. It seems to dry quite hard.
I did my radiator support, headlight buckets, and rear bumper support bar...oh, and also a set of 15" steelies.
It works quite well. It's the same paint as John Deere Blitz Black that many hot rodders use for that satin black look.
At any rate, it's good to see you making continued progress.
Keep up the good work as always. :wink:

Also glad to hear that your professor is doing well, and on the road to full recovery.
 
Thanks for the paint insight Jack.

I think they look super clean 🙂 .

New parts came in...

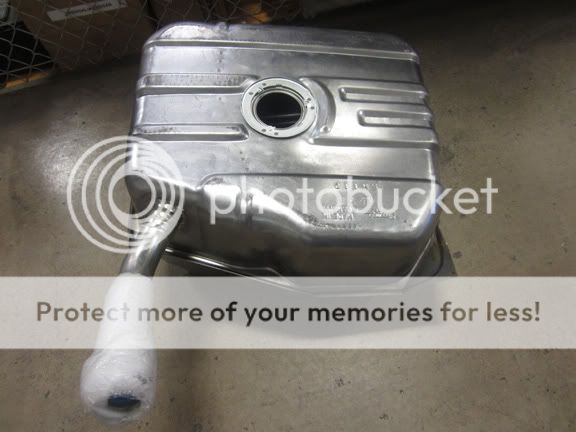
Inside my fuel tank was pretty nasty so I opted for a new one. Best price I could find was from Rock Auto. It came with the filler tube soldered in.

fueltank01.jpg


Next is my '98-02 F-body calipers, shown next to a g-body caliper. These also came from Rock Auto. Outright the calipers were slightly cheaper from the local parts stores but their core charge was as much as the calipers, whereas Rock Auto's core was only $10. I didn't have cores so I went with RA and saved a bunch overall.

calipercompare01.jpg
 
Today I moved the frame from the collision repair shop back to the street rod shop. It's a bit of a truck around the buildings, and this cart from innovativetools.com worked great! They claim it can handle 125 lbs per shelf, and folds up for easy storage. The shelves can be attached on either side and raised or lowered to a bunch of positions.

frameparts12.jpg


here it is back in it's happy home.

frameparts14.jpg


A little closer view of the front frame rail brace.

frameparts13.jpg


Here's a great idea for all those no partner or holes in the heel sport socks- they make great frame paint protectors for jack stands!

sock.jpg


And last for today I took the 7.5 rear partially apart to change the right side axle seal. Although a very small leak it made a mess in there. Luckily I nabbed the good brakes off my parts wagon so to swap this out it'll only cost the price of the seal and top off the gear lube.

axleseal01.jpg
 
Ben, A word of advice, check that gas tank for correct filler neck alignment. I bought 2 wagon tanks from rockauto, made by spectra, and both necks weren't even close, and i painted them and all. So it was a bear to get them re-alinged!
 
Status
Not open for further replies.

GBodyForum is a participant in the Amazon Services LLC Associates Program, an affiliate advertising program designed to provide a means for sites to earn advertising fees by advertising and linking to amazon.com. Amazon, the Amazon logo, AmazonSupply, and the AmazonSupply logo are trademarks of Amazon.com, Inc. or its affiliates.

Please support GBodyForum Sponsors

Classic Truck Consoles Dixie Restoration Depot UMI Performance

Contact [email protected] for info on becoming a sponsor