'80 442 Vortec swap won't run...

Have you had the valve covers off?

Broken springs, stuck open valves?

I don't remember if you said you cranked it over with covers off and visually verified all the movement of rockers, valves, etc...
Yes, took off both today, to see if lifting evenly, or at all... all work, and half are loose, because they aren't fully pumped up, yet... finally dribbling a little oil off rockers... Nothings broken, valve and springs appear functional... Probably wouldn't hurt to tap tips, see if they're fully seated...
 
Last edited:
  • Like
Reactions: 383_StealthRam
Pretty sure I figured it out... I should have caught it yesterday, when I had valve covers off, but focused on every other rocker having been adjusted with a gap, thinking the lifters weren't fully pumped up... The culprit valves, that appeared adjusted with no gap, are actually a little too tight, and not allowing the valves to fully seat, therefore builds no compression, while cranking... Which is why I felt draw, but no pressure, with finger test...
Will adjust rockers, and confirm assessment tomorrow....
 
Quickie update: What I'd assumed was loosely adjusted rockers, turned out to be bent pushrods... 7 of 8 exhaust pushrods bent, when I first ran engine for a couple minutes, with no accessories attached... (It's no wonder it wouldn't run after that)...
I replaced pushrods, but haven't tried turning it over yet, as battery is on charger... Once charged, will do a compression test, to see where that got me... Got a pump primer tool, and will make absolutely sure it's getting oil up top, before I try starting it again...
 
  • Like
Reactions: 383_StealthRam
Update... pushrods had no effect on compression... Ended up pulling heads... 7 of 8 exhaust valves were bent... New pushrods bowed a bit, as well...
Replaced all 8 valves, and am working on oiling system now, when that's done, will install heads, intake, distributor, and exhaust...
It should run then.... We'll see. .
 
Chevy vortech ?Fires at 90 degrees advance I know that's a typo should be like 10 btc to begin with.what I need is cranking compression lbs,( wrong compression your cams out of time?)and if your timed to firecompression stroke not exhaust tdc..you can check for fire at several plugs .how much gas has been poured into carb...OK at spark plugs are yhey wet if so ...then the next time they will be black hopefully not...yes these are relevant questions
.. pull no 1 plug and bump motor untill you feel it compressing the stop and turn your piston up by hand in the normal cranking direction get it on TDC both valves closed then go to hei distributor 'loosen it's bolt ans turn it ,(dustributor)back and Forth (with switch on)past the number one plug terminal (wstching) there should be a spark each time at the end of no 1 plug wire exactly where it fires tur. The distributor right(cw) 10 degrees then set distributor bolt snung ...with fire at one the rest follow suit... okay so I edited I thought " like 'I was like second (#2)to reply and didn't read entire post glad to hear your working on what you found that's the main thing...did you lap the new exhaust valves in and check the installed height should be close to an oem valve minus the bent ones someone will ask about spring height it's possible those speed power valves will run in a lower milliage head without milling the end of the stems ...knowing how much stem
Is sticking up for a given heads valve height might have been more relevant on the old gen 1s motors or Detroit iron but the installed height always comes to mind ...I have set many heads valve height with a bench grinder and a improvised height jig something like a capenters level a good eye and known height to within "say 2 thousanths vialves will be about 2 thousanths tighter after they breakin ...( not saying file them but?.)
Any one following me..thanks hope I can help some one or you next ti.e your compression gauges is questionable get a cylinder up to within 5 degrees top dead center on the fire stroke ( tdc,) valves supposedly closed and spark plug out take a compressor with hose shoot bout 60 to 90 lbs into the plug hole and listen at the intake or exhaust if lots of airs coming out exhaust you know to check valve situations like debrie(lucky) bent / burnt ,valve seat droped /skipping(loose) seat ,valve set to tight tappet failier evt
..or last a hole in piston stuck rings are sometimes heard at pcv port on valve cover with 90 lbs pumped into plug and up to dead zero valves closed yeah I know to much information...
 
Last edited:
  • Like
Reactions: HotRods442
Sorry for not updating sooner... In a nutshell, still not done...
Decided to tear it down, clean everything, reassemble, starting with new standard Clevite 77 main bearings.
Currently, crank is installed, checking clearances with plastigage, #1 & #5 come up .0015 (minimum factory spec), @ 75 ft lbs...
Now I'm cleaning pistons, rings & grooves, preparing to install, with new standard Clevite 77 rod beaings... Will clean and oil cylinders, as I install pistons... After checking bearing clearances, will reinstall cloyes single roller timing set, and the new aluminum timing cover I got to replace stock plastic cover...
Next, the new high volume Melling oil pump & pickup screen get installed, and a new Felpro one piece rear main seal... Install windage tray to main bearing studs, oil pan & rails, with Mahle one piece reusable pan gasket...

Then completed bottom end will sit on fresh motor mounts. I noticed drivers side mount was broken, so I replaced both... I forgot what a pain it is to swap mounts... Done now, so ought to stabilize engine better... At some point, will get urethane inserts for them, and Trans crossmember...
You may notice, engine is still in bay, for this redo... TBH, I don't have a hoist, or an engine stand, neither of which do well on gravel driveways, so wouldn't help much if I had 'em...
Vertical was easiest to position...
EDIT: Crank mains #2,#3 & #4 rechecked under .001, with fresh plastigage... See next update...a
 

Attachments

  • 20240909_130619.jpg
    20240909_130619.jpg
    797.4 KB · Views: 11
  • 20240909_130633.jpg
    20240909_130633.jpg
    674.2 KB · Views: 12
Last edited:
  • Like
Reactions: 383_StealthRam
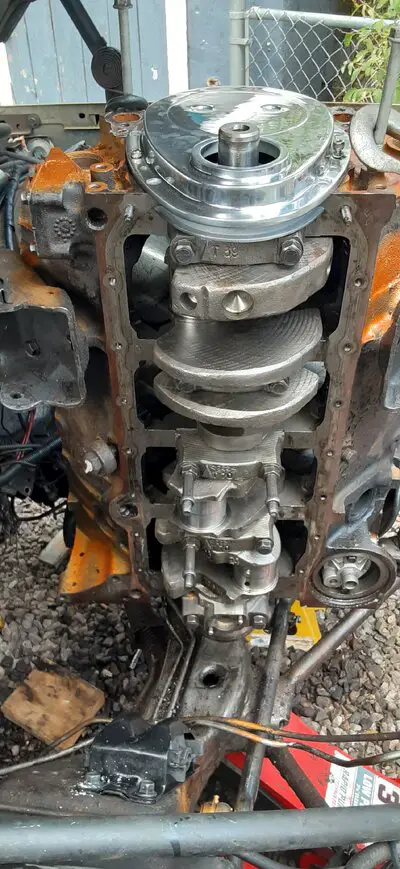
Last update, I was replacing rod, & main bearings, with standard sized sets... In the midst of it, I ran out of usable green plastigage, and used red to get rough idea for clearances... I thought it was a bit over .001 When finished, crank was pretty hard to turn by hand, with balancer... Ordered more green, to recheck...
While waiting, had finished cleaning pistons & rings, so installed them, using bearings from the kit I'd gotten for my old 4 bolt...
They were measuring under .002, a few way under... Red, so guessed 😆...
Was twice as hard to rotate crank enough to install #5, 6, 7, & 8... And once all were tightened up, was locked up... 18" breaker bar wouldn't budge it...
Loosened caps, one by one, to check if one was hanging up, but none appeared scored, or scratched... I did notice some were sharpened on journal side edge parting line... Further inspection revealed slight overhang at parting line, which pinched when tight, locking up rotation... Obviously, rod bearings for older regular rods, don't fit newer pink rods... Either that, or cheap set may have been for resized rods... There were no size stampings, beyond std, so likely just wrong for Vortec...
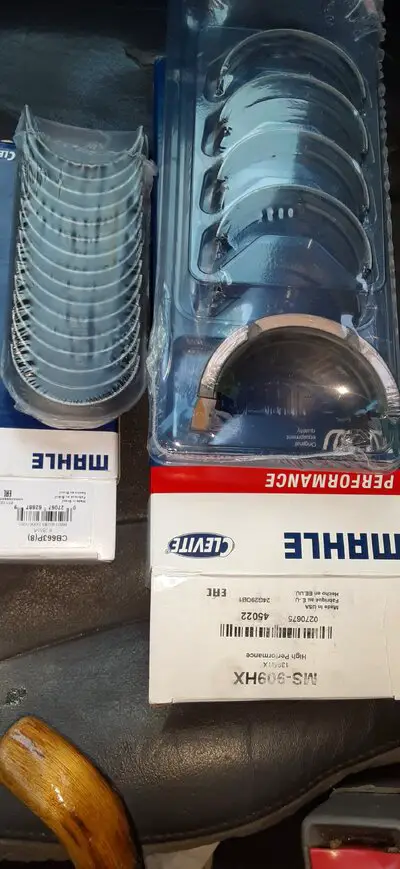
In any case, new bearings were in order... Hunted up std trimetal rod bearings on O'Reilly website, and looked up mains, as well... Given std trimetal were too tight on all but #1, took a closer look at original GM set...
I knew 1 through 4 were marked .0006, with what appeared to be US next to it... I HAD ASSUMED it meant undersize... but then, std should've been looser, not tighter... Looked at GM #5, it was marked .001, not .0006 US, like the rest... A THOUSANDTH OVER??? What the French?
Back to listings, I found performance trimetal, std, with an extra thousandth oil clearance... Well over twice the price of OE Trimetal std set I had, but were cheapest X code... Got them, and the OE Trimetal std rod set...
Hopefully, if I'm correct, they will all have acceptable clearances, this time around... Sure wish I had a micrometer, to measure crank and bearings thoroughly... I may get a roll of 1000 grit Emory cloth, to polish journals a bit, after I chamfer oil passage exits, to be sure none are raised, interfering with clearances...
Will report results afterward...
 

Attachments

  • 20240927_121007.jpg
    20240927_121007.jpg
    663.2 KB · Views: 3
Im trying to follow every thing here ...

So .002 +/- a bit at rods and mains. New Cloyes set, short block and the crank is still very tight, difficult to turn?

Max torque is 35 ft pounds on a properly built short block, heads not installed.

I know what your talking about ref : working on gravel, but some how you do need to get that on a stand.

Have you checked ring gap? We're those pre-gapped or file to fit? Any possibility you got rings butting up?

Might need to get some Prussian Blue and see what's dragging.
 
Last edited:
  • Like
Reactions: HotRods442
Im trying to follow every thing here ...

So .002 +/- a bit at rods and mains. New Cloyes set, short block and the crank is still very tight, difficult to turn?

Max torque is 35 ft pounds on a properly built short block, heads not installed.

I know what your talking about ref : working on gravel, but some how you do need to get that on a stand.

Have you check ring gap? We're those pre-gapped or file to fit? Any possibility you got rings butting up?

Might need to get some Prussian Blue and see what's dragging.
It will be .002+/-, with new main bearings in, standard set came up under .001 on 2, 3, and 4, and that's too tight, in my book... rings are stock, and end gaps are good... prior to pulling and cleaning, they were seized in grooves, and easier to move in cylinders... they are tighter, under tension, but not source of issue... I have a roll of 2000 grit Emory cloth coming, to polish journals, which should reveal any high spots at oiling passages, if they exist...
 
  • Like
Reactions: 78Delta88
What was the provenance on this engine? From who/where did you buy it and were you able to hear it run before shelling out for it?

So okay, just came across the update with the bent pushrods, and the discovery of the bent valves. Now I would definitely be draining the oil pan to check what the oil looks like as well as pulling and filleting the oil fiter to see what's in it?

Your comments on the overhang of the cap edge at the parting line on that one particular rod leaves me to wonder if the cap was put on backwards? When those rods were made and then the caps cracked off, that created a unique mating surface for the cap to the rod so that the cap only fits correctly one way. This mill is beginning to sound more and more like someone's autoshop class project motor that was bitsa'd together from whatever was handy.

Before you dive any deeper into this black hole, it might be about time to sit down and start adding up what it has cost you in parts and time so far and then compare that to what you bought the mill for. if you only paid 2 bills for the engine and are now around a grand or more down for all the parts you've had to order, is it practical to keep on going or would it be simpler to convert what you have into a boat anchor and go find another vortec or LS2/3 and cut your losses?

Nick
 
Last edited:

GBodyForum is a participant in the Amazon Services LLC Associates Program, an affiliate advertising program designed to provide a means for sites to earn advertising fees by advertising and linking to amazon.com. Amazon, the Amazon logo, AmazonSupply, and the AmazonSupply logo are trademarks of Amazon.com, Inc. or its affiliates.

Please support GBodyForum Sponsors

Classic Truck Consoles Dixie Restoration Depot UMI Performance

Contact [email protected] for info on becoming a sponsor