81 Oldsmopile ( G-body rust repair )

Status
Not open for further replies.

EME_Mack

Greasemonkey
This Is my 81 Cutlass supreme which started out as my winter beater but never made it that far. the sad 267 flattened a cam lobe so it sat in my driveway complety buried up until the snow melted enough to dig it out and swap in a vortec 305. Then like a fool after getting it running I tore into it and started to find all the rot.
IMG_1908.JPG

IMG_2172.jpg

Must have been 3 tons of snow on top
IMG_2136.jpg

IMG_2154.JPG
After getting it running and performing some one tire fire load tests. I drove into the back of the shop and tore it apart.
IMG_2183.JPG

Driver side is in decent shape but pass side didn't fare so well. In front of the rear wheels and body mounts are bad both sides, trunk to wheel wells are gone and repaired with tin and rivets.
IMG_2176.JPG

IMG_2175.jpg

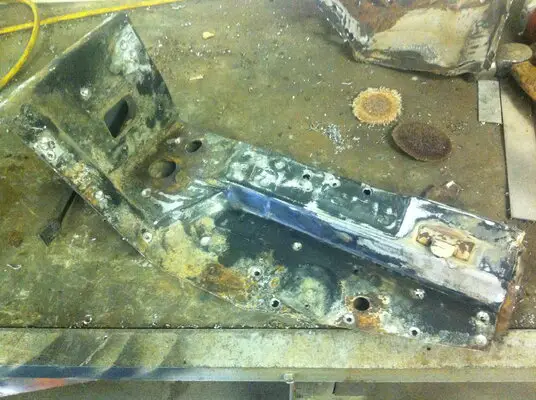
Cutting out the bad, trying to find some good

This is Going to be more of an exercise in body work and restoring a car then trying to make a hotrod. Chances are I'll sell it once its done to fund a Camaro I have. Im just into this for the experience.
 

EME_Mack

Greasemonkey
Started to drill the million spot welds to remove the bondo'd outer rocker and rotten inner rocker
IMG_2190.JPG

Saved these, Cant find stuff like this in the yards around here
IMG_2192.JPG

IMG_2201.JPG

Inner rocker off
This is the body mount brace that is spot welded to the outer side of the floor. It has the pass seat belt mount and supports the body mount. Had to cut the cage nut off, it wasn't caged any more
IMG_2207.jpg

IMG_2208.JPG

Crappy sand blaster stopped half way through
IMG_2220.jpg

Start of the outer floor. made it out of 2 pieces of 20 gage. Kinda rough placement to see how it would fit
IMG_2221.jpg

Made the inner rocker outta 2 peices aswell, my homemade metal brake is only 40" wide here it is getting welded together.
IMG_2247.jpg

Cleaned up the welds in the areas that are going too be showing or spot welded together.
IMG_2251.JPG

So far every thing has been welded with flux core, but I built a cart to house a bottle. Just need to pick one up soon, im not a fan of the mess flux makes plus its tricky to weld without burning through. This is were Im at so far. Hoping to finish this up by fall but its going to be a slow process.
 

mr evil

Moderator
Moderator
Aug 4, 2009
857
544
93
Sooke, BC, Canada
That's........a lot o snow. You really did tear into her! Glad you are taking the time and keeping another classic alive. An 81 Calais t-top was my first olds so I hold a special place in my heart for the tired old 267's and to this day, the upholstery pattern that came in those cars for that one year only is my favorite of all the years.
Good luck with build, keep us updated and welcome to the site!!
 

EME_Mack

Greasemonkey
Decided to work from front to back, so first order of business was to deal with the rust on the front body mount. The body mount bolt was rusted in half so the floor had to come up to remove the leftover from the cage nut. I started by cutting the outer sheet metal from the door mount
IMG_2253.jpg
IMG_2255.jpg
IMG_2257.jpg

IMG_2259.jpg

Once the door mount was off I was seeing more rust so I did something i should have done before, remove the dash and heater box.
IMG_2263.JPG
IMG_2264.JPG

Then I braced the door brace onto the frame, drilled the spot welds from the inner door metal to the floor. Then cut the hole corner out
IMG_2267.jpg
IMG_2268.JPG
 

Rktpwrd

Builder of Cool Shjt
Supporting Member
Feb 2, 2015
4,168
23,918
113
Calgary, Alberta, Canada
Very ambitious project. That's a s**t-ton of work, I know!
Kudo's to you for tackling it and bringing it back from near death. Most others would've walked away and written it off long before now. You are to be commended for your dedication.
 
  • Like
  • Agree
Reactions: 1 users

EME_Mack

Greasemonkey
Once I could get the front corner on the bench. It was easier to get to all the spot welds to remove the multiple layers of floor from the brace.
IMG_2269.jpg
IMG_2271.jpg
IMG_2270.jpg

Cut the cage bolt free and removed the nub that was the body bolt.
IMG_2276.jpg

Removing all the sheet metal from the underside of the thicker body mount metal was a pain in the a**. Ill have to put this piece into the sand blast pile, it was sandwiched between rusty sheet metal but this piece is pretty clean and plenty thick enough to reuse.
IMG_2275.jpg
 

Attachments

  • IMG_2274.jpg
    IMG_2274.jpg
    2.6 MB · Views: 604

truracer20

Master Mechanic
Feb 16, 2014
492
31
28
western PA
Wow you have some work ahead of you. Is the leg on your welding cart a camshaft?
 

EME_Mack

Greasemonkey
Once the area was clear of rusty metal. I takled the inner door metal. I cheated and used the rolled edge from the old piece so it would fit nice.
IMG_2277.JPG

IMG_2278.jpg
IMG_2279.jpg
IMG_2280.jpg
IMG_2281.jpg
IMG_2282.JPG

Finally after 167 steps back I made a step forward with this small patch. Used some 16 gauge as it was closer to the thickness.
 

EME_Mack

Greasemonkey
@ Truracer20. Ya its is the stock bumpstick from the 350 that was destined for this car. But the deck on the block was cracked so I went with a running vortec 5.0L insted

Thanks for the kind words guys. Its definitely a long road. I finished a Restoration of sorts this past fall on my wifes first car, a 91 Chevy tracker. so im confident that I can finish this project as long as I can keep interested.
 

EME_Mack

Greasemonkey
I started the day by doing some maintenance on the sand blaster in the shop, sifted out the big chunks of rust and scale from the media. Cleaned the mount then I started to add the missing sheet metal that was under the body mount. I used 16 gauge for this aswell
IMG_2284.jpg
IMG_2285.JPG

I knew I wouldn't be able to bend the 16 gauge, so I figure the best way to do this is cut out multiple pieces and weld them up.
IMG_2286.JPG

The cardboard made it easier to trace the pattern onto the sheet metal
IMG_2287.JPG

First spot welded the pieces on using the existing holes I drilled
IMG_2288.JPG

Welded the pieces together then cleaned them up a bit
IMG_2289.JPG

IMG_2290.jpg
This weekend I will weld back in the cage nut and add the sheet metal that was on top
 
Status
Not open for further replies.

GBodyForum is a participant in the Amazon Services LLC Associates Program, an affiliate advertising program designed to provide a means for sites to earn advertising fees by advertising and linking to amazon.com. Amazon, the Amazon logo, AmazonSupply, and the AmazonSupply logo are trademarks of Amazon.com, Inc. or its affiliates.

Please support GBodyForum Sponsors

Classic Truck Consoles Dixie Restoration Depot UMI Performance

Contact [email protected] for info on becoming a sponsor