81 Oldsmopile ( G-body rust repair )

Status
Not open for further replies.

EME_Mack

Greasemonkey
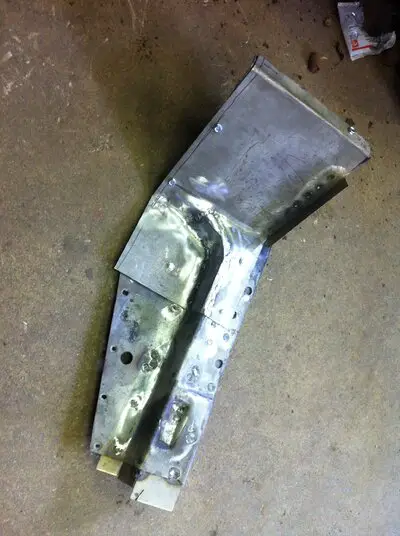
Started to make the small piece of floor that goes over the body mount.
IMG_2291.JPG
IMG_2292.JPG
IMG_2293.JPG

This piece will get painted before its welded into place, just gotta get a HVLP spray gun.
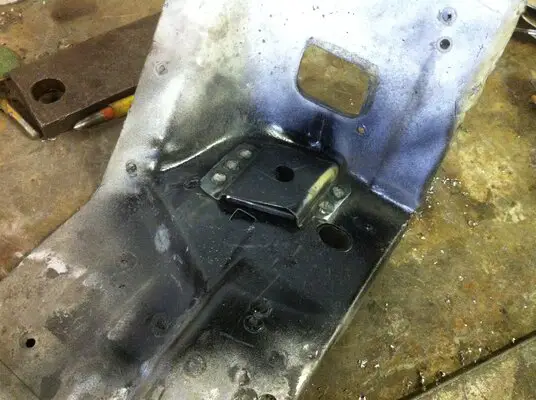
Made a new bracket to house the nut.
IMG_2294.JPG

Used some zinc weld through primer then some tremclad. This part will get sand blasted again before its painted properly just wanted something under there before its all covered up
IMG_2295.JPG

Used some Tek screws to test fit it into place to make sure it didn't get warped with all the welding
IMG_2298.JPG
IMG_2299.JPG
 

Attachments

  • IMG_2296.JPG
    IMG_2296.JPG
    2.1 MB · Views: 355
  • IMG_2297.JPG
    IMG_2297.JPG
    1.1 MB · Views: 350
  • Like
Reactions: 1 user

EME_Mack

Greasemonkey
Need to fix The firewall were the heater box bolts too. Decided to cut it out to make it easyer to fix.
IMG_2300.JPG

This is the mount for the inner fender
IMG_2301.JPG

Must of had a leaking heater core at some point
IMG_2302.JPG

Traced out a plan of attack
IMG_2304.JPG

Then started the attack
IMG_2305.JPG

Test fit
IMG_2306.JPG
IMG_2307.JPG

Then another Cutlass rolled into the shop a '64
IMG_2308.JPG

Sand blasted and ready to be put back on
IMG_2319.JPG
 

mymontess

Greasemonkey
Dec 23, 2014
167
28
18
North York, Ontario, Canada
Wow. Gotta say, your enthusiasm in attacking these rust issues is inspiring! Keep up the good work!
:popcorn:
 
Last edited:
  • Like
Reactions: 1 user

EME_Mack

Greasemonkey
The cutlass took a back seat over work. Had a little time to work on the car this weekend tho. I wanted to finish the fire wall before moving on to the floor, which meant I had to take care of this pesky hole.
IMG_2206.JPG

Cutting it out was a pain because the disk wouldn't fit into the corner without some creativity
IMG_2207.JPG

New piece
IMG_2208.JPG

Some zinc primer, then burn her in
IMG_2211.JPG
Wile I was there i finished up under the heater box hole, welding in the replacement
IMG_2209.JPG
IMG_2210.JPG

The completed fire wall. gonna treat the pitted areas with some por15
IMG_2212.JPG
 
  • Like
Reactions: 1 user

liquidh8

Comic Book Super Hero
Nice to see you tackling those bends. I did a great deal of compound bends on the wagon, and I had to make them in multiple pieces just like you.
 

EME_Mack

Greasemonkey
Started this last week but ran outta wire over the long weekend. Fixed up the door mount then welded it back into place
IMG_2213.JPG
IMG_2214.JPG
IMG_2216.JPG
IMG_2217.JPG

Painted the inside of the body mount then welded the two halves together
IMG_2219.JPG

Wile the paint was drying I fixed up the trans tunnel
IMG_2218.JPG

And the rebuilt body mount welded into its final resting place
IMG_2221.JPG
IMG_2222.JPG
 

EME_Mack

Greasemonkey
The back body mount is going to be a little more difficult to work with since im starting with this

IMG_2227.JPG


I made one out of cardboard to see if it will work. Im pretty sure that the stock support doesn't wow out near the rocker, but if it were straight then it wouldn't cover the body mount so I widened it on the one side a little more so it supports the body mount bushing

IMG_2230.JPG


Used the same scrap metal as I used for the door brace and some 14 gauge metal

IMG_2231.JPG
IMG_2238.JPG


Its the same depth near the trans tunnel, and near the rocker the bottom steps up and gets shallower. The car has been driven around with all this rot and the body started to smash down on the frame since the body mounts were none existent I can't tell how far the gap is between the frame and floor. I figured that I can ad spacers between the bushing and support if the body docent sit down onto the bushing in the end

IMG_2240.JPG

IMG_2250.jpg
IMG_2251.jpg
 

EME_Mack

Greasemonkey
Before I can weld in the body mount support I need something to weld too. So after measuring test fitting and eyeballing, the inner rocker was plug welded into what I hope is the correct position. The body is sitting off the frame thats why its sitting on an angle

IMG_2244.JPG

IMG_2245.JPG


Maybe some one can help me out here. This is the first G-body I have worked on and don't know them very well. Is there a body mount and bolt here, the hole forward to the spring seat. or is that just for a rubber Isolator.

IMG_2246.JPG


And If any one has pictures of this area of the wheel house to rocker area it would be greatly appreciated since I plan on rebuilding it but don't have any idea of the shape

IMG_2247.JPG
IMG_2248.JPG
 
Status
Not open for further replies.

GBodyForum is a participant in the Amazon Services LLC Associates Program, an affiliate advertising program designed to provide a means for sites to earn advertising fees by advertising and linking to amazon.com. Amazon, the Amazon logo, AmazonSupply, and the AmazonSupply logo are trademarks of Amazon.com, Inc. or its affiliates.

Please support GBodyForum Sponsors

Classic Truck Consoles Dixie Restoration Depot UMI Performance

Contact [email protected] for info on becoming a sponsor