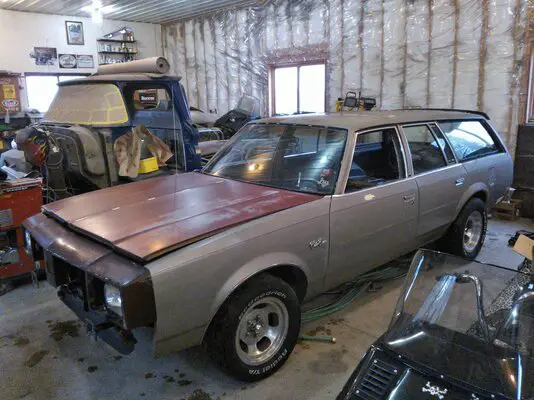
'83 Cutlass Cruiser Build Thread

Been debating adding the vinyl woodgrain trim around the car once it's painted. Should I do it?

  • Yes, that wagon needs woodgrain

    Votes: 12 35.3%
  • No, leave that wagon smooth and simple.

    Votes: 22 64.7%

  • Total voters
    34
  • Poll closed .
Yeah, the 1/4 windows will come out along with the rest of the glass once the car is inside for good.
That way I can weld in the studs for the trim clips, and repair the rust spot.
But before I pull the glass out, I'm going to do all the bodywork on the roof, that way I can save all of that mess from going into the interior of the car.

When Lindsay and I installed the clips on his wagon, we used screws because my Uni-spotter couldn't get close enough due to the collar hitting the window ledge.
Last fall I was using it again and noticed there was a notched collar extension for just this reason... there the whole time right in front of me! :lol:
 
That's a good idea doing the roof while the glass is still in. The interior of the car can get pretty raunchy from debris.
That's right, you still have the hail dents to contend with...

I like the idea of using the weld-on studs for the trim clips. More permanent, and less chances of it rusting around the screw in studs.
 
I have been contemplating buying a stud welder, just for the trim clips. 300 bucks though, ughh. But that is the way to go!
 
Last week I pulled the last few things out of the interior that are coming out. The only things left are the firewall pad, the wiring harness and the steering column.
It has started every time (though sometimes needing a jump) in our frigid sub-zero winter, and I drive it in and out of the shop crouched on one knee... :lol:

I was finally able to pin point where my leaks are coming from.
The first is weeping right thru the seam where my rust spot is, where the floor and firewall come together.
Once it's all cleaned up and patched, a healthy dose of seam sealer on both sides should eliminate any future problems.
The second is dripping thru the vents. Once I pull the heater box out, I'll go thru it the best I can cleaning and resealing it. Hopefully that will take care of that.

I've reached the point where I can't go any further until the car is permanently inside. Luckily my buddies snowmobiles are almost all out of the shop lol...

First thing on the list is to replace the body mounts so that I have a solid baseline to start from when it comes time to get all of my panels aligned.
After that I will start stripping and straightening out the roof as well as filling the holes from the roof rack.
I need to throw some new pins and bushings in the drivers door hinges since it's sagging a bit. The other doors are all still nice and tight.

My header panel needs a crack repair on the driver side, and a few of the screw holes have stripped out the fiberglass.
There are two studs and one bolt on each side that hold the header panel to the fenders.
On the '78 header, the upper bolts thread into the fiberglass and big surprise, they're stripped out.
However on the '83 header, the upper bolts thread into a metal bracket that is integrated into the header panel itself.
I plan on cobbling up something to integrate the metal brackets into the '78 header for added strength, since merely glassing up the broken mounts would just be asking for it to fail again.

Lots to do, lots to do!
I was hoping to be a lot further along by now, but I guess slow progress is better than no progress at all...
 
You are right, slow progress is some progress. Glad you have it all stripped down, and it is a good move replacing the body mounts before permanent panel alignment.
 
Never asked, wagon is going to still have the kidney slots on after paint right?
 
It took a little longer than I expected, but thursday morning we finally got the wagon its own spot inside the shop! :banana:


Once I get done with work tomorrow morning I'm done for the week! I'm burning my last few vacation days and I'm going to try and get as much done on the wagon as I can!
First up is replacing the body mounts, then I'll move on to fixing the roof. :wax:
 

Attachments

  • WP_000660.jpg
    WP_000660.jpg
    609.5 KB · Views: 433
Nice, glad to see you can get started on it. 😀
 
Blake,
It's good to see that you have the car parked in one spot and will continue work on the old gal. Just take your time with the body mounts...and shoot lots of penetrating oil between those bolts. I don't recommend using an impact wrench. The old breaker bar method worked well for me.
Keep us updated on your progress.. It's going to be a nice car when it's done.
 

GBodyForum is a participant in the Amazon Services LLC Associates Program, an affiliate advertising program designed to provide a means for sites to earn advertising fees by advertising and linking to amazon.com. Amazon, the Amazon logo, AmazonSupply, and the AmazonSupply logo are trademarks of Amazon.com, Inc. or its affiliates.

Please support GBodyForum Sponsors

Classic Truck Consoles Dixie Restoration Depot UMI Performance

Contact [email protected] for info on becoming a sponsor