

Thx, I'm getting quite proficient with a Sawzall.Much cleaner ear trim than I did.
You are correct, 1/8" is about right. You might get lucky with some regular washers as shims.
BUILD THREAD 87 Regal Build
- Thread starter RegalRegal
- Start date
You are using an out of date browser. It may not display this or other websites correctly.
You should upgrade or use an alternative browser.
You should upgrade or use an alternative browser.
- Status
- Not open for further replies.
Update
Well I'm back in the saddle again. It was a hell of a summer. I used to wonder how/why cars got neglected in the summer and now realize I have become one of those people, Ah life. I am officially done with work for 20 weeks so here we go.
Well I cleaned out my garage and prepared for some more metal work. I have everything I need. I have been collecting the necessary sheet metal replacement parts, I picked up a new Hobart 140 as I was borrowing the last welder and I also upgraded my heating system.
I trimmed and fit new floor into place.
I did do a lap weld on the Trans hump and in the factory location on front left corner.


After that I decided to remove all off the frame channel, inner and outer rocker And lower b pillar. Yay!


I had this inner rail structure piece along with a few others to a local sandblaster.
I did not want to leave this piece in place with the amount of rust that was nearly impossible to remove.


Everything cleaned up nicer than I expected. I need to get a metal piece fabbed up that goes between the inner structure piece and floor pan. That might take me a bit.


Well I'm back in the saddle again. It was a hell of a summer. I used to wonder how/why cars got neglected in the summer and now realize I have become one of those people, Ah life. I am officially done with work for 20 weeks so here we go.
Well I cleaned out my garage and prepared for some more metal work. I have everything I need. I have been collecting the necessary sheet metal replacement parts, I picked up a new Hobart 140 as I was borrowing the last welder and I also upgraded my heating system.
I trimmed and fit new floor into place.
I did do a lap weld on the Trans hump and in the factory location on front left corner.
After that I decided to remove all off the frame channel, inner and outer rocker And lower b pillar. Yay!
I had this inner rail structure piece along with a few others to a local sandblaster.
I did not want to leave this piece in place with the amount of rust that was nearly impossible to remove.
Everything cleaned up nicer than I expected. I need to get a metal piece fabbed up that goes between the inner structure piece and floor pan. That might take me a bit.
Last edited:
Quick update
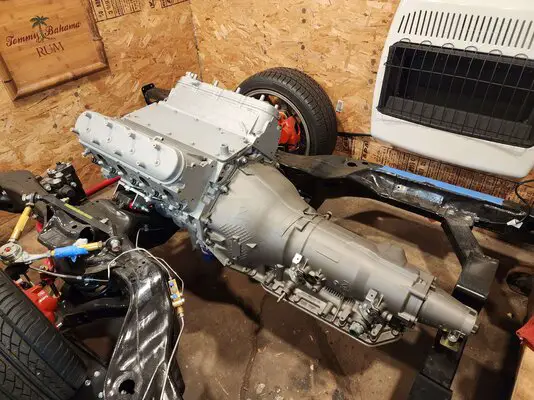
I did end up swapping out the motor mounts I had for the Holley mounts. I was having crossmeber alignment issues with the previous mounts. Could I have gotten them to work? Yes but I did want to risk future clearance issues. As usual parts were on backorder from Holley, they sent me the inner poly pieces. Clam shells and engine brackets were months out. Luckily Summit had the brackets and found the Clams with rubber at Napa. Drilled out rivets and replaced with polys and installed. Install was OK, brackets are super beefy and the G force crossmeber workes perfectly in combination, No alignment issues. More to come
I did end up swapping out the motor mounts I had for the Holley mounts. I was having crossmeber alignment issues with the previous mounts. Could I have gotten them to work? Yes but I did want to risk future clearance issues. As usual parts were on backorder from Holley, they sent me the inner poly pieces. Clam shells and engine brackets were months out. Luckily Summit had the brackets and found the Clams with rubber at Napa. Drilled out rivets and replaced with polys and installed. Install was OK, brackets are super beefy and the G force crossmeber workes perfectly in combination, No alignment issues. More to come
Attachments
Well I guess I should I update this thread. Been so busy actually working on the Regal I haven't had much time to post. I meant to post this on Sunday and do weekly updates.
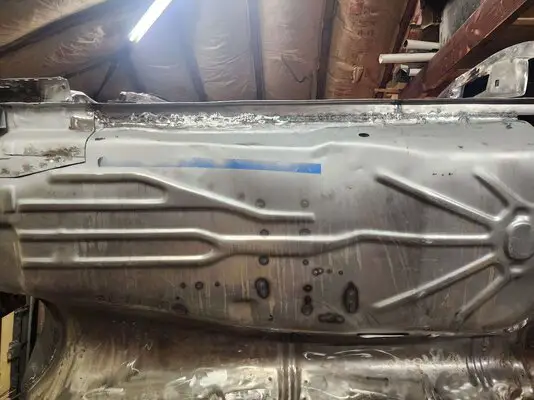
I finished welding floor in place. I was not happy with the open seam on the bottom side of body where I did a lap weld, so I welded that closed. The seam on interior will be filled with seam sealer and less of a concern. With the new floor pan it eliminated the lap from the rocker side, I was trying to keep things simple and have a lap on tunnel side. You know what they say about hindsight. (Probably should have butt welded) I also aligned and welded in seat brackets and brace.

I switched it up for a night and went after a body mount. 1of 3 done. ( Need sheet metal)


Definitely still learning.
I also got the D.S. area inbound from wheel well welded in along with the brace.


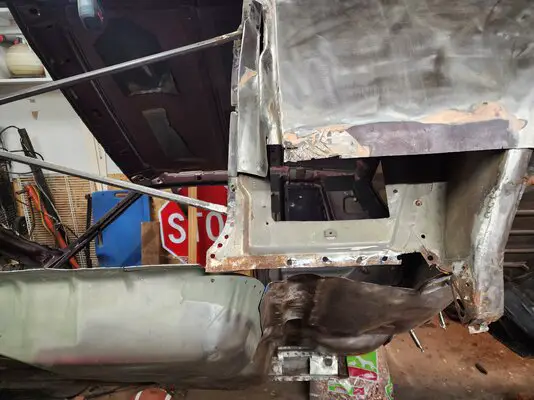
I removed the rest of the outer rocker And the last rusty piece on the d.s.


I needed to extend sheet metal out and down at 90° from new floor pan. I scored the new pan at 1.5" from inner rocker and removed. I finally got the sheet metal I had been waiting for. Now I needed a way to cut clean and bend. I picked up a cheap sheet metal break and it worked great. I did have to cut my piece in half to fit in the break as it is only 30" wide.


So about 10+ years ago my Dad like usual seen a late night ad for a nibbler that attaches to drill and of coarse he bought it and gifted 1 to me. He always would ask if I ever used it and the answer was always no, until now.

It actually worked great. What a nice clean cut and now I tell him every chance I get that I used it.
I bent the metal and tacked in place. Checked the fitment and welded in place .
 ,
,
Then it was time for the frame channel brace. I did use weld thru primer. Not sure if that is completely necessary.

And that is a wrap for the week. Stay tuned, more to come.
I finished welding floor in place. I was not happy with the open seam on the bottom side of body where I did a lap weld, so I welded that closed. The seam on interior will be filled with seam sealer and less of a concern. With the new floor pan it eliminated the lap from the rocker side, I was trying to keep things simple and have a lap on tunnel side. You know what they say about hindsight. (Probably should have butt welded) I also aligned and welded in seat brackets and brace.
I switched it up for a night and went after a body mount. 1of 3 done. ( Need sheet metal)
Definitely still learning.
I also got the D.S. area inbound from wheel well welded in along with the brace.
I removed the rest of the outer rocker And the last rusty piece on the d.s.
I needed to extend sheet metal out and down at 90° from new floor pan. I scored the new pan at 1.5" from inner rocker and removed. I finally got the sheet metal I had been waiting for. Now I needed a way to cut clean and bend. I picked up a cheap sheet metal break and it worked great. I did have to cut my piece in half to fit in the break as it is only 30" wide.
So about 10+ years ago my Dad like usual seen a late night ad for a nibbler that attaches to drill and of coarse he bought it and gifted 1 to me. He always would ask if I ever used it and the answer was always no, until now.
It actually worked great. What a nice clean cut and now I tell him every chance I get that I used it.
I bent the metal and tacked in place. Checked the fitment and welded in place .
,Then it was time for the frame channel brace. I did use weld thru primer. Not sure if that is completely necessary.
And that is a wrap for the week. Stay tuned, more to come.
Attachments

Been super busy with family and the holidays so my update may seem long winded.
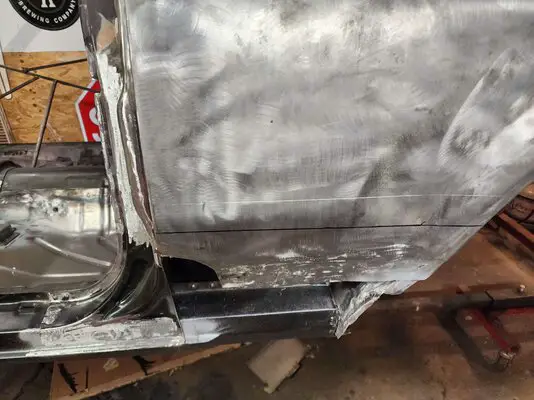
The frame channel brace is in.

I decided to tack the inner rocker in place first, then outer and b pillar.


It was just easier for me to do it that way. I was constantly checking and measuring. I had all pieces tacked and looking good.


I scuffed and painted the inside of rocker with Vht epoxy paint then a little weld through primer.


I Welded everything in place and was happy with the results, but super excited to get this completed.

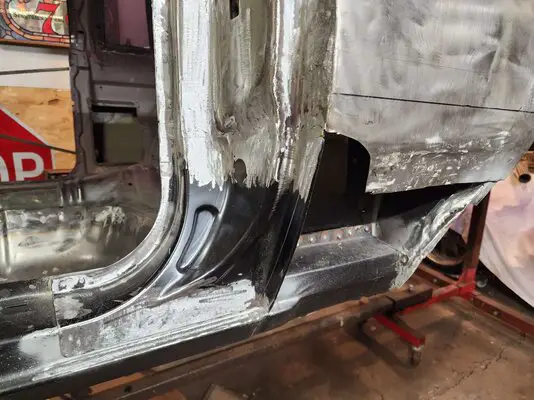
I went after the lower a pillar patch.
And done.


I previously cut a a rusty patch out of the p.s. inner rocker where the brace mounted. I brushed the inside of the rocker the best I could with a 3" round wire brush I affixed to a fiberglass rod attached to a drill. I poured some Por15 into the open patch in rocker and rotated the body around.
Then I welded that up.

After that I started mocking up the bottom support brace. I got a delivery I had been waiting for.


Body mounts and front lower qtr.
I know I should finish the bottom side but my A.d.d. kicked in and I switched direction for a few.


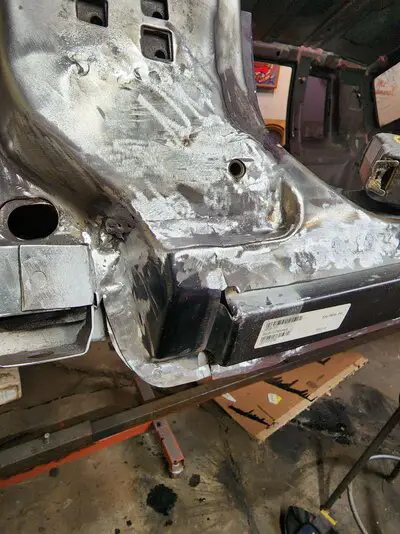
I had to redo this outer part of the wheel well where it contacts the quater.


The fitment of the panel was pretty good, but the issue I have currently is the alignment at the bottom. It looks like I need to section the angled piece that contacts the outer rocker lip to get it in a little.

I also painted the inside pocket behind the front qtr masking off my weld area.
That's all for now.
The frame channel brace is in.
I decided to tack the inner rocker in place first, then outer and b pillar.
It was just easier for me to do it that way. I was constantly checking and measuring. I had all pieces tacked and looking good.
I scuffed and painted the inside of rocker with Vht epoxy paint then a little weld through primer.
I Welded everything in place and was happy with the results, but super excited to get this completed.
I went after the lower a pillar patch.
And done.
I previously cut a a rusty patch out of the p.s. inner rocker where the brace mounted. I brushed the inside of the rocker the best I could with a 3" round wire brush I affixed to a fiberglass rod attached to a drill. I poured some Por15 into the open patch in rocker and rotated the body around.
Then I welded that up.
After that I started mocking up the bottom support brace. I got a delivery I had been waiting for.
Body mounts and front lower qtr.
I know I should finish the bottom side but my A.d.d. kicked in and I switched direction for a few.
I had to redo this outer part of the wheel well where it contacts the quater.
The fitment of the panel was pretty good, but the issue I have currently is the alignment at the bottom. It looks like I need to section the angled piece that contacts the outer rocker lip to get it in a little.
I also painted the inside pocket behind the front qtr masking off my weld area.
That's all for now.
Attachments
Last edited:
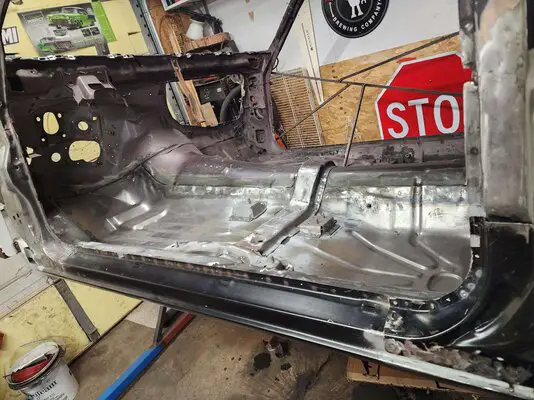
Wow time flies, I haven't had much time to update thread but I have been consistently getting out to garage. I worked on panel fitment and got the qtr fitting good. I did end up removing 3/8" from bottom and re welding. Then welded panel in place, Definitely not perfect but I am satisfied with results. I have 0 experience welding body panels. I am very new to welding in general, but it's time to sink or swim.


With that done I went after ds rear seat pan repair. I do not have all the metal forming tools I need, but I made it work.

I burned through in a couple spots. I used my unibit to make hole bigger and used a plug to fill.
Works great!!!
I started preparing the for the body brace and forgot to take pics of the body. Basically used grinder and small blaster to prep bottom of body. I used Por15 and painted the body just where the brace goes. Then removed paint around holes and sprayed weld through primer. I also removed most of the EDP coating from the inside of brace and painted with 2 coates of Por15, then painted weld through on the part that contacts the body. With some help I placed part, marked holes and removed weld through as needed to get a good weld.
I painted a small test area to see how the por15 will hold up and wow. My blaster couldn't touch it, hammer and scratch tested and approved.


Everything turned out . I cleaned up the pan area . Next will be patch the Ps rear seat pan.


After that it leaves me 1 final repair on bottom side.

Not too bad. I also need to buy and install center console mounts as I'm going with buckets. Before I started all this I bought and installed 2 buckets from a M.C.. It's been so long, I can't seem to remember if there is a difference in mounting brackets between the 60/40 bench and buckets? I thought I had them fully installed with no issues but it's been 20 yrs.
With that done I went after ds rear seat pan repair. I do not have all the metal forming tools I need, but I made it work.
I burned through in a couple spots. I used my unibit to make hole bigger and used a plug to fill.
Works great!!!
I started preparing the for the body brace and forgot to take pics of the body. Basically used grinder and small blaster to prep bottom of body. I used Por15 and painted the body just where the brace goes. Then removed paint around holes and sprayed weld through primer. I also removed most of the EDP coating from the inside of brace and painted with 2 coates of Por15, then painted weld through on the part that contacts the body. With some help I placed part, marked holes and removed weld through as needed to get a good weld.
I painted a small test area to see how the por15 will hold up and wow. My blaster couldn't touch it, hammer and scratch tested and approved.
Everything turned out . I cleaned up the pan area . Next will be patch the Ps rear seat pan.
After that it leaves me 1 final repair on bottom side.
Not too bad. I also need to buy and install center console mounts as I'm going with buckets. Before I started all this I bought and installed 2 buckets from a M.C.. It's been so long, I can't seem to remember if there is a difference in mounting brackets between the 60/40 bench and buckets? I thought I had them fully installed with no issues but it's been 20 yrs.
Last edited:
I sold my Regal that needed much of the same work. It lives on vicariously through yours.
Yes that's awesome, I was following your thread and was bummed when I seen you sold it, but that's life sometimes. Hopefully you find a good roller, I have been told more than once to sell and find something cleaner but I'm on a mission to complete what I started. LolI sold my Regal that needed much of the same work. It lives on vicariously through yours.
Congrats and all the accomplishments. Just awesome work brother. Everything looks great, you should be proud of what you've done. Another one saved, that "shoulda been crushed". I'm 3 yrs into mine, and have gone thru mental ruts,indecision, wrong decisions and just plain not had time. It's so much more then I expected it to be. It looks like your gonna beat me done. I am jealous 😆 🤣
This might help you out. I've had it bookmarked for years.
Thread 'Differences between Bucket seat tracks and 60/40 tracks. w/pics.' https://gbodyforum.com/threads/differences-between-bucket-seat-tracks-and-60-40-tracks-w-pics.73467/
This might help you out. I've had it bookmarked for years.
Thread 'Differences between Bucket seat tracks and 60/40 tracks. w/pics.' https://gbodyforum.com/threads/differences-between-bucket-seat-tracks-and-60-40-tracks-w-pics.73467/
RegalRegal, this is probably stupid but where did you get your floor pans because I've been looking for ones that will specifically replace the door sill part and I've had no luck.
- Status
- Not open for further replies.
Similar threads
- Replies
- 1
- Views
- 95
- Replies
- 1
- Views
- 94
- Replies
- 0
- Views
- 119
GBodyForum is a participant in the Amazon Services LLC Associates Program, an affiliate advertising program designed to provide a means for sites to earn advertising fees by advertising and linking to amazon.com. Amazon, the Amazon logo, AmazonSupply, and the AmazonSupply logo are trademarks of Amazon.com, Inc. or its affiliates.