

When I get home from school today I’m going to make a further in-depth post. But my floor pans are rusted out prettt bad, and I had a hole in the panel behind the rear tire and some pitting under the rear windows. Other than that it’s pretty clean!Hi Blair.
Welcome aboard. It's good to see another wagon being saved. It sounds like you have an honest and viable plan for it. What's the overall condition of the car? Rust, etc? Keep us updated on your progress.
BUILD THREAD A Teenager and His Malibu Wagon.
- Thread starter BlairC_789
- Start date
You are using an out of date browser. It may not display this or other websites correctly.
You should upgrade or use an alternative browser.
You should upgrade or use an alternative browser.
- Status
- Not open for further replies.
Heads up theres alot of reading and stories with this post, mostly because I just enjoyed reminiscing back on everything and typing everything out.
When I first picked up the car it surprisingly managed to drive itself onto the trailer under its own power. Drove it down a dirt road for 1/4 of a mile with no water pump hooked up, using the untuned quadra'junk', with a soda can used to draw fuel from (gas tank wasn't in the car). I bought the car fully expecting for the 305 to blow up within a month after ragging on it.
pictures of the listing and when I first got it home.
.jpg")
.jpg")

.jpg")

.jpg")
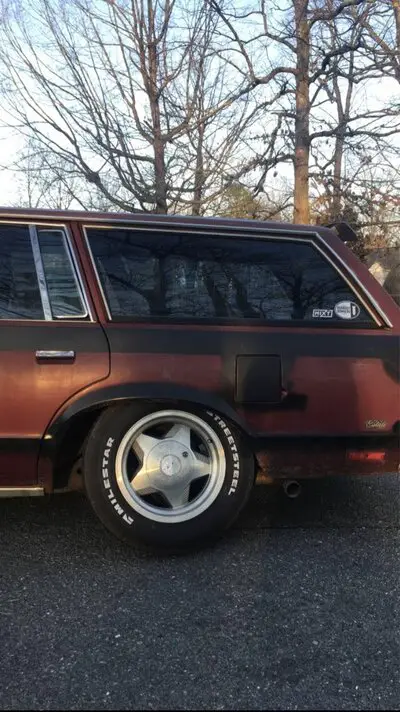
As you can see the wood paneling had been already ripped off along with the trim, they only took off some of the rivets and only painted some of the bare metal spots. The roof rack had been torn off and had some caulk sloppily squeezed into the holes, and a rust hole behind the rear wheel on the passenger side. Both front floor pans were starting to get pin holes, and the rear passenger floor pan has completely rusted out (caused by a crack in the plastic heater box). The interior is a 5/10, everything is there but all the plastic is faded and cracked, and headliner falling down, rear hatch disassembled, no exhaust.
Car came with options of AC (non working), power windows (works but slow), and power rear vent windows (only the motors work), power locks (working condition), and cruise control.
Soon as it was off the trailer I took the gas tank out of the rear hatch and found 2 brass cap ends to put on the gas tank sump system that had been installed, and then bolted it up under the car and hooked up the fuel system. Made a trip to the parts store for a starter since the other one couldn't turn over anymore, a new air filter to replace the crusty one that was falling apart. Took the quadra'junk' off and put a Holley 700 that I had rebuilt earlier, and tried to find some small jets for it but I didn't have any small enough for the 305 so I just rolled with it since it'll run better than the old carb anyway. Finally fixed some vacuum leaks and threw on some v-belts from a lawn mower and it was running good(enough).
.jpg")
.jpg")

.jpg")
I started digging a little more into the car with greasing the suspension, cleaning spark plugs, carb tuning, vacuuming the interior (no signs of mice at all!), grinded off and welded up all the holes from the wood paneling, and then quickly painted the stripes down the side to cover up the bare metal. The striped started out as a joke but damn does it look good now. Greased up the door window locks and power windows, fixed a couple lights, welded up a crappy side exit exhaust. and it was ready to hit the road or so I thought.
Stories of the first drives (and issues)
.jpg")
That night after finishing up my brother, friend, and I all piled in and hit the road to reach our local gas station (our tradition for the maiden voyage of any vehicle we buy) we made it and filled up with fuel and turned the idle down a bit on the carb and we were feeling to confident and wanted to make the trip to McDonalds 20 minutes further away. We made it to McDonalds shut off the wagon went inside and came back out and ate, and then finished up. I cranked the ignition on and....nothing. The battery was dead. My brother called one of his friends at around 12:00 and gives us a jump start. We mess with the alternator with the best we can with our limited arsenal of tools, and pile back in to start the 20 minute drive back home. The alternator appears to have completely crapped out so we drive on. The lights get dim, and dimmer, and dimmer, until we are driving at around 20mph using the moon light as our guiding light. We make it home, turning that 20 minute drive into an hour. The next day I picked up an alternator from the parts store which was also faulty, and had to get another one which finally worked.
.jpg")
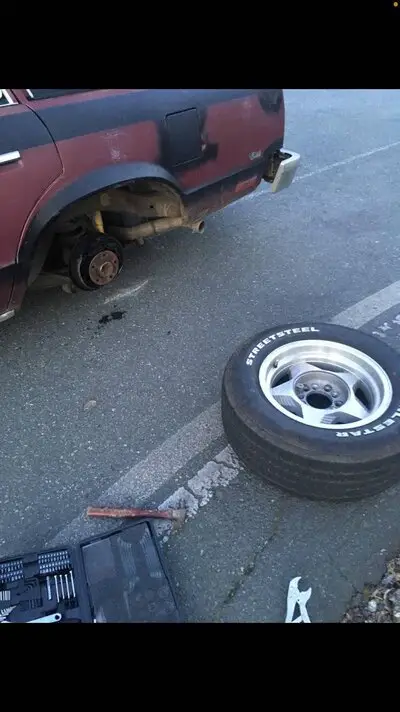
I drove on the tires that originally on the car for 500 miles despite knowing they were a solid 1/10 (not doing this again, I learned my lesson), but I finally had my driver front blow out on me on the way home from work so I called my brother to bring me a floor jack and
wrenches since I didn't have a jack or tire iron with me (smart). I picked up one of those $30
harbor freight tool kits to leave in the car after this. I continued to drive on these tires and the
'surprise surprise' the rear one blows out. I still didn't have a jack, and all my friends were still at
work and my family was out of town, so I walked 2ish miles home and grabbed a scissor jack and
rode my bicycle back since I couldn't drive my truck and leave it there when finished. After this
time I caved in and finally bought new tires, and put a jack and tire iron in the car.
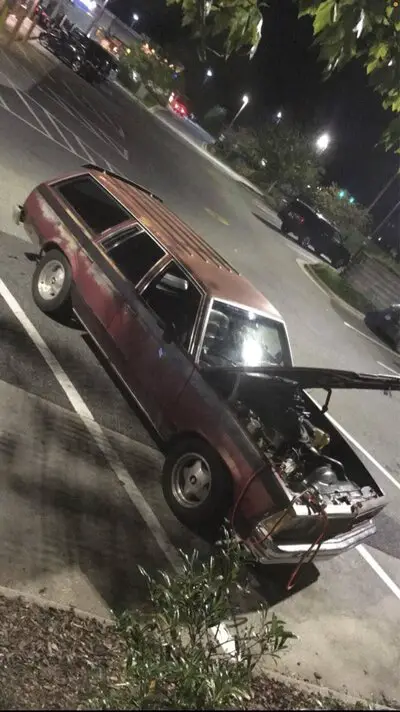
The story of my profile picture:
.jpg")
.jpg")
When out on a cruise around I heard a weird clinky noise come from somewhere in the rear of the car and didn't think much of it. I continue to drive and about a mile later after turning onto a road the wagon seems shimmy around a lot, so I quickly get on the brakes and as I pull off onto a side road the entire car drops and you can hear scraping. I get out and look back and see the entire wheel shoved up into the wheel well. I figure out ALL of the studs sheared off. My only explanation is I should've re torqued the lug nuts which I believe caused the clinky sound when the lug nuts rattled around behind the center cap, and all the weight went onto the studs causing them to shear. Called my brother and he went to the parts store and luckily they had studs that would fit. He brought them too me and I changed them on the side of the road using my harbor freight tool-kit hammer to pound the old broken off stud ends out, and put the new studs in using my tire iron. The drum fell of when the studs sheared so I put the brakes back together, but not being an expert with drum brakes I couldn't figure out how to put the parking brake system back in, so I left it out. I later put it back together correctly.
Next post
Sorry for the long read, but I just enjoyed typing this out for my personal enjoyment. The next post will be more of just things I have actually worked on, and less story like (unless that's what you guys want). It'll be on starting to work on the little bit of rust, and fixing up the interior some.
When I first picked up the car it surprisingly managed to drive itself onto the trailer under its own power. Drove it down a dirt road for 1/4 of a mile with no water pump hooked up, using the untuned quadra'junk', with a soda can used to draw fuel from (gas tank wasn't in the car). I bought the car fully expecting for the 305 to blow up within a month after ragging on it.
pictures of the listing and when I first got it home.
As you can see the wood paneling had been already ripped off along with the trim, they only took off some of the rivets and only painted some of the bare metal spots. The roof rack had been torn off and had some caulk sloppily squeezed into the holes, and a rust hole behind the rear wheel on the passenger side. Both front floor pans were starting to get pin holes, and the rear passenger floor pan has completely rusted out (caused by a crack in the plastic heater box). The interior is a 5/10, everything is there but all the plastic is faded and cracked, and headliner falling down, rear hatch disassembled, no exhaust.
Car came with options of AC (non working), power windows (works but slow), and power rear vent windows (only the motors work), power locks (working condition), and cruise control.
Soon as it was off the trailer I took the gas tank out of the rear hatch and found 2 brass cap ends to put on the gas tank sump system that had been installed, and then bolted it up under the car and hooked up the fuel system. Made a trip to the parts store for a starter since the other one couldn't turn over anymore, a new air filter to replace the crusty one that was falling apart. Took the quadra'junk' off and put a Holley 700 that I had rebuilt earlier, and tried to find some small jets for it but I didn't have any small enough for the 305 so I just rolled with it since it'll run better than the old carb anyway. Finally fixed some vacuum leaks and threw on some v-belts from a lawn mower and it was running good(enough).
I started digging a little more into the car with greasing the suspension, cleaning spark plugs, carb tuning, vacuuming the interior (no signs of mice at all!), grinded off and welded up all the holes from the wood paneling, and then quickly painted the stripes down the side to cover up the bare metal. The striped started out as a joke but damn does it look good now. Greased up the door window locks and power windows, fixed a couple lights, welded up a crappy side exit exhaust. and it was ready to hit the road or so I thought.
Stories of the first drives (and issues)
That night after finishing up my brother, friend, and I all piled in and hit the road to reach our local gas station (our tradition for the maiden voyage of any vehicle we buy) we made it and filled up with fuel and turned the idle down a bit on the carb and we were feeling to confident and wanted to make the trip to McDonalds 20 minutes further away. We made it to McDonalds shut off the wagon went inside and came back out and ate, and then finished up. I cranked the ignition on and....nothing. The battery was dead. My brother called one of his friends at around 12:00 and gives us a jump start. We mess with the alternator with the best we can with our limited arsenal of tools, and pile back in to start the 20 minute drive back home. The alternator appears to have completely crapped out so we drive on. The lights get dim, and dimmer, and dimmer, until we are driving at around 20mph using the moon light as our guiding light. We make it home, turning that 20 minute drive into an hour. The next day I picked up an alternator from the parts store which was also faulty, and had to get another one which finally worked.
I drove on the tires that originally on the car for 500 miles despite knowing they were a solid 1/10 (not doing this again, I learned my lesson), but I finally had my driver front blow out on me on the way home from work so I called my brother to bring me a floor jack and
wrenches since I didn't have a jack or tire iron with me (smart). I picked up one of those $30
harbor freight tool kits to leave in the car after this. I continued to drive on these tires and the
'surprise surprise' the rear one blows out. I still didn't have a jack, and all my friends were still at
work and my family was out of town, so I walked 2ish miles home and grabbed a scissor jack and
rode my bicycle back since I couldn't drive my truck and leave it there when finished. After this
time I caved in and finally bought new tires, and put a jack and tire iron in the car.
The story of my profile picture:
When out on a cruise around I heard a weird clinky noise come from somewhere in the rear of the car and didn't think much of it. I continue to drive and about a mile later after turning onto a road the wagon seems shimmy around a lot, so I quickly get on the brakes and as I pull off onto a side road the entire car drops and you can hear scraping. I get out and look back and see the entire wheel shoved up into the wheel well. I figure out ALL of the studs sheared off. My only explanation is I should've re torqued the lug nuts which I believe caused the clinky sound when the lug nuts rattled around behind the center cap, and all the weight went onto the studs causing them to shear. Called my brother and he went to the parts store and luckily they had studs that would fit. He brought them too me and I changed them on the side of the road using my harbor freight tool-kit hammer to pound the old broken off stud ends out, and put the new studs in using my tire iron. The drum fell of when the studs sheared so I put the brakes back together, but not being an expert with drum brakes I couldn't figure out how to put the parking brake system back in, so I left it out. I later put it back together correctly.
Next post
Sorry for the long read, but I just enjoyed typing this out for my personal enjoyment. The next post will be more of just things I have actually worked on, and less story like (unless that's what you guys want). It'll be on starting to work on the little bit of rust, and fixing up the interior some.
Attachments
Wow. How many of your guardian angels did you manage to assassinate with this car?
Since you and it have survived this far, keep telling the story. Avoid posting incriminating evidence on the internet.
Since you and it have survived this far, keep telling the story. Avoid posting incriminating evidence on the internet.

Holy smokes! What an odyssey . Everything will be gotten to in good time. Thanks for sharing your adventures. I hope this has been a learning lesson for you.
Good luck!
Good luck!
Oh to be young again. I think there are quite a few of us guys here who has similar stories like yours from our younger days. It seems as though you are able to tackle what comes at you head on and don't let obstacles discourage you. That says a lot about you at 19. Most guys your age would abandon any hopes of moving forward let alone wanting an old classic Gbody wagon to begin with. I can remember my friends laughing at me when I showed up with my first Gbody (78 Malibu) because they all had older 60's and early 70's stuff (I'm of an older generation) until I started beating them on the street. Reading your story so far, I can tell you are learning from all this every step of the way. My hat's off to you. Please continue.
It wasn’t easy, I broke the harbor freight hammer, and luckily my brother had another in his truck. Took just over an hourWelcome Blair ,
great story and a great wagon to save .
I have to say, swapping out wheel studs roadside...I am impressed !
Thanks for reminding me the tires on my cutlass are how old ?
I would daily that. After I fixed the AC 😆
I would also leave the exterior as it is. Thats a crapload of block sanding waiting to happen.
I would also leave the exterior as it is. Thats a crapload of block sanding waiting to happen.
All I need is the high pressure AC line and I hope all the other components are in working order, but I don't need it that bad since in the summer it might be a high of 90 one day a year around here.I would daily that. After I fixed the AC 😆
I would also leave the exterior as it is. Thats a crapload of block sanding waiting to happen.
For the block sanding its nothing new too me. I just put on some music and go at it for a couple hours every night.
Its time for an overview on my interior. Ill go over what i have done so far and my plans for the interior in the future
The interior wasn't in super good condition when buying the car, but everything is there which is great (minus the tailgate plastic cover, and headrests). The dash is cracked terribly all over, cruise control/turn signal stalk plastic is broken, front seats are ripped and tore, power seat transmission is broken but motor is working, headliner was surprisingly in half decent condition but definitely on its lasts legs, carpet is wearing through and stained, cargo area rusted, door seals/ window sweeps shot, all plastic is sun faded/dried, and b pillars falling apart.
Headliner, Sun Visors, Steering Wheel
Soon as I bought the wagon I knew I wanted a headliner with some kind of patterned fabric that stuck out a bit. So the old one got pulled out (I struggled more than I want to admit) and got the fabric and foam cleaned off. I did a little bit of patch work with fiber glass on the back of the board because it had cracked a little in the removal process in some areas. I reupholstered the sun visors to match the headliner which took a while since I did all the sewing mostly by hand since I didn't want to risk breaking my sewing machine needles on the hard pressboard insert's.
I sourced some 3/16 foam for cheap at a local furniture upholstery shop, a roll of fabric of my choosing from a craft store, and 3 cans of '3M 90 adhesive spray'. Putting the headliner together went smooth and came out great, although I should've ironed out the tiny crease down the middle of the fabric.
Decided to swap out the steering wheel with something more modern. It had sticky goo that just wouldn't come off, didn't like how big it was, and how it looked.
While the headliner was out I welded up the roof rack holes since they were already removed and had been filled in with Epoxy. I kept the roof rails because I think they break up the long roof. I did this while I had the headliner out to prevent catching anything on fire when welding.
Got a grant wheel with adapter kit and it went on easily and its been perfect. At the same time I put in one of the cupholders from gbody parts, and I'm not happy with it because the holders are so small, but no worries since it works for now and ill be making a center console later.


.jpg")


Audio System

As stated earlier I want a good sound setup in the wagon when I am finished. So I've started to tackle that.
I put in a JVC KD-X370BTS headunit. I would like to put in a double din touch screen down the road.
For the front dash speakers I have the 2 on the outside corners. I went with Kicker CSC35's. On the driver side there was a wire loom I had to move over an inch in order to fit the speaker all the way in.
For the rear speakers I went with Kenwood KFC-415C. Didn't want to mess with 6x9's and having adapters with depth mounting problems.
Tried a couple subwoofers but settled on a Skar SDR-1X12D2. Paired with a BOSS AR1600.4 amp. Which also powers the 2 rear speakers.
When I end up making a center console Ill be integrating 2 speakers inside it.
Intellitronix Gauge Cluster
On my original gauges I only had a speedometer, gas gauge, and the clock. Which only the gas gauge had worked.
I knew whenever I get my 355 put in I'm going to need to keep an eye on everything so I looked around for the 3 pod gauges you can stick on the dash but I couldn't find anywhere to put them. So I looked at intellitronix universal cluster (DP10002). To mount the the gauges I had to cut up the original cluster face plate and a bit of the plastic around where the dummy lights were. Then mounted the gauges on plexi-glass and bolted the plexi to the original cluster faceplate. I wish I took more pictures of the process. The wiring was simple, and I used an old 12 point harness I had laying around to make it organized. The final product was PERFECT. My only complaint is the lights are a little bright even with the dimming feature on, but ill just tint the plexi glass darker when the dash gets pulled apart again. It also has 0-60 time, 1/4 mile time and odometer, trip meter which is going to be fun to mess with. Don't judge my choice of blue, since I'm painting the car blue and doing interior color swap.


Extra Interior Things & Interior Plans.
I had to replace the interior door handle for the front passenger door, and also bought the dome light cover. Also anyone know where to source the dome light cover for the rear dome light with a switch?
The cargo area had surface rust because the rear hatch seal had been leaking. I took the spare tire door out, sanded everything and then brush painted it all using some matte black I had in storage and it came out great and still hasn't scratched up much after lots of use for the last year.


I've got ALOT of work to do in order to get this interior close to done, but slowly making progress
Ill be swapping the interior color to black/grey so I've got to get a dash cover, find some black bucket seats I like, re cover the rear seat, fiberglass some of the plastics before painting them, carpet, and re upholster the door panels.
The door panels I plan on upholstering them like factory black panels, except where the power window switch is ill be using the same headliner fabric there.
As I said a custom center console and a double din radio in the future.
Ive already bought all brand new door seals for after the door jambs are painted.
My brother said he will machine me a billet shifter knob, and turn signal/ tilt wheel stalks which will be awesome!


The interior wasn't in super good condition when buying the car, but everything is there which is great (minus the tailgate plastic cover, and headrests). The dash is cracked terribly all over, cruise control/turn signal stalk plastic is broken, front seats are ripped and tore, power seat transmission is broken but motor is working, headliner was surprisingly in half decent condition but definitely on its lasts legs, carpet is wearing through and stained, cargo area rusted, door seals/ window sweeps shot, all plastic is sun faded/dried, and b pillars falling apart.
Headliner, Sun Visors, Steering Wheel
Soon as I bought the wagon I knew I wanted a headliner with some kind of patterned fabric that stuck out a bit. So the old one got pulled out (I struggled more than I want to admit) and got the fabric and foam cleaned off. I did a little bit of patch work with fiber glass on the back of the board because it had cracked a little in the removal process in some areas. I reupholstered the sun visors to match the headliner which took a while since I did all the sewing mostly by hand since I didn't want to risk breaking my sewing machine needles on the hard pressboard insert's.
I sourced some 3/16 foam for cheap at a local furniture upholstery shop, a roll of fabric of my choosing from a craft store, and 3 cans of '3M 90 adhesive spray'. Putting the headliner together went smooth and came out great, although I should've ironed out the tiny crease down the middle of the fabric.
Decided to swap out the steering wheel with something more modern. It had sticky goo that just wouldn't come off, didn't like how big it was, and how it looked.
While the headliner was out I welded up the roof rack holes since they were already removed and had been filled in with Epoxy. I kept the roof rails because I think they break up the long roof. I did this while I had the headliner out to prevent catching anything on fire when welding.
Got a grant wheel with adapter kit and it went on easily and its been perfect. At the same time I put in one of the cupholders from gbody parts, and I'm not happy with it because the holders are so small, but no worries since it works for now and ill be making a center console later.
Audio System
As stated earlier I want a good sound setup in the wagon when I am finished. So I've started to tackle that.
I put in a JVC KD-X370BTS headunit. I would like to put in a double din touch screen down the road.
For the front dash speakers I have the 2 on the outside corners. I went with Kicker CSC35's. On the driver side there was a wire loom I had to move over an inch in order to fit the speaker all the way in.
For the rear speakers I went with Kenwood KFC-415C. Didn't want to mess with 6x9's and having adapters with depth mounting problems.
Tried a couple subwoofers but settled on a Skar SDR-1X12D2. Paired with a BOSS AR1600.4 amp. Which also powers the 2 rear speakers.
When I end up making a center console Ill be integrating 2 speakers inside it.
Intellitronix Gauge Cluster
On my original gauges I only had a speedometer, gas gauge, and the clock. Which only the gas gauge had worked.
I knew whenever I get my 355 put in I'm going to need to keep an eye on everything so I looked around for the 3 pod gauges you can stick on the dash but I couldn't find anywhere to put them. So I looked at intellitronix universal cluster (DP10002). To mount the the gauges I had to cut up the original cluster face plate and a bit of the plastic around where the dummy lights were. Then mounted the gauges on plexi-glass and bolted the plexi to the original cluster faceplate. I wish I took more pictures of the process. The wiring was simple, and I used an old 12 point harness I had laying around to make it organized. The final product was PERFECT. My only complaint is the lights are a little bright even with the dimming feature on, but ill just tint the plexi glass darker when the dash gets pulled apart again. It also has 0-60 time, 1/4 mile time and odometer, trip meter which is going to be fun to mess with. Don't judge my choice of blue, since I'm painting the car blue and doing interior color swap.
Extra Interior Things & Interior Plans.
I had to replace the interior door handle for the front passenger door, and also bought the dome light cover. Also anyone know where to source the dome light cover for the rear dome light with a switch?
The cargo area had surface rust because the rear hatch seal had been leaking. I took the spare tire door out, sanded everything and then brush painted it all using some matte black I had in storage and it came out great and still hasn't scratched up much after lots of use for the last year.
I've got ALOT of work to do in order to get this interior close to done, but slowly making progress
Ill be swapping the interior color to black/grey so I've got to get a dash cover, find some black bucket seats I like, re cover the rear seat, fiberglass some of the plastics before painting them, carpet, and re upholster the door panels.
The door panels I plan on upholstering them like factory black panels, except where the power window switch is ill be using the same headliner fabric there.
As I said a custom center console and a double din radio in the future.
Ive already bought all brand new door seals for after the door jambs are painted.
My brother said he will machine me a billet shifter knob, and turn signal/ tilt wheel stalks which will be awesome!
- Status
- Not open for further replies.
Similar threads
- Replies
- 11
- Views
- 307
- Replies
- 2
- Views
- 175
GBodyForum is a participant in the Amazon Services LLC Associates Program, an affiliate advertising program designed to provide a means for sites to earn advertising fees by advertising and linking to amazon.com. Amazon, the Amazon logo, AmazonSupply, and the AmazonSupply logo are trademarks of Amazon.com, Inc. or its affiliates.