

I don't think I ever have removed a dash before in my life! Am guessing there are non obvious fastener locations. Any tips on where to start? I have a 79 Grand Prix
Dash Removal Tips
- Thread starter Str8sixfan
- Start date
You are using an out of date browser. It may not display this or other websites correctly.
You should upgrade or use an alternative browser.
You should upgrade or use an alternative browser.
- Status
- Not open for further replies.
I'll start with the easy ones; 4 torx or 7mm screws across the top by the windshield, may have to remove center speaker cover. 2 10mm bolts on the bottom corners, 1 10MM under the right side of the radio and 1 13mm bolt above the steering column. There may be more, i have only pulled a GP dash twice and i fear I'm missing something.
Don't forget the fuse block, parking brake wire, radio and climate control. There is also the vacuum lines for the climate control, and vacuum servos and the heater temp cable.
Don't forget the fuse block, parking brake wire, radio and climate control. There is also the vacuum lines for the climate control, and vacuum servos and the heater temp cable.

My Malibu had the wiring harness taped to the back of the dash (but my cutlass did not...) be sure to remove that before pulling. I remember wishing I had seen that before I had the dash half way out.
There's a connector on the left side of the fuse block that connects to the tail light harness. Disconnect that at the same time you disconnect the fuse block. The fuse block remains attached to the dash harness.Don't forget the fuse block
The parking brake handle and cable stay on the dash- Disconnect the wire loop from the parking brake assembly (bolted to the kick panel), and then pry the plastic cable end bushing out of the forked retainer.parking brake wire
Tip - the 2nd time will be much easier than 1st, and expect plenty of WTF moments during the 1st and a lot less on the 2nd.
Sounds like I'm being a wise *ss (and I am somewhat), but it's a PITA until you figure out everything that has t be removed. I unbolt the steering column.
Pulling the dash gauge panel, radio, heater control and glove box prior to removing any dash mounting hardware make this go easier.
Sounds like I'm being a wise *ss (and I am somewhat), but it's a PITA until you figure out everything that has t be removed. I unbolt the steering column.
Pulling the dash gauge panel, radio, heater control and glove box prior to removing any dash mounting hardware make this go easier.

This should help - it's when I did my 88 Monte - but it should be close.
 www.montecarloss.com
I'll give it a shot from the write-ups I found and from what I remember.
- Remove the negative battery cable
- Set your front seat(s) all the way back
- If you have a center ash tray - remove it, or if you have a breadbox - remove it
- Pull the A-pillar trim on each side of the windshield - (2) screws on each side. I have a t-top so I had to pull the sun visors, removed the t-tops, and then loosen the front trim to get out the A-pillar trim, there is a screw in the front visor trim where it meets the windshield - be sure to remove these too
- Remove the (2) dash speaker grills by taking out the (2) screws on each. Disconnect the dash speakers on each side
- Undo the brake release handle on the lower left side, it slips out of the mechanism at the end and you also need to pull the yellow plastic thingy out of the little forked prong.
- Take the radio trim off - there are (2) lower screws and (2) upper screws, disconnect the cigarette lighter from the wiring and remove it
- Remove the ac controls and radio - there are (4) 7mm screws holding the ac/heater stuff in, remove the radio, then push the AC control unit into the dash
- Remove the lower steering column cover - there are (4) screws that hold it on, remove these and disconnect the air tube if there is one connected
- Remove the diag port - the computer diag port is screwed in above the transmission hump on the drivers side - again 7mm on these except the ash tray light it just pulls out of a clip(IIRC)
- Remove the gauge pod trim - there are (7) screws that hold the pod trim in. (4) along the bottom and (3) at the top
- There is a remote mirror adjuster on the lower right of the gauge pod trim, with the trim pulled ahead a little you can slide the retaining clip up and off. Then you can move the adjuster lever forward so you can use an allen wrench to release the adjuster from the cable
- Remove the headlight switch - there are (3) 7mm screws holding the headlight switch in, remove those and disconnect the wiring
- Remove the pod There are (4) 10mm nuts holding the pod in
- You need to pull the gauge pod forward to remove the speedo cable and the vss signal wires attached to the speedo. You can reach back and press the tab to release the speedo cable. The vss signal connector screw is 6mm or 9/32nd's or something pretty small
- There are (3) 10mm bolts along the bottom of the dash, one at each end and one in the middle above the transmission hump on the passenger side.
- Disconnect the light inside the ash tray under the dash and the passenger side floor light.
- There are the (4) 7mm screws, (2) in each defroster vent where the dash meets the windshield.
- Lower steering column - there are (2) 15mm nuts that hold the steering wheel column up, remove them and the steering column drops out of the way The dash plate slides between the two metal plates that are there
- Once the dash is loose, you will need to unclip the wiring harness that runs along the center behind it in 2 places above the pod and 1 above the radio area, try not to break the clips if you are going to use a stock style dash or your wiring will hang loose behind the dash and maybe even hang down below the dash in places.
- Remove convenience center wiring - there are (2) 7mm nuts that hold wiring called the convenience center to the dash above the brake release, I did it after moving the dash away from the firewall and getting it from the top
Take your time and watch where stuff goes. The gauge pod was the most time consuming for me. Stuff is brittle and the shift selector slowed me down a bit.
Entire Dashboard install
Anyone have a write up on how the dash mounts into place looking to install mine this weekend haven't had any luck on a write up
www.montecarloss.com
I'll give it a shot from the write-ups I found and from what I remember.
- Remove the negative battery cable
- Set your front seat(s) all the way back
- If you have a center ash tray - remove it, or if you have a breadbox - remove it
- Pull the A-pillar trim on each side of the windshield - (2) screws on each side. I have a t-top so I had to pull the sun visors, removed the t-tops, and then loosen the front trim to get out the A-pillar trim, there is a screw in the front visor trim where it meets the windshield - be sure to remove these too
- Remove the (2) dash speaker grills by taking out the (2) screws on each. Disconnect the dash speakers on each side
- Undo the brake release handle on the lower left side, it slips out of the mechanism at the end and you also need to pull the yellow plastic thingy out of the little forked prong.
- Take the radio trim off - there are (2) lower screws and (2) upper screws, disconnect the cigarette lighter from the wiring and remove it
- Remove the ac controls and radio - there are (4) 7mm screws holding the ac/heater stuff in, remove the radio, then push the AC control unit into the dash
- Remove the lower steering column cover - there are (4) screws that hold it on, remove these and disconnect the air tube if there is one connected
- Remove the diag port - the computer diag port is screwed in above the transmission hump on the drivers side - again 7mm on these except the ash tray light it just pulls out of a clip(IIRC)
- Remove the gauge pod trim - there are (7) screws that hold the pod trim in. (4) along the bottom and (3) at the top
- There is a remote mirror adjuster on the lower right of the gauge pod trim, with the trim pulled ahead a little you can slide the retaining clip up and off. Then you can move the adjuster lever forward so you can use an allen wrench to release the adjuster from the cable
- Remove the headlight switch - there are (3) 7mm screws holding the headlight switch in, remove those and disconnect the wiring
- Remove the pod There are (4) 10mm nuts holding the pod in
- You need to pull the gauge pod forward to remove the speedo cable and the vss signal wires attached to the speedo. You can reach back and press the tab to release the speedo cable. The vss signal connector screw is 6mm or 9/32nd's or something pretty small
- There are (3) 10mm bolts along the bottom of the dash, one at each end and one in the middle above the transmission hump on the passenger side.
- Disconnect the light inside the ash tray under the dash and the passenger side floor light.
- There are the (4) 7mm screws, (2) in each defroster vent where the dash meets the windshield.
- Lower steering column - there are (2) 15mm nuts that hold the steering wheel column up, remove them and the steering column drops out of the way The dash plate slides between the two metal plates that are there
- Once the dash is loose, you will need to unclip the wiring harness that runs along the center behind it in 2 places above the pod and 1 above the radio area, try not to break the clips if you are going to use a stock style dash or your wiring will hang loose behind the dash and maybe even hang down below the dash in places.
- Remove convenience center wiring - there are (2) 7mm nuts that hold wiring called the convenience center to the dash above the brake release, I did it after moving the dash away from the firewall and getting it from the top
Take your time and watch where stuff goes. The gauge pod was the most time consuming for me. Stuff is brittle and the shift selector slowed me down a bit.


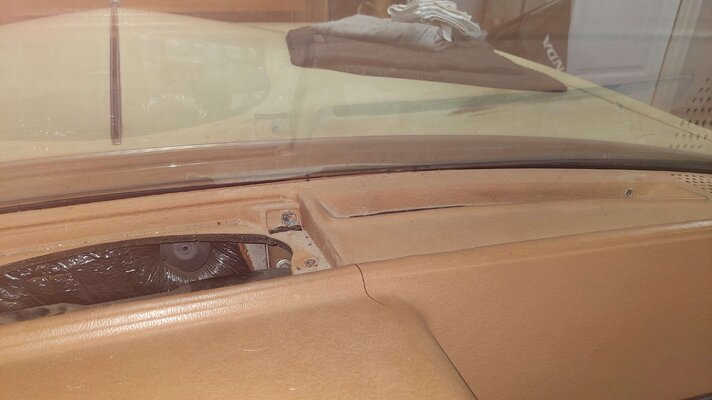
OK, something is a little different with my 79. I removed two bolts under the center third speaker screen, but there are no more fasteners present from this side and it's clearly still being held on by something near the windshield.
Attachments

- Status
- Not open for further replies.
Similar threads
- Replies
- 0
- Views
- 267
GBodyForum is a participant in the Amazon Services LLC Associates Program, an affiliate advertising program designed to provide a means for sites to earn advertising fees by advertising and linking to amazon.com. Amazon, the Amazon logo, AmazonSupply, and the AmazonSupply logo are trademarks of Amazon.com, Inc. or its affiliates.
