Manual linkage install help

Status
Not open for further replies.

Bonnewagon

Rocket Powered Basset Hound
Supporting Member
Sep 18, 2009
10,540
14,217
113
Queens, NY
I also hated the cheapola lower push rod that GM used. I prefer the Big Block Chevy style.
1654269881974.png
I also got tired of replacing the upper clutch pedal push rod which wears out fast at the contact points. I sprung for the spherical ball end rod set. MUCH stouter and they don't wear out like the stock rod.
1654270999127.png
 
  • Like
Reactions: 4 users

pagrunt

Geezer
Sep 14, 2014
9,128
15,258
113
Elderton, Pa
Few other things I also want to add after seeing GP403's posting of the break down diagram is the return hooks to a slot in the frame, all frames have the three holes for the cross shaft bracket, the three bracket bolts are the same as C truck/G van rally wheel center retaining bolts, & the diagram is actually showing '73-'77 A body linkage but very close to '78-'81 linkage.
 
  • Like
Reactions: 1 users

oldsmobile joe

Royal Smart Person
Nov 12, 2015
2,067
3,053
113
mpls
Here is an additional pic from my '80 olds manual. Linkage is the same as chevy
20220603_170355~2.jpg
 

Attachments

  • 20220603_170355.jpg
    20220603_170355.jpg
    522.6 KB · Views: 105
  • Like
  • Informative
  • Useful
Reactions: 3 users

CopperNick

Comic Book Super Hero
Supporting Member
Feb 20, 2018
3,347
3,011
113
Canada
Oh, yeah, one other item. Once you have the clutch pedal hung and the bracket bolted down, and before you connect the rod, swing the pedal all the way to the toe board and see if it comes into contact with the fuse block at any point along its path of travel. What I found with mine was that the arm hit a secondary block that is attached to the main or primary one. That secondary needs to be moved to get the room for the clutch pedal to bottom, otherwise the neutral safety switch that is located near the top of the arm on the bracket will not function and you won't get a starter noise.

Moving that secondary block, if necessary, is a PITA but actually very much doable. To accomplish the move, you first have to drop the fuse block off its bolts or studs. That gives you better access to the secondary. What you should find is that it is clipped to the main fuse block and sits in a socket for that purpose. That socket is physically duplicated along several of the edges of the primary and once you release the clips, the whole taco can be ever so gently nudged over to another socket that is out of the path of the arm and re-clipped back into place For what I wanted personally, I removed the secondary block from the Three O'clock attachment position, and dropped it down to the Six O'clock one. I did have to unplug a couple of wires from their contacts on the primary block to gain some space for the move but then was able to re-route them and put 'em back to work.


BE, VEWY, VEWY ,VEWY GENTLE. You are dealing with old plastic and old wire. Both get stiff and brittle as they age. You may find you will have to unplug some of the wires and reroute them to get a clean and clear path. Yes they will come out, just be aware that most of them are held by locking fingers and they have to be lifted or depressed or teased out of the way to get the plug to come off the contact.

Again, if you think a picture might help, lemme know.


Nick
 
  • Like
  • Useful
Reactions: 2 users

Bonnewagon

Rocket Powered Basset Hound
Supporting Member
Sep 18, 2009
10,540
14,217
113
Queens, NY
Already mentioned, but 2x on the return springs. I use three total, like at every point that needs pulling back, the clutch fork, anywhere rods contact things like the Z-bar, especially between the pedal and the dashboard. There are a lot of places to attach a spring but most hit wires or stuff. Find a spot where it will not bind and enjoy the pedal in the full up return position.
 
  • Like
  • Useful
Reactions: 1 users

CopperNick

Comic Book Super Hero
Supporting Member
Feb 20, 2018
3,347
3,011
113
Canada
While the parts breakdown pictures for the clutch/brake pedal assembly are useful, perhaps seeing it as working assembly might be of use here


DSCN3105.JPG


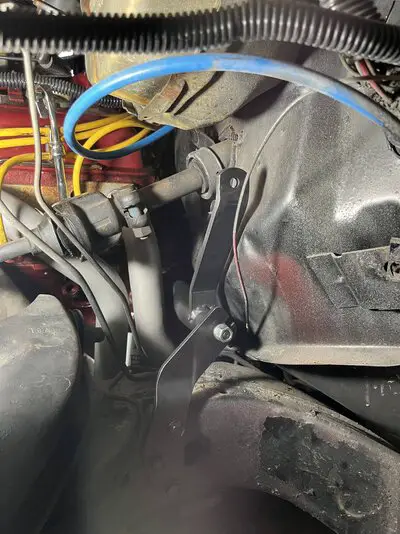
So this first shot is obviously an overview of what the complete pedal assembly more or less ought to look like. This unit is stock, including the pedal pads


DSCN3107.JPG
DSCN3108.JPG


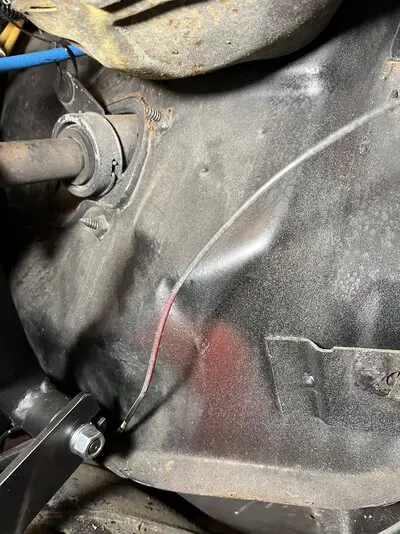
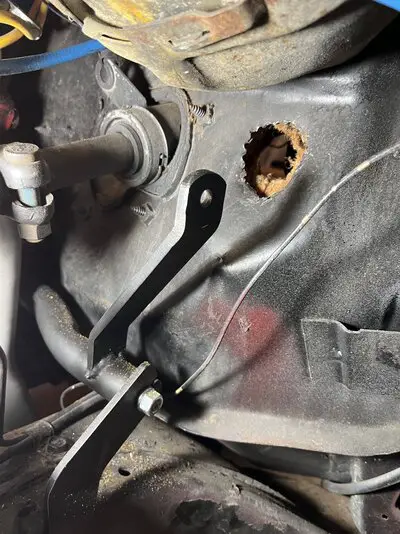
These next two shots are detail pics of the bracket. What you are seeing is the mount for the brake light switch and the stop/return bumper for the clutch pedal.


DSCN3114.JPG


And this is what the factory neutral safety switch more or less looks like. If you refer back to the previous detail shotmof the bumper et al, you can see an ear attached just above the upper bracket mounting hole on the left side. That is the mount point for the switch and the upper hole in the clutch pedal is the mount point for the slide. The switch is not in a fixed position. Instead it "floats" or is free to pivot as needed in order to maintain a linear relationship with the pedal so that the slide can come and go freely

DSCN3109.JPG


This is just a shot of the mounting hole for the upper rod that connects the pedal to the Z-Bar. When this particular assembly was harvested, the hole for the rod was completely egged out and the rod itself had about half of its pin surface worn away. Totally useless and probably part of the reason the car was sent to the yard. This assembly, like the others I have scored, came originally from a Saudi Chevvy, aka Irani Taxi, or Iraqui taxi, plus a few other impolite sobriques. Long back story to them but the Coles Notes says they were part of deal done by the Saudis with GM for a fleet purchase, ultimate user to be determined. Deal fell through and GM North America consigned the orphans to as many dealers as they could bamboozle into taking them. Over the years I have picked about 5-6 of them and the boz count is supposed to be slightly more than a hundred. Pretty much all gone to rust by now. Anyway, moving on.......


DSCN3110.JPG


DSCN3112.JPG


So these last two shots are of the fuse block that resides adjacent to the clutch pedal. The second shot clearly shows the large silver metal bodied relay that I had to move from the original location at three o'clock on the fuse block to its current location at six o0clock. I think the second shot is more clear in terms of the amount of distance that now exists between the fuses and the clutch pedal. You have to look real close and squint a little to see the two lugs that act as mounts for the plug in for that relay. They appear in multiple locations around the perimeter of the block which is sort of an indication that GM had allowed for the probability that the fuse block would be a common source item used across multiple vehicles and that some kind of adaptability needed to be built in.


Here endith the show and tell. Hope these help the cause.


Nick
 
  • Like
  • Useful
Reactions: 2 users

Baker7888

G-Body Guru
Dec 3, 2021
665
115
43
Maine
Thanks everyone.

Any insight on cutting the floor hole for the shifter? I am using a t10. The camaro was easy cause there was a giant dimple where you need to cut. Not so much on this car.
 

Kaelco

n00b
Feb 12, 2022
2
4
3
Hey All,

Looking for some help with a manual linkage/clutch pedal install in a 78 malibu originally equipped with a th350. I am using the clutch pedal/linkage kit similar to the OPG kit (see pic). I just need a little help getting started, installing the pedal and where the bracket goes on the frame, the z bar etc. Pics would be helpful! I have scoured the internet and have not been able to find much relevant info. It appears most are asking hydraulic retrofit oriented questions.

PS I have a T-10 I will be mating to a 350. I already have the attached kit (pic), the trans, g body bellhousing, clutch, flywheel etc, I should have just about everything and am ready to get started!
I just put the clutch pedal assembly in my 78 elky… it is hard to get the pedal assembly off.. I took the dash gauges out and it allowed to use a long extension to take out the 4 bolt that hold it on… once out put the clutch pedal stop on also if you use one… I didn’t take pics of it but did where upper clutch rod and Zbar are
 

Attachments

  • CC89D240-B760-4C78-A962-C5550EF608C4.jpeg
    CC89D240-B760-4C78-A962-C5550EF608C4.jpeg
    2.5 MB · Views: 102
  • 4A2481A0-DC02-49FC-A669-090243583714.jpeg
    4A2481A0-DC02-49FC-A669-090243583714.jpeg
    1.7 MB · Views: 107
  • A05CEB95-E3EA-4B86-98BF-A3DB098DA436.jpeg
    A05CEB95-E3EA-4B86-98BF-A3DB098DA436.jpeg
    1.7 MB · Views: 102

doood

Amateur Mechanic
Sep 24, 2020
549
754
93
Is the Z-bar clutch pedal assembly only good with old 4-speeds? I hear people use hydraulic clutch for more modern trans with overdrive 5th or 6th. Forgive my total ignorance on the subject - I would love to have a manual transmission some day.
 

Texas82GP

Just-a-worm
Apr 3, 2015
7,981
18,676
113
Spring, Texas
Is the Z-bar clutch pedal assembly only good with old 4-speeds? I hear people use hydraulic clutch for more modern trans with overdrive 5th or 6th. Forgive my total ignorance on the subject - I would love to have a manual transmission some day.
You only need the Z bar for mechanical linkage. It isn't used for a hydraulically actuated clutch. I'm using mechanical linkage with a T5 5-speed from a 3rd gen Camaro. The bellhousing is the 82 Camaro T5/mechanical linkage unit. They are fairly rare. I'm using G Body linkage.
 
  • Like
Reactions: 1 users
Status
Not open for further replies.

GBodyForum is a participant in the Amazon Services LLC Associates Program, an affiliate advertising program designed to provide a means for sites to earn advertising fees by advertising and linking to amazon.com. Amazon, the Amazon logo, AmazonSupply, and the AmazonSupply logo are trademarks of Amazon.com, Inc. or its affiliates.

Please support GBodyForum Sponsors

Classic Truck Consoles Dixie Restoration Depot UMI Performance

Contact [email protected] for info on becoming a sponsor