My 87 442’s turn

CopperNick

Comic Book Super Hero
Supporting Member
Feb 20, 2018
3,347
3,011
113
Canada
+1 on CK80's above comment. To fully investigate your A pillars you are going to have to dismount the doors so you can get a good look at the lower sections and the pocket where the lower bracket that supports the front lower fender mount sits. Some where on this board there is a short series of pictures showing how I drilled the door hinges using a 1/8 drill bit to create alignment holes prior to unbolting the hinges. If your doors swing into position and close easily then no tweaking of the hinges prior to doing the drilling needs to occur. Just be tender and careful; 1/8th bits tend to snap if any sideways pressure gets laid on them.

When I did my driver's A pillar I ended up having to replace the complete lower inner and outer sheet metal from just below the hinge pocket all the way to the floor pan and past that to the seam. I was lucky in that I had managed to score a pair of pillar sections that were harvested from a hulk. Harder to find and score now.

Budget $$$$? Think lots of overtime.


Nick
 
  • Like
Reactions: 1 user

69hurstolds

Geezer
Supporting Member
Jan 2, 2006
8,088
17,308
113
Go see Cash Cat. Just be prepared.

giphy.gif
 
  • Like
  • Haha
Reactions: 3 users

john87442

Master Mechanic
Supporting Member
Mar 9, 2021
305
327
63
Geneva ohio
Yeah definitely need to take doors off next along with removing the dash,just haven’t gotten that far yet. It’s good to know you had the same issue in regards to the hinge pillar and you said you were able to fix it by patching with a donor car? Well I’m going to have to look into that for sure, I can’t imagine anything around here will be much better. I do have to replace bushings and pins on hinges but that is a good idea.
 

CopperNick

Comic Book Super Hero
Supporting Member
Feb 20, 2018
3,347
3,011
113
Canada
If you are going to be getting into hinge rebuild mode, then Dormann, among others, offers kits for that purpose. Unless you have already tried to move the hinges to compensate for wear induced sag, where they are on the pillars is where the factory put them for the original alignment and me here thinking you could drill the holes for the alignment pins that I suggested, and then drop the hinges, one at a time to do the pin work. With the fenders off, you can do one hinge at a time and not have to wrestle with the door in the process. Of course, if the doors have been shifted at some time in the past, then you will have to do the hinges first and then wrestle the door back into alignment before you can dirll the alignment pin holes and take the doors off again.

Do be aware that the capscrews that hold the hinges to the post and the door are metric. The heads accept an 11mm socket or wrench but, from experience, go with a 6 point socket or 6 flat wrench because trying them with a 12 point can cause the corners on the bolt head to round off, and extracting the stumps will be a MUY MAS PITA. Also be aware that they will likely be rusted in place to some degree and will likely require some "encouragement" to come loose. Be extremely careful if you use a penetrating fluid and then try to heat them. Many Penetrants state on the can that heat can cause toxic fumes. Lungs do not like that s***.

Oh, yeah, at this point there is at least one other member who is doing a Tee-Top cabin project. The search engine ought to know the thread. One major suggestion mentioned in that thread was to heavily brace the cabin from side to side and front to back, including diagonals before digging into the floor if major panel work is going to happen. Unlike their full roof brethren, T-Tops don't have that complete roof panel and its bracing to help keep the cabin straight. That strut between the two Inserts in the roof is structurally weak and can twist or shift under stress. Just another something else to consider.


Nick
 

john87442

Master Mechanic
Supporting Member
Mar 9, 2021
305
327
63
Geneva ohio
Thanks Nick good advice, I just got off the phone with Original parts group and ordered full floor all the seat brackets and braces a pillars and t top header, I have the new z bolt pockets delivered today but had more questions about the correct way or best placement of braces after I get the glass out. I did see hutches video on the rotisserie but of course not a t top car. I do like how he used the door hinge bolts and striker location but I will definitely need more bracing than that. I’m still a little way off from that but it’s on my mind. Just finished the new outlet for the welder also so pretty soon I’ll be able to get at it.
 

CopperNick

Comic Book Super Hero
Supporting Member
Feb 20, 2018
3,347
3,011
113
Canada
Full floor can be done with the body still mounted to the frame but normally it is a fit from below exercise meaning the pan has to come up into the cabin from underneath. The other thing about the pan is that the perimeter sill flap that extends out to meet the inner/outer rocker panel flange in the door pockets, doesn't go all the way. it falls short by as much as several inches and is not available as a separate part. You have to use a flat section of sheet metal and create that as a "custom" item. That was also a topic on another thread just recently. In your case that is going to be an issue because the pictures show extensive amounts of rust and decay along the wall of the pan where it rises to become the sill flap.


Nick
 

john87442

Master Mechanic
Supporting Member
Mar 9, 2021
305
327
63
Geneva ohio
Agreed there is a lot of rot on the driver side. I do see what you’re talking about though, the passenger side is in good shape and I can see how that side connects although a little different from side to side, and the new hole I found in the back seat area would also be in line of the flat stock I’ll need to form. It’s a real shame that nobody makes that piece. I have some flat stock to use and a nice metal brake at the fire station I work at in their maintenance department. I’ll just have to make a good template and try to form some pieces. Talk about a project. I’m very appreciative of this group with all the support and knowledge to help me work through the challenges I’m facing.
 

john87442

Master Mechanic
Supporting Member
Mar 9, 2021
305
327
63
Geneva ohio
North east Ohio right on the lake, great in the summer but cold in the winter. Lots of salt up here on the roads in the winter so everything gets rusty. This car will never see another bad weather day again and once finished it will only have sunshine to deal with.
 

john87442

Master Mechanic
Supporting Member
Mar 9, 2021
305
327
63
Geneva ohio
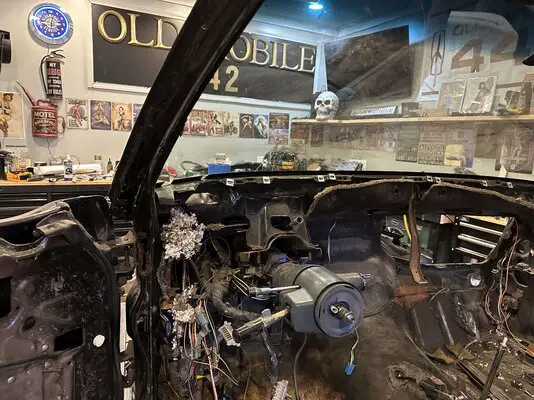
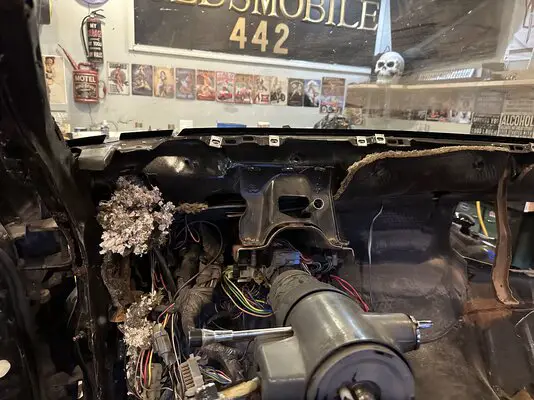
So as I’m taking everything apart I’m finding mice remnants and shells everywhere including on top of the headliner where there was a nice home built but today I got the dash and taking out wires and look in the left corner of the dash frame… a nest of jute and paper and motherload of shells!!!! These things get everywhere…. Just one of the reasons I’m also reworking all the harness.
 

Attachments

  • 1A98D1B8-8423-400A-8C5B-65FC514C77E4.jpeg
    1A98D1B8-8423-400A-8C5B-65FC514C77E4.jpeg
    991.6 KB · Views: 65
  • A63DAE68-33D3-4FB6-B7A5-7BAEEB361E38.jpeg
    A63DAE68-33D3-4FB6-B7A5-7BAEEB361E38.jpeg
    2.6 MB · Views: 64
  • Like
Reactions: 1 user

GBodyForum is a participant in the Amazon Services LLC Associates Program, an affiliate advertising program designed to provide a means for sites to earn advertising fees by advertising and linking to amazon.com. Amazon, the Amazon logo, AmazonSupply, and the AmazonSupply logo are trademarks of Amazon.com, Inc. or its affiliates.

Please support GBodyForum Sponsors

Classic Truck Consoles Dixie Restoration Depot UMI Performance

Contact [email protected] for info on becoming a sponsor