Off idle BOG at WOT

Status
Not open for further replies.

MonteLS_84

Apprentice
Jul 28, 2021
63
10
8
Welp, I bought a brand new msd street fire distributor. Still bogged. Put in light springs. Still have the bog. On the bright side, the engine seems to be running smoother and more responsive with the new distributor.

Also, checked for 12v going to distributor - and I have 12v.

Going under now to peak at the tank and fuel pump, and see if I can find anything...
Well, the fuel pump looks brand new - just like I was told it was. It's an electric Holley. From what I see online, it should be somewhere between 25 and 32 gph. Is that enough?

The only thing I noticed is that the pumps mount is slightly higher than the lines coming out of the tank. Would that be a major problem? Wouldn't there be enough fuel in the line when I floor it?

The only other thing I saw is a screw in fuel filter, so I ordered a new one for the heck of it.
 

stew86MCSS396

Greasemonkey
Aug 1, 2022
170
213
43
(808)
My sincerest apologies as I may have sent some barking up the wrong tree. Agreed that the centrifugal weights need to return back center. I've used that recurve kit and with the lightest springs, it was detonation city but since you're running a new distributor suppose we can rule that out. Can't remember which Holley pump I used back in the day on my Buick 455 but my understanding is the pump needs to be gravity fed.
 

MonteLS_84

Apprentice
Jul 28, 2021
63
10
8
My sincerest apologies as I may have sent some barking up the wrong tree. Agreed that the centrifugal weights need to return back center. I've used that recurve kit and with the lightest springs, it was detonation city but since you're running a new distributor suppose we can rule that out. Can't remember which Holley pump I used back in the day on my Buick 455 but my understanding is the pump needs to be gravity fed.
Does seem like I'm getting some pinging when I punch it now. As for the fuel pump...I figure there'd be enough fuel in the line regardless...but wouldn't be the first time I'm wrong. I'm going to lower it and see if it makes a difference.

Currently, I'm blowing the carb out, replacing the accelerator pump, and debating to go with bigger jets.
 

78Delta88

Royal Smart Person
Supporting Member
May 23, 2022
1,247
1
1,008
113
SW Arizona
Does seem like I'm getting some pinging when I punch it now. As for the fuel pump...I figure there'd be enough fuel in the line regardless...but wouldn't be the first time I'm wrong. I'm going to lower it and see if it makes a difference.

Currently, I'm blowing the carb out, replacing the accelerator pump, and debating to go with bigger jets.
Seems like your getting closer. One of the things I mentioned earlier was pump sufficiency. It's important to know what you do have than more of what you should have. Specifications are fine and it helps in the parts selection when building a project, but in running the project you need to know what you do have.

If you haven't done a pump test yet... Please do the following, and even if it's just for your own peace of mind.

1. Unhook distributor.... (Sparks = Very Bad)
2. Unhook fuel line going into carb
3. Get a rubber hose that fits snuggly over the open fuel line end. Hose needs to be long enough to safely go into a bottle/jar
4. Get about a 1-quart clear glass jar or full size "coke bottle". (A Mason Jar works great for this).
5. Setup jar on manifold in front of carb, and in a manner that the jar will not tip over and the gas will not spill out.
6. Place open end of hose into jar.
(You will also have to find a method to keep the hose from popping out of the jar and spraying gasoline everywhere).
7. Crank engine (distributor unhooked) for about a count of 5.
8. Stop cranking and pull key, go check fuel in the jar.
9. Jar should be about 1/2 full, clear, clean, no dirt, no foul odor (other than normal gas odor) and no water.
10. Set jar on work bench and let sit about 30 min.
11. Inspect the contents of the jar. Any water will settle to bottom, gasoline will be floating on top, dirt will be at the bottom or maybe still floating in the contents of the jar.
12. Reset your engine and button up
13. Fuel line back attached, hook up distributor, start let run about 15 seconds, shut down and check for leaks at points where you disconnected the fuel line
14. Make any correction as needed...

Until you do a pump sufficiency test, you still don't really know if you are getting the volume and pressure you need for your application.

Every thing you do in diagnostics needs to have a purpose, with a real world answer to either establish or rule out a potential cause of the problem.
 
Last edited:

MonteLS_84

Apprentice
Jul 28, 2021
63
10
8
Seems like your getting closer. One of the things I mentioned earlier was pump sufficiency. It's important to know what you do have than more of what you should have. Specifications are fine and it helps in the parts selection when building a project, but in running the project you need to know what you do have.

If you haven't done a pump test yet... Please do the following, and even if it's just for your own peace of mind.

1. Unhook distributor.... (Sparks = Very Bad)
2. Unhook fuel line going into carb
3. Get a rubber hose that fits snuggly over the open fuel line end. Hose needs to be long enough to safely go into a bottle/jar
4. Get about a 1-quart clear glass jar or full size "coke bottle". (A Mason Jar works great for this).
5. Setup jar on manifold in front of carb, and in a manner that the jar will not tip over and the gas will not spill out.
6. Place open end of hose into jar.
(You will also have to find a method to keep the hose from popping out of the jar and spraying gasoline everywhere).
7. Crank engine (distributor unhooked) for about a count of 5.
8. Stop cranking and pull key, go check fuel in the jar.
9. Jar should be about 1/2 full, clear, clean, no dirt, no foul odor (other than normal gas odor) and no water.
10. Set jar on work bench and let sit about 30 min.
11. Inspect the contents of the jar. Any water will settle to bottom, gasoline will be floating on top, dirt will be at the bottom or maybe still floating in the contents of the jar.
12. Reset your engine and button up
13. Fuel line back attached, hook up distributor, start let run about 15 seconds, shut down and check for leaks at points where you disconnected the fuel line
14. Make any correction as needed...

Until you do a pump sufficiency test, you still don't really know if you are getting the volume and pressure you need for your application.

Every thing you do in diagnostics needs to have a purpose, with a real world answer to either establish or rule out a potential cause of the problem.
Done. Everything seems normal.

I haven't moved the pump yet. Hopefully today. I have narrowed it down, however.

I ran a search on the auto parts stores, and the same looking pump comes in a 25, 32, and 34 gph.

The largest one has a 10 psi rating. The smallest, however, has a 4 rating...

There's a screw in filter. I'm going to change that. I'm about at my wits end. I'm going to take a guess and assume I have the 25 gph, 4 psi. Would that be insufficient for WOT on a high performance application?
 

MonteLS_84

Apprentice
Jul 28, 2021
63
10
8
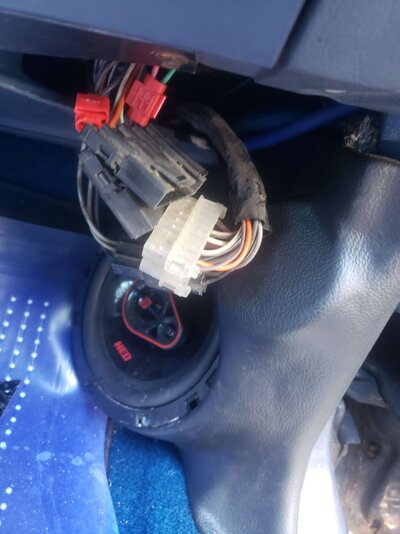
Does anyone know off-hand which end of this harness would lead to the trans? Black side, or white side? This is the harness under passenger dash.

Asking because my bog seemed to go away or at least got way better when I unplugged this. 🤔 Am I seeing a coincidence, or are these wires somehow affecting the distributor or something?

I installed an Edelbrock performer rpm manual fuel pump, based off recommendations that my fuel pump was too small...but I still have the bog.

Wondering about these wires because I have a switch wired in for lockup and if this harness is disconnected, want to make sure lockup is still getting activated (trying to save myself some time hunting).

Also, is there anything there I need plugged in?
 

Attachments

  • 20220922_174612.jpg
    20220922_174612.jpg
    449.7 KB · Views: 76

78Delta88

Royal Smart Person
Supporting Member
May 23, 2022
1,247
1
1,008
113
SW Arizona
Does anyone know off-hand which end of this harness would lead to the trans? Black side, or white side? This is the harness under passenger dash.

Asking because my bog seemed to go away or at least got way better when I unplugged this. 🤔 Am I seeing a coincidence, or are these wires somehow affecting the distributor or something?

I installed an Edelbrock performer rpm manual fuel pump, based off recommendations that my fuel pump was too small...but I still have the bog.

Wondering about these wires because I have a switch wired in for lockup and if this harness is disconnected, want to make sure lockup is still getting activated (trying to save myself some time hunting).

Also, is there anything there I need plugged in?
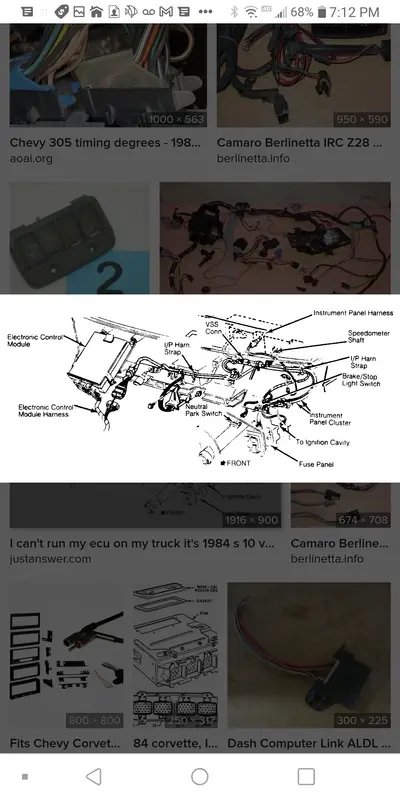
Need someone else to chime in, but I think those connectors go to the ECM. Notice two connectors to left of ecm box.

See screen shot attached.

The best way to rule out if lockup converter is coming on at wrong time or is staying on, would be to disconnect the 4 pin connector.

See pic ... https://www.crankshaftcoalition.com/wiki/File:1984_THM200R4_Pic_1B.jpg

Pic of the trans is one I built for the section as written.

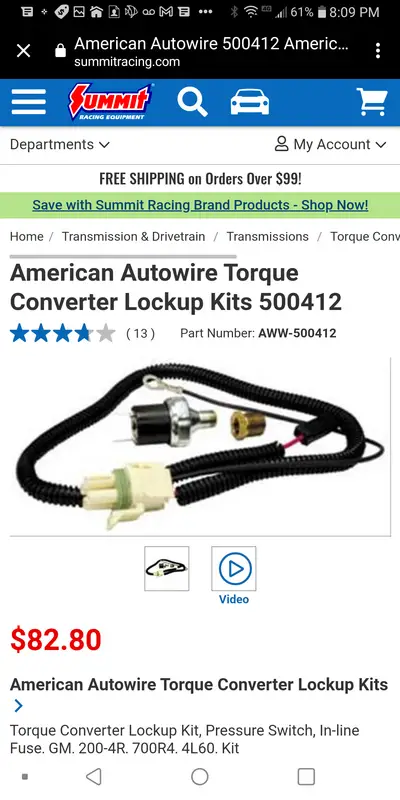
If you ever need to do the lock up as a separate stand alone, screen shot attached
 

Attachments

  • Screenshot_20220922-191229.png
    Screenshot_20220922-191229.png
    997.3 KB · Views: 62
  • Screenshot_20220922-200911.png
    Screenshot_20220922-200911.png
    459.3 KB · Views: 65
Last edited:

CopperNick

Comic Book Super Hero
Supporting Member
Feb 20, 2018
3,347
3,011
113
Canada
Does that harness connector happen to be located on the passengers' side of the cabin adjacent to the kick panel mounted down low on the A-pillar? If so, then carefully pop that kick cover off; it just snaps in place and take a look behind it. if you see a silver/aluminum colored box, your are looking at the CCC. It is NOT a computer, it is more of an electronic idiot-savant that takes input from solenoids and sensors that would have been located on the original carb had it still been on the intake and functional, and uses them to adjust the advance and timing at the distributor. As noted and mentioned above, if you decommission or disconnect the CCC from its sensors, then you have to swap out the distributor and the carb for non-electronically controlled models; which you indicate that you have done.

If you want to totally isolate out the CCC, then you have to unplug all the connectors that run to it, and then remove it entirely. Any sign or hint of corrosion on the case can be a symptom of internal problems Using an aluminum outer shell to cover the motherboards was not the smartest thing the engineers ever chose to do.

The picture of the plug that you posted tells another story. A correctly burning plug ought to display a light tan color on the electrode. White like the one in the picture could be a sign of a lean burn golng on. Not enough fuel for a proper combustion cycle to occur. You did mention that when you come onto the throttle pedal heavy, the car just lays down and cries. Fuel starvation has been suggested along that line and, now.........

I have to wonder just how many fuel filters you have in your fuel system. Typically, most mfgr's suggest an in line filter in the circuit either just before or just after the electric pump. You've already gone and sent out for a new in line filter for down at the pump but here is me wondering if you have put another filter in the line just before the carb? Also does that carb come with an internal fuel filter that, if present, might be located behind the inlet fitting? Reason for asking here is that two filters are one too many and will cause fuel starve out.

Turning to your picture of the advance weights on the advance plate, they are definitely not sitting at rest or fully closed like they ought to be. When you swapped the springs, did you happen to swing those weights in and out to see if they moved freely back and forth? Also not seeing any lube such as dielectric grease sitting on those two rubbing blocks sitting under the weights. Doesn't take much, just the proverbial little dab will do ya. The other thing to appreciate is that the stock weights have a definite shape and curl into each other fairly tightly when at rest. Generic weights are not as cleanly and precisely shaped-they look more like a metal blob and they can be lighter in physical weight than the stockers were. There is a specialty tuner's science involved in just understanding the advance weights and how they function. That is why the suggestion about tuning the timer was made. Even from the factory there were multiple variants of weights installed, mostly according to model/variant/ use, mixing and matching weights to customize the advance is as much an art as it is magic in the hands of an experienced tekkie. Shops with the old Sun distributor machines are few and far between now but that machine in the hands of an old school mechanic could make your distributor get up and talk.

Would not suggest doing a cam swap until you get your BOG solved. Unless you know for sure that the cam in the mill is not stock then let it be until you have remedied your present problem. Breaking in a new cam comes with its own set of issues and headacbes. You don't want to be chasing a fuel problem during the cam break in cycle.

AS for a jet change out, Your new "Eddy", and I am thinking you are referring to an Edelbrock carb here, pretty much comes preset right out of the box and the idle stop screw and the idle adjustment screws shouldn't need any tweaking to get the carb to function. Yes, the idle mixture screws can be move to optimize the idle but to do that correctly you need a tach and a vacuum gauge to tell you what your changes are doing to the engine idle and the vacuum being pulled at idle.

Oh, yeah, having the lockup unpowered will not hurt the t-mission per se. Having it active helps your gas consumption and mileage once you hit fourth but for around town, stop and go, it will spend more time unlocked simply due to the amount of braking that happens in stop and go traffic.
 

MonteLS_84

Apprentice
Jul 28, 2021
63
10
8
Need someone else to chime in, but I think those connectors go to the ECM. Notice two connectors to left of ecm box.

See screen shot attached.

The best way to rule out if lockup converter is coming on at wrong time or is staying on, would be to disconnect the 4 pin connector.

See pic ... https://www.crankshaftcoalition.com/wiki/File:1984_THM200R4_Pic_1B.jpg

Pic of the trans is one I built for the section as written.

If you ever need to do the lock up as a separate stand alone, screen shot attached
Yeah, that looks about right. I unplugged the ECM but never unplugged this other connector.

The connector in question- I read that by jumping pin F to pin A, lock up engages. So, I put a switch in between A and F. Unfortunately, I can't tell if the converter locks up or not - I don't notice any feel or change in rpm, ever. I do know that F is giving A power when switch is on. 🤷‍♂️ I left this part out - I am also running a vacuum switch. So basically, I turn my switch on when I want lock up, and the vacuum switch controls when it kicks in and out. As stated though, I'm not sure if it is actually working or doing anything.
 

MonteLS_84

Apprentice
Jul 28, 2021
63
10
8
Does that harness connector happen to be located on the passengers' side of the cabin adjacent to the kick panel mounted down low on the A-pillar? If so, then carefully pop that kick cover off; it just snaps in place and take a look behind it. if you see a silver/aluminum colored box, your are looking at the CCC. It is NOT a computer, it is more of an electronic idiot-savant that takes input from solenoids and sensors that would have been located on the original carb had it still been on the intake and functional, and uses them to adjust the advance and timing at the distributor. As noted and mentioned above, if you decommission or disconnect the CCC from its sensors, then you have to swap out the distributor and the carb for non-electronically controlled models; which you indicate that you have done.

If you want to totally isolate out the CCC, then you have to unplug all the connectors that run to it, and then remove it entirely. Any sign or hint of corrosion on the case can be a symptom of internal problems Using an aluminum outer shell to cover the motherboards was not the smartest thing the engineers ever chose to do.

The picture of the plug that you posted tells another story. A correctly burning plug ought to display a light tan color on the electrode. White like the one in the picture could be a sign of a lean burn golng on. Not enough fuel for a proper combustion cycle to occur. You did mention that when you come onto the throttle pedal heavy, the car just lays down and cries. Fuel starvation has been suggested along that line and, now.........

I have to wonder just how many fuel filters you have in your fuel system. Typically, most mfgr's suggest an in line filter in the circuit either just before or just after the electric pump. You've already gone and sent out for a new in line filter for down at the pump but here is me wondering if you have put another filter in the line just before the carb? Also does that carb come with an internal fuel filter that, if present, might be located behind the inlet fitting? Reason for asking here is that two filters are one too many and will cause fuel starve out.

Turning to your picture of the advance weights on the advance plate, they are definitely not sitting at rest or fully closed like they ought to be. When you swapped the springs, did you happen to swing those weights in and out to see if they moved freely back and forth? Also not seeing any lube such as dielectric grease sitting on those two rubbing blocks sitting under the weights. Doesn't take much, just the proverbial little dab will do ya. The other thing to appreciate is that the stock weights have a definite shape and curl into each other fairly tightly when at rest. Generic weights are not as cleanly and precisely shaped-they look more like a metal blob and they can be lighter in physical weight than the stockers were. There is a specialty tuner's science involved in just understanding the advance weights and how they function. That is why the suggestion about tuning the timer was made. Even from the factory there were multiple variants of weights installed, mostly according to model/variant/ use, mixing and matching weights to customize the advance is as much an art as it is magic in the hands of an experienced tekkie. Shops with the old Sun distributor machines are few and far between now but that machine in the hands of an old school mechanic could make your distributor get up and talk.

Would not suggest doing a cam swap until you get your BOG solved. Unless you know for sure that the cam in the mill is not stock then let it be until you have remedied your present problem. Breaking in a new cam comes with its own set of issues and headacbes. You don't want to be chasing a fuel problem during the cam break in cycle.

AS for a jet change out, Your new "Eddy", and I am thinking you are referring to an Edelbrock carb here, pretty much comes preset right out of the box and the idle stop screw and the idle adjustment screws shouldn't need any tweaking to get the carb to function. Yes, the idle mixture screws can be move to optimize the idle but to do that correctly you need a tach and a vacuum gauge to tell you what your changes are doing to the engine idle and the vacuum being pulled at idle.

Oh, yeah, having the lockup unpowered will not hurt the t-mission per se. Having it active helps your gas consumption and mileage once you hit fourth but for around town, stop and go, it will spend more time unlocked simply due to the amount of braking that happens in stop and go traffic.
CCC is unplugged and in the trunk. Correct, I am running Edelbrock 650 carb and MSD street fighter HEI distributor. This other connector (previously pictured) apparently was part of the harness that plugged into the CCC.

In regards to that connector, I am using pins A and F to engage and disengage lock up via a toggle switch.

Being that I'm running carb and HEI, how or why could anything in this connector give me a bog?

I do have 2 fuel filters. 1 just outside of the tank - 40 micron, and another 40 micron just before carb (after fuel pump). Carb does not have a filter inside, and the only other filter would be the sock on the sending unit. Is running these 2 filters a no no? I recently switched from electric to manual pump, and added the 2nd fuel filter to replace where the electric pump was.

As for distributor, I bought and installed this MSD one the other day. The only mods I did to this one is put in light springs, which I'm going to swap out for medium springs today. I'm currently hearing pinging.

I'm going to have to redo my timing today, as I think I moved the distributor a little when swapping. I'm going to get TDC, and start around 10 degrees...and advance and retard until it sounds smooth. Then, disconnect vacuum advance, set idle to 3000 rpm, and set timing somewhere between 34 and 36 degrees. Idle down, set idle, plug advance back in, and drive. Am I missing anything?
 
  • Like
Reactions: 1 user
Status
Not open for further replies.

GBodyForum is a participant in the Amazon Services LLC Associates Program, an affiliate advertising program designed to provide a means for sites to earn advertising fees by advertising and linking to amazon.com. Amazon, the Amazon logo, AmazonSupply, and the AmazonSupply logo are trademarks of Amazon.com, Inc. or its affiliates.

Please support GBodyForum Sponsors

Classic Truck Consoles Dixie Restoration Depot UMI Performance

Contact [email protected] for info on becoming a sponsor