Olds ticket to 9s... LS swap adventure.

Status
Not open for further replies.
Just watching to get ideas for bracing the rear IF I end up notching my frame

deer popcorn GIF

I am just going to box the frame to the inside when I do the Monte's full-notch this Winter. In my opinion, this isn't the structural area most folks believe it to be and building a ladder isn't going to net the desired results. A touch of triangulation and some more solid body mounts would be more appropriate.

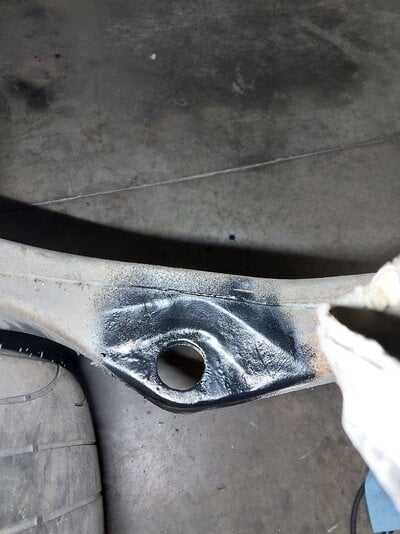
Reinforcing the control arm pick up points, as shown, is crucial.
 
Well excuuuuuuuse the hell outta me!!
😁
No one really wants to disagree with Mr Riddler.... 🤔😁
I am just going to box the frame to the inside when I do the Monte's full-notch this Winter. In my opinion, this isn't the structural area most folks believe it to be and building a ladder isn't going to net the desired results. A touch of triangulation and some more solid body mounts would be more appropriate.

Reinforcing the control arm pick up points, as shown, is crucial.
All my research on the interwebs for rear suspension comes to the same conclusion. For caged cars anyway.
 
Ok, got one more pair of body mount locations to replace and the chassis upgrades/ repairs are done. Which is good because the weather here is back to sucking and I am back in the garage to keep making progress.

Got the rear bracing welded out. pulled the springs out and let it sit on the frame to check clearance. It will touch the rear disks caliper bolts to the frame before it hits any of the bracing. Win.
20201105_134417.jpg


So I got to fabricating up lower arm bracket braces. Again I just saw something on Trick Chassis' site and decided to reproduce. So begin the process.

1: Make templates.
20201105_143009.jpg


2: Transfer to metal and cut out.
20201105_142950.jpg
20201105_143811.jpg


3: Fit to mount brackets.
20201105_161543.jpg


4: Tack in and add internal bracing. I added a piece of angle iron inside the brackets to add rigidity.
20201106_130730.jpg


Since I had bought one 3/16" x 4" x 8' flat bar I just cut some slices off it to weld in instead of one long piece and bending to shape, I think it came out alright.

20201106_133819.jpg


Got a little more clean up of the booger welds I did on the bottom and front. I think its going to work.
20201106_163312.jpg
20201106_162649.jpg
20201106_162631.jpg


I did some calculation of the weight added with the metal I have used. Its a bit of a rough estimate but so far only 33.74lbs of metal added. Thats what will come out of the doors once I get the drivers door bar out, I think this will be a bigger upgrade than a door bar.
 
Ok, got one more pair of body mount locations to replace and the chassis upgrades/ repairs are done. Which is good because the weather here is back to sucking and I am back in the garage to keep making progress.

Got the rear bracing welded out. pulled the springs out and let it sit on the frame to check clearance. It will touch the rear disks caliper bolts to the frame before it hits any of the bracing. Win.
View attachment 161190

So I got to fabricating up lower arm bracket braces. Again I just saw something on Trick Chassis' site and decided to reproduce. So begin the process.

1: Make templates.
View attachment 161192

2: Transfer to metal and cut out.
View attachment 161191View attachment 161193

3: Fit to mount brackets.
View attachment 161194

4: Tack in and add internal bracing. I added a piece of angle iron inside the brackets to add rigidity.
View attachment 161196

Since I had bought one 3/16" x 4" x 8' flat bar I just cut some slices off it to weld in instead of one long piece and bending to shape, I think it came out alright.

View attachment 161197

Got a little more clean up of the booger welds I did on the bottom and front. I think its going to work.
View attachment 161200View attachment 161199View attachment 161198

I did some calculation of the weight added with the metal I have used. Its a bit of a rough estimate but so far only 33.74lbs of metal added. Thats what will come out of the doors once I get the drivers door bar out, I think this will be a bigger upgrade than a door bar.
To cut weight, you should back half it🙂 I mean, you’re already balls deep anyway.
 
To cut weight, you should back half it🙂 I mean, you’re already balls deep anyway.
Lol, that idea has been pondered. But it deviates from street car too much...
I think it looks awesome! 😎 When a fox body can lay down a low 7 on 275s, 8s in a G should be no problem.
Thanks man, kinda what I'm thinking. Should be a good grudge car or street racer.
 
Ok, got one more pair of body mount locations to replace and the chassis upgrades/ repairs are done. Which is good because the weather here is back to sucking and I am back in the garage to keep making progress.

Got the rear bracing welded out. pulled the springs out and let it sit on the frame to check clearance. It will touch the rear disks caliper bolts to the frame before it hits any of the bracing. Win.
View attachment 161190

So I got to fabricating up lower arm bracket braces. Again I just saw something on Trick Chassis' site and decided to reproduce. So begin the process.

1: Make templates.
View attachment 161192

2: Transfer to metal and cut out.
View attachment 161191View attachment 161193

3: Fit to mount brackets.
View attachment 161194

4: Tack in and add internal bracing. I added a piece of angle iron inside the brackets to add rigidity.
View attachment 161196

Since I had bought one 3/16" x 4" x 8' flat bar I just cut some slices off it to weld in instead of one long piece and bending to shape, I think it came out alright.

View attachment 161197

Got a little more clean up of the booger welds I did on the bottom and front. I think its going to work.
View attachment 161200View attachment 161199View attachment 161198

I did some calculation of the weight added with the metal I have used. Its a bit of a rough estimate but so far only 33.74lbs of metal added. Thats what will come out of the doors once I get the drivers door bar out, I think this will be a bigger upgrade than a door bar.

Nice, i have too looked at the trick chassis braces, i might have to steal your idea of welding up my own. There is really nothing to it at all just a couple cuts and some welds.

Looks good man.
 
Nice, i have too looked at the trick chassis braces, i might have to steal your idea of welding up my own. There is really nothing to it at all just a couple cuts and some welds.

Looks good man.


Motion Raceworks has given me the latest inspiration... Just need to fine some 4130 1 5/8" tubing locally.
short_2000x.jpg
 
OK! Status update

Last two days I have been quite busy in the garage.

First off I have completed the last 2 body mount repairs. I primed the bare metal in 2k epoxy on all the frame mods and painted black, then undercoated with aerosol undercoating. Just spot coats but the rest of the frame was in pretty good shape, and mostly still factory undercoated.
20201109_162810.jpg

I then set to boxing the back edge of the boxed frame section as it will be close enough to the cage mount that its needs to be done. Everything within 6" of the cage mounts and all.
20201109_165049.jpg

20201109_165109.jpg


Got the top plates for the frame cut, fit and welded in. I used the supplied flat plates that came with the Rhodes cage kit.

20201110_120206.jpg


20201110_120223.jpg


Once all that was done I began the process of putting it back together and seeing how the new body mounts were gonna look. I disassembled the wooden body stand and started to fit up the body mounts and line everything up. It wasnt nearly the fight I had when I did this with my regal because I left the rear bumper in place and left the trans crossmember in place and bolted tight. All the repaired body mounts are close enough to work and its sitting on the new prothane poly mounts. I feel like its sitting a bit taller on the new poly mounts. I have one body bolt that I need to cut the cage nut out to remove, but more on that later.

20201110_202135.jpg


With the body and frame lined up it was fit the main hoop and tack it in. with the new poly mounts I didn't need to trim anything off the main hoope and it is reasonably tight in the B pillar. So far, I like the feel, I still need to get a helper in to help with the cross bar fitting before I start on the rear support bars. I am thinking they will land right onto the top of the coil spring mounts and then I can put bars back from them later once I add in the parachute cross back. We shall see.
20201110_193157.jpg
 
Last edited:
Been busy with the tedious process of fitting in the cage. I lifted the body off and welded pads onto the frame for the front down bars and started final fitting the front bars, mocked up door bars to make sure everything would be happy. Halo bar is tacked in now, its nice and snug to the roof.
20201113_185807.jpg


Once I got the front bars trimmed and notched to be close to where I was happy. Dropped the body back to the frame and continued.
20201113_133326.jpg


I'm pretty happy with the overall fitment of the Rhodes Racing cage, if I was going to criticize it I would say the front bars are bent slightly off of what the A pillars are angled at.

Some preliminary install fitment pics.

20201113_133314.jpg
20201113_133603.jpg
20201113_133607.jpg
 
Status
Not open for further replies.

GBodyForum is a participant in the Amazon Services LLC Associates Program, an affiliate advertising program designed to provide a means for sites to earn advertising fees by advertising and linking to amazon.com. Amazon, the Amazon logo, AmazonSupply, and the AmazonSupply logo are trademarks of Amazon.com, Inc. or its affiliates.

Please support GBodyForum Sponsors

Classic Truck Consoles Dixie Restoration Depot UMI Performance

Contact [email protected] for info on becoming a sponsor