

Your getting YEARS of experience and knowledge from your first project. Like cheap tools don’t last, LOL. As long as you don’t LOSE the mule skinner ( like I did ) you’ll have it for years, just flip the wheel regularly and it won’t get out of shape. I saw a guy do that with one. As for over head welding, I’ve worked in alot of closed up steel mills and foundries and found welding blankets left behind. One that was torn, I cut up and use one piece with my helmet, kinda like a sandblasting hood. It will prevent sparks from going down the back of your collar. Speaking of sparks, whenever your welding above your feet put something over your shoe laces to help the sparks bounce away. I worked with a guy that his laces caught a good sized spark and ended up in emergency with a 3rd degree burn. I use either old cut up rubber floor mats and vinyl tape or just the vinyl tape that I get from work.
BUILD THREAD Rustier then I thought!!!
- Thread starter RabbitHoleSS
- Start date
You are using an out of date browser. It may not display this or other websites correctly.
You should upgrade or use an alternative browser.
You should upgrade or use an alternative browser.
- Status
- Not open for further replies.
There was really no way to reuse the driver #2 mount. It was way worse on the bottom then I thought.

And the piece I thought was whole was not. So I Frankensteined this 1 too. Hey atleast there's some original metal goin back in.

I started fixing the missing spots and kept lookin at the pitted spot on top. It was so thin the pick went right thru so...

It came out ok. I caked etch then some rustoleum paint in between the pieces of metal.

Im gonna seal every seam the best I can. The biggest thing I've noticed about this rust is it all originates at seams. I have a whole new perspective of 90% rust free lol. After I welded it all together I test fit it on the car. It took a little while to get it all tight but a lil hammer and a bunch of clamps later I got it were I wanted and welded in.

I turned my focus to cleaning up all the drop panels? (I have no idea what to call them) that the floor connect to. They were rusty and need replaced in places. As I cut the very bottom of the white metal I noticed surface rust goin up in between the 2 pcs. So I made a relief cut and bent it up so I could clean it all up and epoxy the crap out of all of it. I use a purple clean n strip on a 2in roloc and 36 grit rolocs/flapper discs. It works pretty well. Im gonna sandblast anywhere I missed tommorow.

The pass side isn't as bad so I didn't feel like peeling them apart.

I made the drop panels for the driver side and welded them in. I lapped these pieces instead of butt welding so I'll pay extra attention when I do the underbody


I also finally got the chassis out from under the car. My driveway is at a slight decline so it got interesting. I put it on 4 7$ furniture dollies.

I started the rear wheelhouse investigations while waiting on paint to dry. Ill say the heat gun works like a champ with a 5 way knife. It comes off like butter.

As far as I can tell it doesnt go any higher but basically runs the length of it front to back. The body mount that butts up to it is rotted too. I also have to patch a few spots were the trunk pan lip connects to the wheelhouse. I was gonna fit the floor soon but it gives me easy access to this crap with it out. So I'm fixing it first. Im thinking of cutting the entire seam out and butt welding a strip of 20 ga in its place. The pass side is worse but doesn't go up to the trunk support. The driver rear seat belt anchor is connected to rusty metal so I'll have to fix that too.


None of my "plans" have really worked out like I thought they would but they've worked out. Im having trouble with water in my lines. I installed a desiccant/filter but it filled with water in 45mins. And the replacement cartridge is 40 bucks. So only thing I can think to do is cool the air and trap the water before it goes in the tank. So I'm takin the ac condenser off my 05 f150 POS. Im gonna run the line from the comp. head to the condenser to a HF water trap to the tank. I might even put a fan on the condenser. Because right now I cant sandblast,paint or run my good tools there's so much water. I remember at the shop I worked they had a dryer for the air compressor which I cant afford. So I think this is an alternative. I thought I read a thread on here someone's a compressor mechanic. If there reading this and my idea is stupid please let me know thanks. Sorry for the extra long post.
And the piece I thought was whole was not. So I Frankensteined this 1 too. Hey atleast there's some original metal goin back in.
I started fixing the missing spots and kept lookin at the pitted spot on top. It was so thin the pick went right thru so...
It came out ok. I caked etch then some rustoleum paint in between the pieces of metal.
Im gonna seal every seam the best I can. The biggest thing I've noticed about this rust is it all originates at seams. I have a whole new perspective of 90% rust free lol. After I welded it all together I test fit it on the car. It took a little while to get it all tight but a lil hammer and a bunch of clamps later I got it were I wanted and welded in.
I turned my focus to cleaning up all the drop panels? (I have no idea what to call them) that the floor connect to. They were rusty and need replaced in places. As I cut the very bottom of the white metal I noticed surface rust goin up in between the 2 pcs. So I made a relief cut and bent it up so I could clean it all up and epoxy the crap out of all of it. I use a purple clean n strip on a 2in roloc and 36 grit rolocs/flapper discs. It works pretty well. Im gonna sandblast anywhere I missed tommorow.
The pass side isn't as bad so I didn't feel like peeling them apart.
I made the drop panels for the driver side and welded them in. I lapped these pieces instead of butt welding so I'll pay extra attention when I do the underbody
I also finally got the chassis out from under the car. My driveway is at a slight decline so it got interesting. I put it on 4 7$ furniture dollies.
I started the rear wheelhouse investigations while waiting on paint to dry. Ill say the heat gun works like a champ with a 5 way knife. It comes off like butter.
As far as I can tell it doesnt go any higher but basically runs the length of it front to back. The body mount that butts up to it is rotted too. I also have to patch a few spots were the trunk pan lip connects to the wheelhouse. I was gonna fit the floor soon but it gives me easy access to this crap with it out. So I'm fixing it first. Im thinking of cutting the entire seam out and butt welding a strip of 20 ga in its place. The pass side is worse but doesn't go up to the trunk support. The driver rear seat belt anchor is connected to rusty metal so I'll have to fix that too.
None of my "plans" have really worked out like I thought they would but they've worked out. Im having trouble with water in my lines. I installed a desiccant/filter but it filled with water in 45mins. And the replacement cartridge is 40 bucks. So only thing I can think to do is cool the air and trap the water before it goes in the tank. So I'm takin the ac condenser off my 05 f150 POS. Im gonna run the line from the comp. head to the condenser to a HF water trap to the tank. I might even put a fan on the condenser. Because right now I cant sandblast,paint or run my good tools there's so much water. I remember at the shop I worked they had a dryer for the air compressor which I cant afford. So I think this is an alternative. I thought I read a thread on here someone's a compressor mechanic. If there reading this and my idea is stupid please let me know thanks. Sorry for the extra long post.
Attachments

I thought I read a thread on here someone's a compressor mechanic.
I’m the Huckleberry you’re thinking of.
😏
It’s not a crazy idea, but I will say a few things. First of all, the air receiver tank is going to be your most effective water knockout, so install your condenser/homemade dryer downstream of the discharge on the tank, not between the pump and the tank.
Secondly, you will need most certainly to install a fan on the condenser, no fan, no cooling lower than ambient air temperature. However, you’re still not going to be able to efficiently remove most of the water unless you can lower the dew point. This is why refrigerated dryers have and use refrigerant. Your most effective dew point for maximum water removal from the air stream is 2 degrees Celsius (35.6 degrees F).
So what does all this mean? Basically, you’re not going to be able to remove too much more water with your homemade dryer, but some is still better than none.
What can you do? Drain your tank of water more frequently (several times a day if necessary), install a fan on your home made dryer, and install dryer as far away from the compressor as possible. This will give the air more time to cool down and the water to drop out of the airstream before it reaches your home built dryer. If your air lines make elevation changes (ie goes up a wall to the ceiling), consider installing drip legs with manual drains below the elevation. Water doesn’t like to flow straight up.
Then, at the very end before point of use, install your desiccant dryer with a new cartridge. Don’t forget inline filters to remove particulates and compressor oil carryover.
Hope this helps ya out a bit. Any other air system or compressor related questions, don’t hesitate to ask.
D.

Tombstone reference. One of my favorite movies ever. Im gonna run an electric fan on the condenser. Im also thinkin of buying a bigger compressor. This 1 runs alot its "5hp" 30 gallon craftsman. 8.4 scfm@40. Im guessing this is a big reason why so much water now. I dont think this little guy has a discharge line. The pump is the same size as my fist lol.I’m the Huckleberry you’re thinking of.
😏
It’s not a crazy idea, but I will say a few things. First of all, the air receiver tank is going to be your most effective water knockout, so install your condenser/homemade dryer downstream of the discharge on the tank, not between the pump and the tank.
Secondly, you will need most certainly to install a fan on the condenser, no fan, no cooling lower than ambient air temperature. However, you’re still not going to be able to efficiently remove most of the water unless you can lower the dew point. This is why refrigerated dryers have and use refrigerant. Your most effective dew point for maximum water removal from the air stream is 2 degrees Celsius (35.6 degrees F).
So what does all this mean? Basically, you’re not going to be able to remove too much more water with your homemade dryer, but some is still better than none.
What can you do? Drain your tank of water more frequently (several times a day if necessary), install a fan on your home made dryer, and install dryer as far away from the compressor as possible. This will give the air more time to cool down and the water to drop out of the airstream before it reaches your home built dryer. If your air lines make elevation changes (ie goes up a wall to the ceiling), consider installing drip legs with manual drains below the elevation. Water doesn’t like to flow straight up.
Then, at the very end before point of use, install your desiccant dryer with a new cartridge. Don’t forget inline filters to remove particulates and compressor oil carryover.
Hope this helps ya out a bit. Any other air system or compressor related questions, don’t hesitate to ask.
D.

I bought it to run roofing guns originally. The sanders etc use 10x the air. Im figurin if its running less its runnin cooler. I empty my tank then 5 mins later its spewing out my gun.
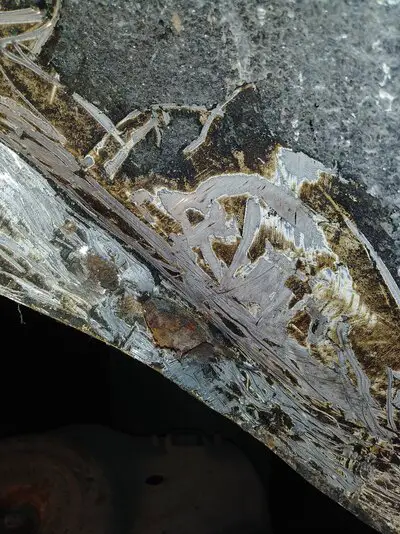
My son always wants to help so i got free labor on the scraping of undercoat/seam sealer. I heat... he scrapes.
 After he uncovered the seam I started cutting just the rust out.

 Then I started on the trunk/wheelhouse/body mount area. I started by trying to save what was there and patch in pcs but it was too rusty.

So I drilled out the spotwelds on the backseat brace and cut it out.


I've had this for a while. I moved it to 2 houses and Im glad I did. The 500 dollar parts car has really payed dividends. Heck I haven't even touched the car, just the spare parts the PO accumulated which includes a fox body 8.8 with g body spring perches and bolt pattern with disc brakes has trick chassis double adj. Uppers and lowers.

It wasn't exactly rust free though. I had to cut out a small rust hole on top. It was a 1/4 in rust hole but i know its worse on the back. It also gave me great access to inside the body mount to sand blast and paint. I also had to cut most of the inner wheelhouse lip out.

I had to build the lip that attaches to the inner wheelhouse. I bent it with my handbrake but its for aluminum so I gouged a line with my cutoff wheel where I wanted it to bend.

I had to use Dougs copper trick to fill in some gaps. It works like a charm. I spent alot of time trimming/fitting this piece in. It wanted to sit crooked. I used my big level before and after across both #5 body mounts to make sure it sits right.


I had to get in the trunk to weld it. It was hairy to say the least. The car is about 40 in. off the ground on 4x4 and cinder blocks. The back is supported by 4 blocks and 2x6. Im not a skinny guy but it felt solid so I went for it. The car is still standing and I got it mostly welded in.

I might grind these trunk welds down smooth since you can see them. Im struggling with my plug welds. I think im running to hot. I start in the middle and work my way out but im blowing the edges away on the top metal. Also when Im butt welding if the gap is any thicker then a body saw blade I'm blowing holes in it. I had a hobart 140 but sold it for 500 with my 25 cu ft tank. I didnt have these problems when I practiced on scrap metal with my hobart. I have an eastwood 135 now and I think its not as user friendly. The arc seems really erratic. Sometimes it'll blow a hole the instant it touches the panel.Any advice is greatly appreciated.

Now I just gotta weld 1 more lip on where the back seat meets the inner wheelhouse. Then Im getting all the paint/undercoating off the wheelhouse to make sure I don't need to cut back further. I don't think I do, but I wanna make sure before I cut the new wheelhouse to fit. I gotta do the exact same to the driver side next and its worse, but I think its coming together nicely for a rook.
So I drilled out the spotwelds on the backseat brace and cut it out.
I've had this for a while. I moved it to 2 houses and Im glad I did. The 500 dollar parts car has really payed dividends. Heck I haven't even touched the car, just the spare parts the PO accumulated which includes a fox body 8.8 with g body spring perches and bolt pattern with disc brakes has trick chassis double adj. Uppers and lowers.
It wasn't exactly rust free though. I had to cut out a small rust hole on top. It was a 1/4 in rust hole but i know its worse on the back. It also gave me great access to inside the body mount to sand blast and paint. I also had to cut most of the inner wheelhouse lip out.
I had to build the lip that attaches to the inner wheelhouse. I bent it with my handbrake but its for aluminum so I gouged a line with my cutoff wheel where I wanted it to bend.
I had to use Dougs copper trick to fill in some gaps. It works like a charm. I spent alot of time trimming/fitting this piece in. It wanted to sit crooked. I used my big level before and after across both #5 body mounts to make sure it sits right.
I had to get in the trunk to weld it. It was hairy to say the least. The car is about 40 in. off the ground on 4x4 and cinder blocks. The back is supported by 4 blocks and 2x6. Im not a skinny guy but it felt solid so I went for it. The car is still standing and I got it mostly welded in.
I might grind these trunk welds down smooth since you can see them. Im struggling with my plug welds. I think im running to hot. I start in the middle and work my way out but im blowing the edges away on the top metal. Also when Im butt welding if the gap is any thicker then a body saw blade I'm blowing holes in it. I had a hobart 140 but sold it for 500 with my 25 cu ft tank. I didnt have these problems when I practiced on scrap metal with my hobart. I have an eastwood 135 now and I think its not as user friendly. The arc seems really erratic. Sometimes it'll blow a hole the instant it touches the panel.Any advice is greatly appreciated.
Now I just gotta weld 1 more lip on where the back seat meets the inner wheelhouse. Then Im getting all the paint/undercoating off the wheelhouse to make sure I don't need to cut back further. I don't think I do, but I wanna make sure before I cut the new wheelhouse to fit. I gotta do the exact same to the driver side next and its worse, but I think its coming together nicely for a rook.
Your getting to be an expert. As for weld blow through, could be a combination of things. The metal being thin, rusty on the back, heat to high, wire speed to fast. I have a Miller 210, I drop both heat and speed back a notch when I run into that situation. I always like to start a plug weld on the edges so it’s starting with 2 layers of metal. Keep it up, your doing DAMN GOOD especially for a ROOK
Thanks for the kind words. Im gonna practice plug welds from the edges in and see if that helps. Im getting better but im still nervous about welding anything on the outside of the car that people can see. Lucky for me I have a s### ton of welding to do that you cant really see.Your getting to be an expert. As for weld blow through, could be a combination of things. The metal being thin, rusty on the back, heat to high, wire speed to fast. I have a Miller 210, I drop both heat and speed back a notch when I run into that situation. I always like to start a plug weld on the edges so it’s starting with 2 layers of metal. Keep it up, your doing DAMN GOOD especially for a ROOK
PRACTICE,PRACTICE, PRACTICE, thats just what all the hidden welding gives you. Try different techniques to find which works best for you. By the time you get to welding the appearance areas you’ll know just where to set your welder controls. The biggest rule for that is SPACING your welds far enough apart and taking the time to let things cool.
Might want to try a plug welding clamp or a copper spoon to help prevent burn throughs.
I went ahead and fit the pieces into the pass wheelhouse. At the bottom, right by the body mount I had to repair rusted metal. I sandblasted in the seams and body mount.

Then I epoxied between the seams except where I want to plug weld. There's 3 layers of metal here from the Factory. I tried to recreate it. There's the body mount lip,trunk pan, and inner wheelhouse all welded together. If I wanted could I plug weld thru 2 pcs into the 3rd.

After welding all the lips onto the trunk pan I ground them all smooth and brushed on unreduced epoxy as thick as I could.

I started on the driver side wheelhouse. I cut out the wheelhouse that was rusty.


I decided I wanted to fix the body mount at the same time so I have something to tie the wheelhouse to. So..


I cleaned everything left with the clean n strip wheel. Put on rust converter for the minuscule rust left and started makin the trunk pan patch. I use cardboard as a pattern. I didn't take into acct the ribs in the trunk pan so I'm just gonna smash them so I can weld it in ok. Before I paint any new metal I wash it in dawn and hot water then wax/grease remover everything. Scuff with 80 and brush on the epoxy. It seems to work pretty good.

I dont know what goodmark sprays the panels with so I sanded it down and brushed on epoxy in between were I cant get when its all welded in.

I sandblasted inside the og body mount then sprayed rustoleum in there .When its all back together and on the tip over jig I plan to spray something inside of all the nooks.This is where I want to plug weld thru both of these pieces to the trunk drop off. If its a bad idea let me know I appreciate it.

I don't know if I should weld the patch to the mount and weld it in all together or weld them in seperately. Any advice is appreciated. Since it was 70 I opened the garage to clean and figured I should paint as much as I can while its nice.


I found out I have aluminum bumpers too. I went to stick my welding magnet on the bumper and it fell off. Now if I could only find an aluminum core support....
Then I epoxied between the seams except where I want to plug weld. There's 3 layers of metal here from the Factory. I tried to recreate it. There's the body mount lip,trunk pan, and inner wheelhouse all welded together. If I wanted could I plug weld thru 2 pcs into the 3rd.
After welding all the lips onto the trunk pan I ground them all smooth and brushed on unreduced epoxy as thick as I could.
I started on the driver side wheelhouse. I cut out the wheelhouse that was rusty.
I decided I wanted to fix the body mount at the same time so I have something to tie the wheelhouse to. So..
I cleaned everything left with the clean n strip wheel. Put on rust converter for the minuscule rust left and started makin the trunk pan patch. I use cardboard as a pattern. I didn't take into acct the ribs in the trunk pan so I'm just gonna smash them so I can weld it in ok. Before I paint any new metal I wash it in dawn and hot water then wax/grease remover everything. Scuff with 80 and brush on the epoxy. It seems to work pretty good.
I dont know what goodmark sprays the panels with so I sanded it down and brushed on epoxy in between were I cant get when its all welded in.
I sandblasted inside the og body mount then sprayed rustoleum in there .When its all back together and on the tip over jig I plan to spray something inside of all the nooks.This is where I want to plug weld thru both of these pieces to the trunk drop off. If its a bad idea let me know I appreciate it.
I don't know if I should weld the patch to the mount and weld it in all together or weld them in seperately. Any advice is appreciated. Since it was 70 I opened the garage to clean and figured I should paint as much as I can while its nice.
I found out I have aluminum bumpers too. I went to stick my welding magnet on the bumper and it fell off. Now if I could only find an aluminum core support....
- Status
- Not open for further replies.
Similar threads
- Replies
- 0
- Views
- 152
GBodyForum is a participant in the Amazon Services LLC Associates Program, an affiliate advertising program designed to provide a means for sites to earn advertising fees by advertising and linking to amazon.com. Amazon, the Amazon logo, AmazonSupply, and the AmazonSupply logo are trademarks of Amazon.com, Inc. or its affiliates.