BUILD THREAD “The Juggernaut”

84 W40

G-Body Guru
Dec 9, 2009
582
793
93
Apologies, I thought you may have missed it. Guys sometimes ask redundant questions that were addressed in the posts because they didn’t read the entire thing.

No, the Aeromotive pickup does not have a check valve or any such thing, it’s merely a straight vent port. Their reference to it in the instructions are vauge at best too, leaving it entirely up to the installer. I don’t view what I’ve done as unsafe, as I haven’t omitted any safety equipment other than the rollover valve. I really would’ve rather used it, I went to the trouble of getting one even, but with the way our fuel systems are vented from the factory and the unavailability of true vented gas caps for our cars, I didn’t really see any other option short of reinstalling a stock style charcoal canister again.

Which I definitely didn’t want to do.

As far as charcoal canisters and fuel smells are concerned, I truly do believe it’s a select few individuals that have less than adequate and poorly designed/executed fuel system changes that’s causing their issues. In my other Cutlass “Olds Cool “, I eliminated and removed the charcoal canister and all it’s related components, and installed the exact same K&N breather under the trunk floor, just forward of the tank. I parked the car in my garage under all circumstances (hot, cold, full, empty, hot/humid days etc) and had absolutely zero fuel odours.

Really, the only time there should be any fuel smells present is when the fuel itself is very warm, and/or under pressure in the tank. (expansion). If the tank is vented, there is no way for the tank to be pressurized, therefore no pressure to push the smells and vapors out. I honestly do believe the majority of issues people have posted are because of deficiencies in their fuel systems causing pressurized tanks. If anything, you would think the opposite should be true, there should be a slight to moderate vacuum within the tank as the fuel gets consumed with an improperly vented system, that would slowly equalize as the tank was able to pull air back in.

A bit of speculation and theorizing here I realize, but it’s all based on logical reasoning and real world physics. I welcome the discussion on this, hope it helps you, and look forward to seeing what you do with yours.

Donovan
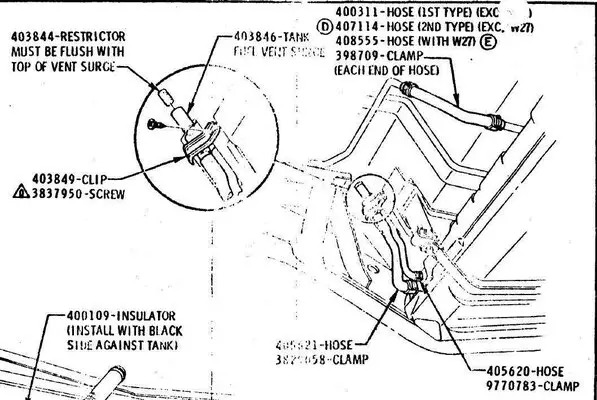
The way you vented your tank reminds me how my 68 and 69 442 was vented from the factory. I never had any smell of gas in my garage. This is what it looked like

_12784_FT3127Z.jpg 1970fuelventsurge_5c948737d20c9f46885a5d13bf25ba133404c5ce.jpg
 
  • Like
Reactions: 3 users
Oct 14, 2008
8,826
7,779
113
Melville,Saskatchewan
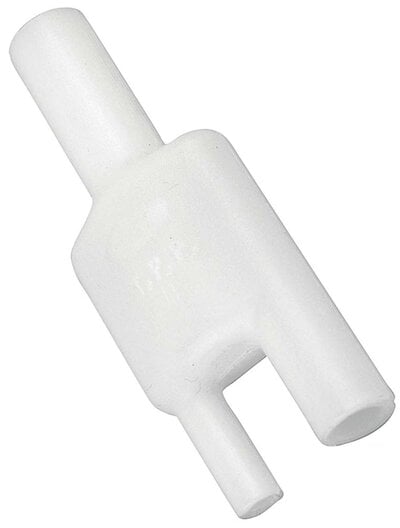
Yeah, my 70S has that white plastic vent. I like Donovan's version, looks nice.
 
  • Like
Reactions: 1 user

Rktpwrd

Builder of Cool Shjt
Supporting Member
Feb 2, 2015
4,171
23,921
113
Calgary, Alberta, Canada
Thanks Donovan, somehow forget or missed them. I really like the new chamber, notch on the end and other improvements. Your set looks less rough and what expect they should look like than the set that flowed 245ish cfm. 500HP should be easy, peasy for you. Yeah, that is what I guessed for price. Thanks.

No problem, my pleasure. For that price, I’ll take every chance I can get to show them off!
😅

Wow! Say that really fast, and maybe it won't hurt quite as much! I hope that those heads will live up to your expectations Donovan.

Yeah, agreed here too Jeff. It was quite the expenditure and a tough pill to swallow, but if you’re going to spend money for horsepower, the heads are where you do it. Everything else just goes round and round and up and down.

The way you vented your tank reminds me how my 68 and 69 442 was vented from the factory. I never had any smell of gas in my garage. This is what it looked like

View attachment 217202 View attachment 217203

Huh, who knew? It’s rewarding and redeeming to see my thought processes were correct in their execution if the factory did something similar!

Thanks for posting that.
 
  • Like
Reactions: 1 users

Rktpwrd

Builder of Cool Shjt
Supporting Member
Feb 2, 2015
4,171
23,921
113
Calgary, Alberta, Canada
Wrapped up the driver’s side inner wheel tub close out panel tonight.

9F3430F5-3431-4779-86DF-565D875F1153.jpeg


For those of you who thought this was a pretty gravy little project for ole Rktpwrd, you’d be sorely mistaken. It was quite time consuming and particular, with lots of behind the scenes work that no one would ever suspect. Just for reference, this is but a sampling of just some of the tools this required:

2ADC8B08-399D-4CD7-99BF-A5B34CC73B46.jpeg


Not to mention little things like the welder, air compressor, light, etc. Cleanup is usually a pretty good indicator of the amount of work it took too, my calibrated arm says the dust pan weighed about 2 1/2” pounds by the time it was all said and done.

I picked up this little swivel air tool fitting last week, without it the work would’ve been just about impossible:

B6EB8873-07BC-4F73-B3D1-1E8819C88639.jpeg


With the air hose hanging straight down from the tool, it gets hung up on the brake rotor, caliper, and rearend. Having this little guy was a real life saver, it allowed me to achieve the angles I needed without interference.

The entirety of the close out panel was made up of 3 different pieces, the long flat piece was the main one, with 2 smaller ones completing the ends. This one at the front of the tub was by far the most difficult to make. A lot going on here with multiple angles and transitions, reverse curves, and an angled flange that got spot welded to an existing piece that doesn’t line up with anything else:

A53FC24C-D57F-4C52-81B8-79DAE1262BAC.jpeg


The gap between the spot welded flange and the rest will get filled with seam sealer before undercoating, just to seal it all up nice and keep water from having a place to get in. The seam between the inner and outer tubs needs to be sealed up as well anyways, so not a big deal to do that gap at the same time.

Took a bit of doing, but it transitions quite nicely into the main piece:

78E2BFFC-A59E-4184-8071-01F4E8896FA8.jpeg


I know it looks tight, but there’s plenty of room around the parking brake cable, about a fingers width:

61A7C8A8-43BE-4AB2-B42D-7F66C9B953F8.jpeg


BFCBE746-D2FF-4283-A412-D85390089A0D.jpeg


I know not much of it is visible with the wheel on and the car aired down, but at least what you can see looks like it’s supposed to.

7BD515CF-59F9-4422-B097-95229C598F9B.jpeg


More will be visible with the car at ride height.

Adding this piece in was definitely worth it, the 2 end pieces especially added a lot of additional strength to the inner tub. Plus, the additional protection from road debris it affords for the fuel, air, and newly added vent lines is yet more justification for doing it.

Might take a break from it for a bit and go back to working on my “secret” project for a while, but the passenger’s side might make for a decent little project for Mike to work on during his days helping out here.

D.
 
  • Like
Reactions: 14 users

Streetbu

Know it all, that doesn't
Supporting Member
May 22, 2011
3,737
11,587
113
Central NY
Looks great Donovan. I have one of those swivels as well. But I put mine on my hose so all of the air tools can get into tighter spots. They do seem to wear out after a year or two, but its worth it to me. Plus they are cheap to replace.
 
  • Like
  • Agree
Reactions: 3 users

melloelky

Comic Book Super Hero
Oct 22, 2017
4,163
9,569
113
mass
Looks great Donovan. I have one of those swivels as well. But I put mine on my hose so all of the air tools can get into tighter spots. They do seem to wear out after a year or two, but its worth it to me. Plus they are cheap to replace.
they're a nice addition for sure,kid i work with runs the dynabrade's and they last but they're to pricey for me.
 
  • Like
Reactions: 2 users

Streetbu

Know it all, that doesn't
Supporting Member
May 22, 2011
3,737
11,587
113
Central NY
I've been buying the $12 at HF. First one was from from Snap-On and it didn't last any longer
 
  • Like
Reactions: 2 users

Rktpwrd

Builder of Cool Shjt
Supporting Member
Feb 2, 2015
4,171
23,921
113
Calgary, Alberta, Canada
Got The ‘Naut down off the jackstands and cleaned up a bit tonight, as she’s going to be receiving a visit from some GBF royalty. The one and only motorheadmike and Cauterize are both coming on different days this week for a look-see and get together.

4317FB73-C779-4957-B0B8-EFC849AD59E8.jpeg


Been a while since I’ve seen her back on the ground and laid out. The pictures don’t convey just how low she is, or her sinister attitude. This is motivation personified.
Love it.
 
Last edited:
  • Like
  • Wow
  • Love
Reactions: 15 users

Rktpwrd

Builder of Cool Shjt
Supporting Member
Feb 2, 2015
4,171
23,921
113
Calgary, Alberta, Canada
D70E7B0E-DFB9-4FB0-B57A-2EB8B9D13FA2.jpeg


DBD92C30-B2ED-4411-85A8-F4FAECB475BC.jpeg


D261B933-EB07-4899-AD43-387970D89080.jpeg


F815454B-94A1-4E54-BF49-B915AEE42535.jpeg


E453DE90-01C5-4F8F-81BF-07C142A08B08.jpeg


C76431C6-5123-43ED-AC62-523387327595.jpeg
 
  • Like
  • Love
  • In Love
Reactions: 18 users

69hurstolds

Geezer
Supporting Member
Jan 2, 2006
8,201
17,605
113
Might want to throw some wax on that thing. Paint is looking a little flat. :ROFLMAO:
 
  • Like
  • Haha
Reactions: 1 users

GBodyForum is a participant in the Amazon Services LLC Associates Program, an affiliate advertising program designed to provide a means for sites to earn advertising fees by advertising and linking to amazon.com. Amazon, the Amazon logo, AmazonSupply, and the AmazonSupply logo are trademarks of Amazon.com, Inc. or its affiliates.

Please support GBodyForum Sponsors

Classic Truck Consoles Dixie Restoration Depot UMI Performance

Contact [email protected] for info on becoming a sponsor