What did you do to your non g-body project today [2025 edition]
- Thread starter 86LK
- Start date
You are using an out of date browser. It may not display this or other websites correctly.
You should upgrade or use an alternative browser.
You should upgrade or use an alternative browser.
bit dirty but no visible tears in the fabric. removed the passenger seat, drivers seat too far back to get bolts out, power seat wouldn't move even though dash lights up, have to chk fuses later, apply direct battery power if needed
jacked it up so I could get underneath, placed on cut pieces of railroad ties
you know, the 2nd row is in good enough shape you can pull it and install it as as some sort of backrow seat with the ability to flip down and tumble forward.


jacked it up so I could get underneath, placed on cut pieces of railroad ties
you know, the 2nd row is in good enough shape you can pull it and install it as as some sort of backrow seat with the ability to flip down and tumble forward.


Last edited:
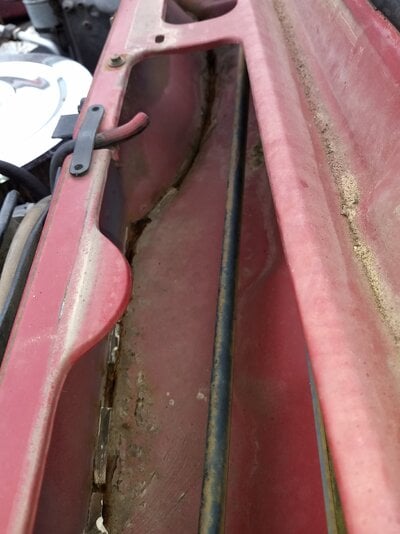
Chased more wiring- Beverly originally came from the factory with a th350C but it's been swapped for a regular unit and the electrical is now just hanging. Well, some of it has been extremely securely tied, wedged, or otherwise lodged in a crevice after being hacked up and changing colors 4 times. The damn choke wire (factory) has been spliced into and the extra lead goes nowhere, plus the whole shebang is T'd into the freakin' alternator. Maybe they forgot about tapping into the oil pressure sending unit? I found a few plugs that were disconnected but have yet to find why I have no reverse lights, and need to probe a few things to see if there's even power.
I also managed to scrape the sealer from the wiper cowl area, cover it in Rust Inhibitor Primer, and squirt new sealer in. Naturally, I'll be painting the entire area again later:
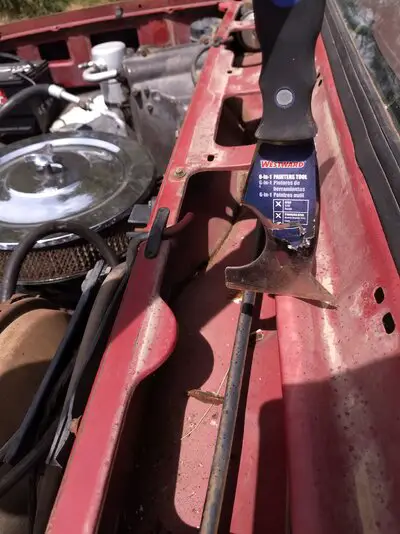
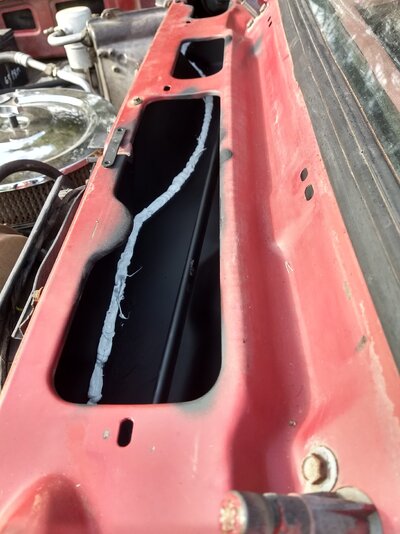
Yeah, it's not the prettiest but it'll do.
I also managed to scrape the sealer from the wiper cowl area, cover it in Rust Inhibitor Primer, and squirt new sealer in. Naturally, I'll be painting the entire area again later:


Yeah, it's not the prettiest but it'll do.
It's a driver, and it's in the cowl. It's not the Juggernaut. Weatherproofing accomplished. Nice improvement.Chased more wiring- Beverly originally came from the factory with a th350C but it's been swapped for a regular unit and the electrical is now just hanging. Well, some of it has been extremely securely tied, wedged, or otherwise lodged in a crevice after being hacked up and changing colors 4 times. The damn choke wire (factory) has been spliced into and the extra lead goes nowhere, plus the whole shebang is T'd into the freakin' alternator. Maybe they forgot about tapping into the oil pressure sending unit? I found a few plugs that were disconnected but have yet to find why I have no reverse lights, and need to probe a few things to see if there's even power.
I also managed to scrape the sealer from the wiper cowl area, cover it in Rust Inhibitor Primer, and squirt new sealer in. Naturally, I'll be painting the entire area again later:
View attachment 254472View attachment 254471
Yeah, it's not the prettiest but it'll do.
Thanks for the compliment and for making me laugh.It's a driver, and it's in the cowl. It's not the Juggernaut. Weatherproofing accomplished. Nice improvement.
Got into the third set of tail lights trying to make the custom ones I want, this time it went a lot better but know when to stop while I'm ahead. Gonna have the mechanic look at how to make the curve cuts cause I couldn't with the wheel I was using. But will only bore you with two pics here, the rest I'll throw in the build thread


None. I left those plates in the soup for around three days and shook the pot once to agitate the slurry. Cracked the lid to remove them and found most of the brake clean was still there. The pot having a tight fitting lid helped as it prevented evaporation of the soup.I've tried the same process on a much smaller scale on completely different parts. I'm curious what effect it has on the clutch material, if any? Seems like a good solution provided it's not $9 a can where you live. Do you suppose that denatured alcohol would do the trick? Most have a fair amount of methanol, benzene, and acetone- I've never looked into what they'd do to clutch frictions though...
Found a lot of crud at the bottom of the pot. Took out the disks and used a non-metallic parts cleaning brush, sort of like an over large toothbrush and gave them a good brushing then sprayed them down again and hit them with compressed air. When dry you could see the metallic dust that Barnett used when it formulated the friction material. They even visually came close in thickness to the new ones; very ,little wear to speak of and they have been in continuous service without maintenance or adjustment since before the turn of the millenia!
The thing with the brake cleaner spray that I use is that it has no Chloro-Fluoro-Carbons or CFC's in it. Not sure what they used as the active ingredient; a lot of mfgrs are now going to acetone due to the Cali Follies and Prop65 among other things. CRC , the brand that I use, just pulled their old formula off the shelf and replaced it with a new formulation. I was able to have my supplier bring some in for me to test so the carb is going to get to be the guinea pig.
As for the balance of the project, I summarily elected to tear down the rest of the clutch assembly and pull the inner hub. Once off the mainshaft it bore witness to the extent of the wear and damage that it had suffered; major necking of most of the alignment studs. Basically you get a skinnier diameter where the plates are supposed to ride which makes them hang up and jam; not releasing cleanly or completely. So the inner hub, the friction disks, and some assorted other components are going to get replaced. Laid the list on my Indie bike shop this PM and might get them in by the end of the month.
Nick
Last edited:
Aside from all of the above, I did manage to mix up some J-B two part epoxy and fill in the oversized holes in the dash frame to which the gauge fascia was supposed to get attached. Even with mediocre heat the mixture set quite hard and has been sitting for around a week at the least. Tomorrow is a free day so back into the shop to locate and tag some pilot holes so that I can drill and tap the bosses back to a useable diameter again. Also time to initialize the O-2 sensor so I will see how that goes.
Nick
Nick
Got 99% there installing my new receiver but now somehow one of the height speaker wires isn't long enough so gonna end up running a new longer line and then hopefully get it all up and running tonight


Success!
First, I was actually able to generate enough mental enthusiasm that I could override my body's physical reluctance and head out to the shop. Harder than it seems sometimes.
Once there I got back on the dash frame work and was able to re-drill the two bosses that had become hogged out and useless a few years ago. The JB worked as advertised. I did the actual drilli8ng by hand as the steering wheel sits right dead nuts in front of the two holes and effectively blocks any access for a drill. Just as well because doing it by hand let me control the speed and accuracy of the hole; oh yeah, by hand, I do mean by hand, literally like running a wood screw into a plank. I used the fascia as the drilling guide and started with a self drilling sheet metal screw. That gave me a dimple into which I could center the drill bit and after that it was just like running in a normal screw.
Once I had the holes out to the diameter I thought would work, the next step was to root around in the bin that held all the car trim screws and see if I could locate three that matched for length and screw pitch and head size. And I actually found them!!!! After that I used those screws as my taps to cut the thread, and that worked, so on went the dash face and back in went the screws. Thing One done.
Thing Two
So I have posted a few times about my adventures with installing an AFR gauge in my G-10 body. Almost to the day before I got called in for orientation and shifts, I did manage to complete the wiring harness for the relay that Innovate insists has to be used with their gauge. All that remained was to initialize the sensor. That happens in two steps for those who have experienced the unmitigated joy of dealing with one of these suckers. Step One is to boot the gauge itself up without the O-2 sensor in the circuit and let it "learn" takes a couple of minutes. Only complication in my case was that the first couple of tries came up bupkus. Nothing too heavy; I had left the fused power lead to the relay off the plus terminal on the battery so it needed to be installed, and kill switch in the ground terminal actually worked so the switch had to be turned on. After that, on with the key and watch the pretty lights for a minute or so, then turn it off again.
Step two is to locate the essential last component, aka the actual O-2 sensor and plug it in to its harness. Remember to take the cute little plastic cover off the end or it will melt and bugger the sensor; no I didn't forget, surprisingly. Then back to the key and turn it on again. What this does is to check the heater portion of the sensor and calibrate the actual AFR ratio by giving the gauge a max reading as a reference point. Max in this case was 22/4, which is so lean that by comparison a toothpick needs to go on a diet.
There is still a Thing Three but that requires me to emulate Mr. Snakie-Sneer and slip under the van to pull the plug out of the O-2 bung and screw the sensor into position. For that you can dismount the sensor from its harness and install it by itself, then remake the connection; apparently, according to the destructions, that doesn't disturb the set up.
The bike?
Is on hold until the clutch parts come in. Maybe by month end I can get that sorted out and move on the carb.
Big Tip of the Day Here, don't let your toys sit: play with them or they get sulky and misbehave.
CopperNick
Similar threads
- Replies
- 106
- Views
- 5K
- Replies
- 254
- Views
- 12K
- Replies
- 6
- Views
- 620
- Replies
- 17
- Views
- 2K
GBodyForum is a participant in the Amazon Services LLC Associates Program, an affiliate advertising program designed to provide a means for sites to earn advertising fees by advertising and linking to amazon.com. Amazon, the Amazon logo, AmazonSupply, and the AmazonSupply logo are trademarks of Amazon.com, Inc. or its affiliates.


