

Thanks Ace! I haven't updated the build thread in a while because I've been sidetracked by cold weather. The 5.3 engine arrived last week, but I probably won't get much done on the installation until Spring. In the meantime, I'll use whatever warm days we get to continue the rust repair in the floorboards. I'd like to get the interior back together before we dig into the engine and trans install.The Muscle rods conversion will make it easy. I am finishing up an LS3 6L80e build now and if I have learned anything it is buy parts designed to work together. Buying all the "good stuff" from the various manufacturer's does not mean they are going to all work and fit well with one another. Here is a pic of mine and you can see how well it all fit, even the much bigger trans.
EL CAMINO 1983 El Camino 5.3 Swap / Build Thread
- Thread starter JohnIL
- Start date
You are using an out of date browser. It may not display this or other websites correctly.
You should upgrade or use an alternative browser.
You should upgrade or use an alternative browser.
- Status
- Not open for further replies.
Very cool project.
I too just recently picked up a 1983 El Camino, 305 carb with 3 speed auto. I'm trying to decide which direction I'm going to go with it......... kinda wanting to do a 70 SS 454 El Camino styling project, paying homage to the old big block trucks, and throwing a big inch LS into it.
Ive already got on 468" LS powered car...don't know if I need to build another monster N/A car. 🙂
That sounds awesome!!! I like the 5.7 Diesels for their uniqueness. I would totally buy that motor if I could and if your project works out, which I believe it will! keep us updatedI'm new to the forum, but I've been reading through old threads as research for a build my son and I are starting. We're doing an LS swap (actually an iron block 4.8L) with an 4l60E transmission swap into a 1983 El Camino SS. This will be my son's first car when he turns 16 in just over a year. Rather than invest in a new (used) car for him to drive, we wanted something that he can use to learn about cars and take some pride in. My dad and I spent lots of time together in the garage when I was young and I want to do the same with my own son. The car/truck has quite a bit of family history, which makes it worth more to us than its paltry market value. Back in high school, I bought a 1981 El Camino from my uncle. I swapped out the blown (thrown rod) V6 and 3sp manual for a 350 SBC and TH350 auto. By the time I was done, it was 400hp street racer. I've grown up now, sort of, and my El Camino is long gone. But, I get to relive my youth vicariously through my son. The 1983 El Camino we're starting with is a gift from my dad to my son. Dad bought it from the same uncle I bought mine from. In fact, my uncle bought this El Camino to replace the one he sold to me! Fast forward WAY too many years and we're back in the G-Body business.
About the car
1983 El Camino SS
Brown on brown on brown (seriously boring!)
Factory 350 Oldsmobile Diesel (Who ever heard of a diesel SS anyway?)
Stock interior, stock suspension, stock everything else.
Our plans
Goal: Cool old car with modern performance and reliability
Engine: 4.8L Vortec take-out engine. We plan to keep the engine stock. I'm not ready for my son to have a hot rod just yet. The 4.8 will have way more juice than the doggy old diesel anyway.
Transmission: Stock 4L60E take-out. We wanted a modern reliable overdrive transmission. Since the engine will be stock, there was no need for anything beefier than a 4L60E.
Suspension: We're starting with new stock height cargo-control rear springs and air bags (limited hauling capacity was always one of my pet peeves). Next up is a rear anti-sway bar and new poly front anti-sway bar end links (body roll was another pet peeve). The goal is to make it ride and drive more like a modern vehicle. Depending on how it handles, we might replaced the stock front anti-sway bar with something beefier and add front and rear frame braces. It's not intedended for autocross, but I want it to handle better than my old '81 did. While we're under there, we'll freshen up the brakes with new calipers & pads and cylinders & shoes. Again, nothing exotic, just fresh and reliable.
Body: There's a good bit of rust repair needed in the quarter panels and doors. Once the holes are patched and everything is smoothed out, we plan to repaint with the original light brown base color. To liven it up a little, we will repaint the below-the-beltline two tone in dark red (instead of dark brown) with bright red SS stripes.
Interior: The dark brown interior is so retro that it's actually back in style again. It is almost exactly the same shade of brown as my 2015 GMC pickup. And, my son digs the old school bench seat. So, the interior will stay pretty much stock, with a modern touch-screen sound system (of course).
Wheels & Tires: American Racing Outlaw I wheels (my son has the same taste in wheels as his old man!). 15x7 in front, 15x8 in back. Cooper Cobra tires. 235/60-R15 up front, 255/60-R15 in back. We haven't order the wheels and tires yet. If you know of any clearance problems with these sizes, please let us know!
The pile of parts
We're getting the engine, transmission, ECM, and harnesses from Tilden Motorsports. While we're waiting for the engine and trans to arrive, we've starting collecting parts.
Muscle Rods G-Body LS conversion stuff
Engine mounts
Transmission cross member and rear mount
LH8 Oil Pan
In-tank fuel pump kit
Fuel line and regulator kit
Aluminum G-body LS radiator
Trans cooler line kit
Power steering line kit
Electric to mechanical speedometer controller
Moog cc627 Variable Rate Cargo Control rear coil springs
AirLift 60733 1000lbs rear air bags
Energy Suspension poly front anti-sway bar end links
Hellwig 5815 rear anti-sway bar
Stock replacement master cylinder and brake booster (Diesel master cylinder is completely different)
Stock replacement front brake calipers and pads
Stock replacement rear brake cylinders and shoes
That should keep us busy for a while. Lots and lots of details yet to be worked out. I've done lots of engine swaps, but this is my first LS swap. I'm sure I'll have lots of questions for the forum along the way.
I'm including a picture of the car and the proud new owner.
Thanks in advance for any advice you can share. This should be a fun adventure!
John
GM Diesel Fan,That sounds awesome!!! I like the 5.7 Diesels for their uniqueness. I would totally buy that motor if I could and if your project works out, which I believe it will! keep us updated
If you're serious about wanting the 5.7 Diesel, it's definitely available. It ran fine when my father parked the Elco about 17 years ago. He parked the car because of brake issues. It was stored in a garage the entire time. The engine is not stuck (I rotated it to remove the torque converter bolts during the removal). And, it's 100% complete. I also have the working TH-350 trans that came with it. I even have the rare and illusive HD radiator with integrated trans cooler AND oil cooler. I only have an inkling of how much of this is worth, but I'll definitely entertain offers.
John
This is something i'll definitely think about. definitely one of my favorite motors. But obviously, don't want to set anything in stone. Just something I thought about because I haven't seen those motors that often. by the way, wasn't trying to get your hopes up or anything but those motors are definitely interestingGM Diesel Fan,
If you're serious about wanting the 5.7 Diesel, it's definitely available. It ran fine when my father parked the Elco about 17 years ago. He parked the car because of brake issues. It was stored in a garage the entire time. The engine is not stuck (I rotated it to remove the torque converter bolts during the removal). And, it's 100% complete. I also have the working TH-350 trans that came with it. I even have the rare and illusive HD radiator with integrated trans cooler AND oil cooler. I only have an inkling of how much of this is worth, but I'll definitely entertain offers.
John
Finally, some progress...
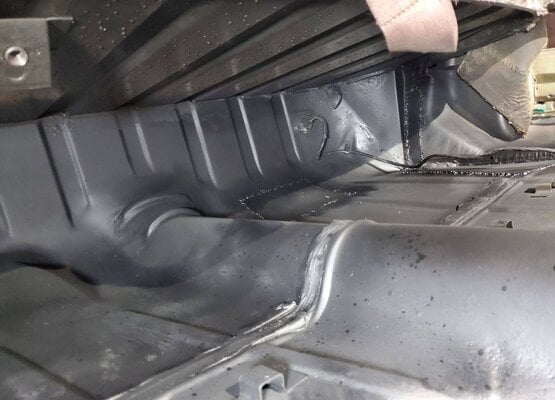
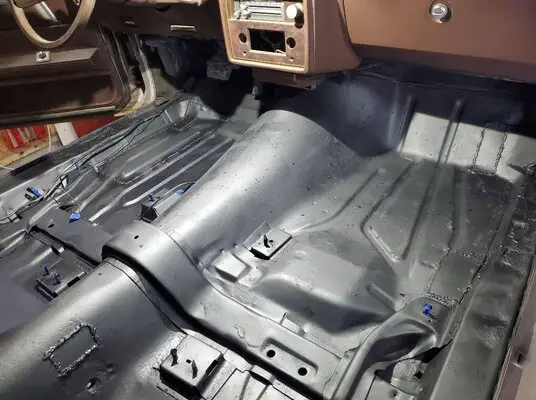
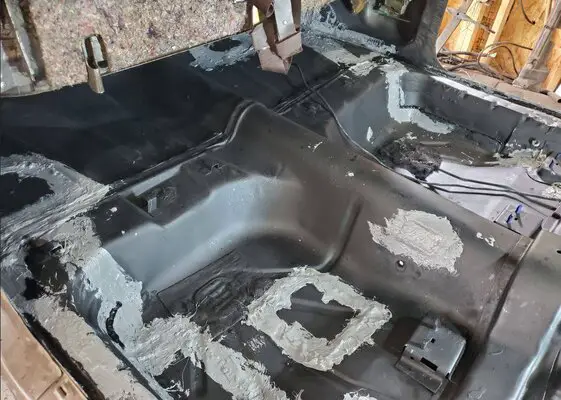
After a long cold winter and and, so far, a cool damp spring, the weather is finally starting to cooperate and it's warm enough for some serious garage time. All the way back in September of last year, we started cutting rust out of the floor pans and welding in patch panels. We got about 2/3 of the new steel welded in before winter set in and it got too cold to play in the garage. Now that we're into spring, I took a couple of days off of work to button up the floorpans. Pictures below. New steel is welded in, everything has been treated with Eastwood Rust Converter, and coated with Eastwood Rust Encapsulator. Now that the floor pans are all one color, it feels like real progress.
We have seam sealer on order. Once that arrives, everything will get sealed up from above (undercarriage comes later). Next comes Kilmat sound deadening mat. Then, finally, after almost a year, the original carpets and seats can go back in. We will need to install a new headliner, at some point, and replace some small interior parts. But, for now, our goal is to have the carpets, seats, and trim back together by the end of June so we can move on to the mechanicals.
The drive train is quietly waiting in the wings along with a bed-full of motor mounts, transmission cross member, radiator, ECU, fuel system, and electrical, etc, etc, etc. Stay tuned...
Attachments

The Interior Goes Back Together
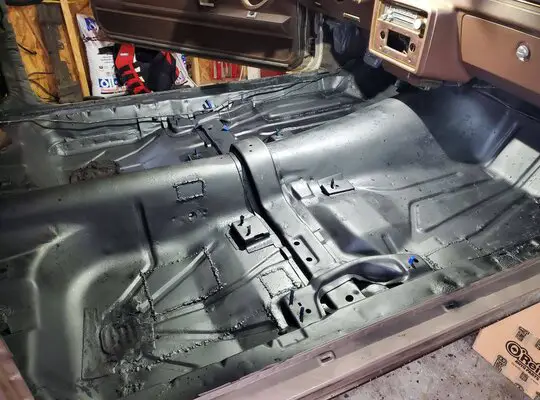
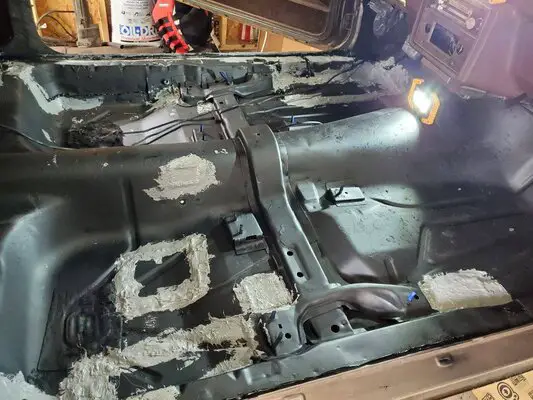
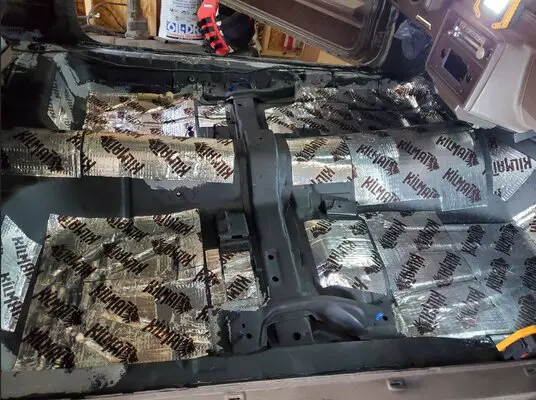
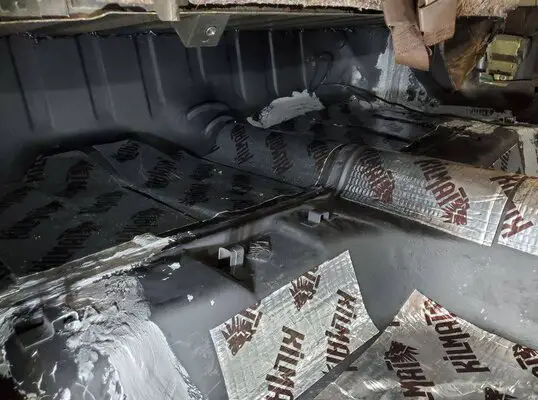
Finally, the rust repair on the floors is finished. I got a week off from work and spent as much of that time as possible in the garage. We started the week sealing up the floors, sound deadening the cabin and reinstalling the interior. We used Eastwood brushable seam sealer to coat all of the panel seams and the patch panels. You can see from the pictures that my son and I are absolutely NOT professional seam sealers. We wasted a lot of material, but I'm confident that we got it all sealed. The next day, we installed Kilmat sound deadening sheets on as much of the floor as possible, before reinstalling the original carpeting, seats and trim. We have enough Kilmat left to deaden the doors (when we do the body work) and the ceiling (when we replace the sagging headliner). But, for now, we're done inside the cabin.
Finally, the rust repair on the floors is finished. I got a week off from work and spent as much of that time as possible in the garage. We started the week sealing up the floors, sound deadening the cabin and reinstalling the interior. We used Eastwood brushable seam sealer to coat all of the panel seams and the patch panels. You can see from the pictures that my son and I are absolutely NOT professional seam sealers. We wasted a lot of material, but I'm confident that we got it all sealed. The next day, we installed Kilmat sound deadening sheets on as much of the floor as possible, before reinstalling the original carpeting, seats and trim. We have enough Kilmat left to deaden the doors (when we do the body work) and the ceiling (when we replace the sagging headliner). But, for now, we're done inside the cabin.
Attachments
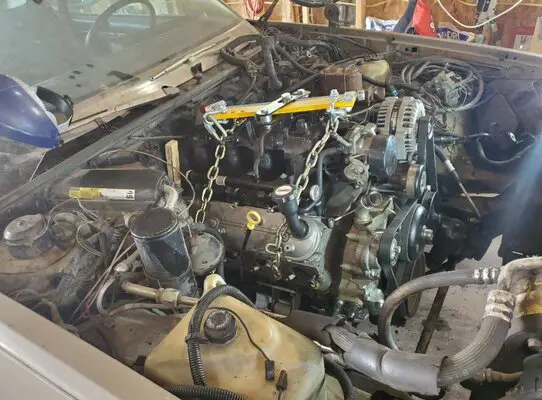
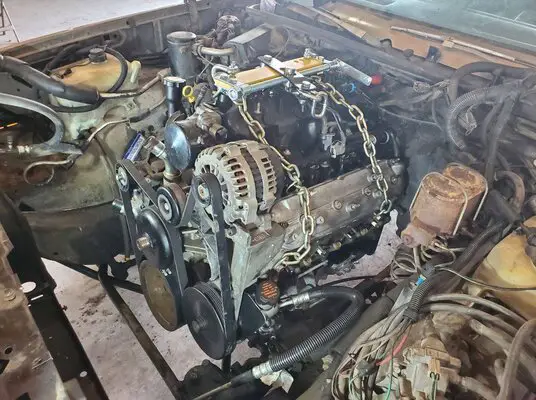
The El Camino Officially has an LS!!!
After my son and I got the interior back together, I spent the last couple days of my vacation getting started on the drive train installation. I've never worked with an LS engine, so I'm moving in slow motion and learning as I go.
I started by removing the stock truck exhaust manifolds. Amazingly, all of the bolts came out without breaking. I really wasn't looking forward to fighting broken bolts. Crisis averted, thankfully.
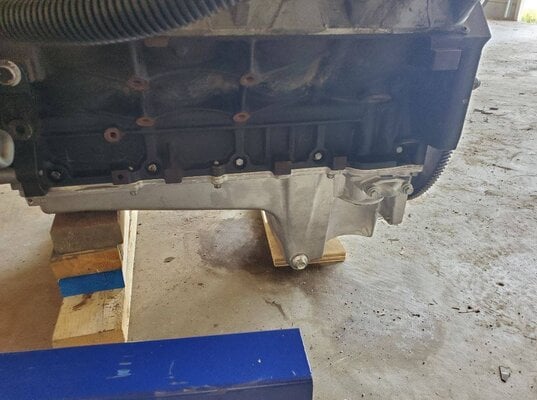
Next, hoisted the engine up in the air so I could pull the stock truck oil pan, pickup tube, and windage tray. I replaced them with a new LH8 pan, tube, and tray from Muscle Rods.
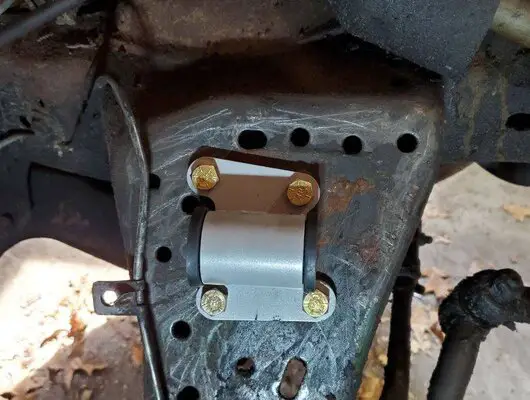
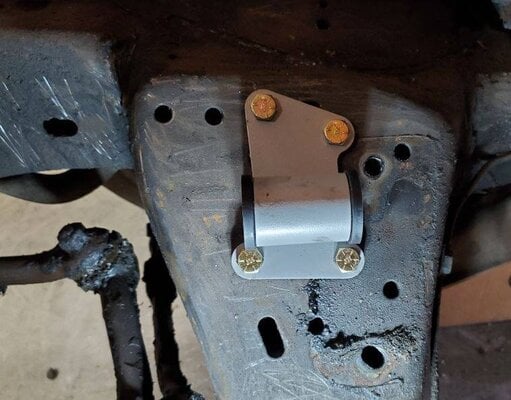
With the bottom end buttoned back up, I moved onto the engine mounts (also from Muscle Rods). The instructions really didn't help much with the position of the engine mounts. Luckily, the bolt holes only lined up one way on the front cross member. I'm including a couple of pictures to help the next guy who uses this kit.
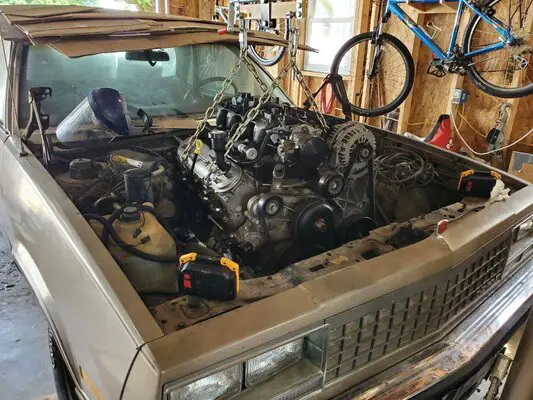
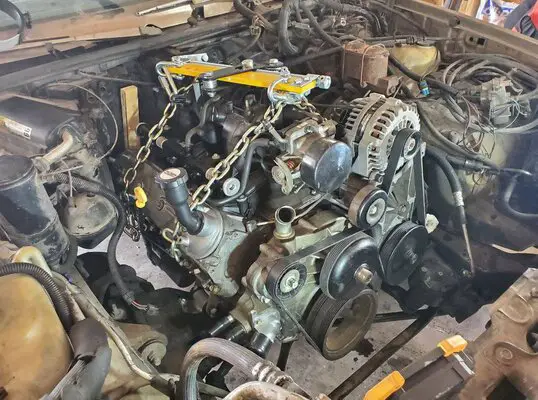
With the engine mounts bolted loosely to the block, I dropped the engine into place. I had to temporarily remove the driver's side accessories (power steering pump and alternator) to avoid bashing the power steering pump into the steering gearbox. With that out of the way, the engine settled down into place. The toughest part of the process was getting the nuts on the back side of the engine mount bolts inside the cross member.
So, the El Camino officially has an LS. There's still a LONG way to go before it runs, but at least it's in the car.
Next up, when I get more time, is installing the 4L60E transmission and the transmission cross member that came with the Muscle Rods kit. More to come...
After my son and I got the interior back together, I spent the last couple days of my vacation getting started on the drive train installation. I've never worked with an LS engine, so I'm moving in slow motion and learning as I go.
I started by removing the stock truck exhaust manifolds. Amazingly, all of the bolts came out without breaking. I really wasn't looking forward to fighting broken bolts. Crisis averted, thankfully.
Next, hoisted the engine up in the air so I could pull the stock truck oil pan, pickup tube, and windage tray. I replaced them with a new LH8 pan, tube, and tray from Muscle Rods.
With the bottom end buttoned back up, I moved onto the engine mounts (also from Muscle Rods). The instructions really didn't help much with the position of the engine mounts. Luckily, the bolt holes only lined up one way on the front cross member. I'm including a couple of pictures to help the next guy who uses this kit.
With the engine mounts bolted loosely to the block, I dropped the engine into place. I had to temporarily remove the driver's side accessories (power steering pump and alternator) to avoid bashing the power steering pump into the steering gearbox. With that out of the way, the engine settled down into place. The toughest part of the process was getting the nuts on the back side of the engine mount bolts inside the cross member.
So, the El Camino officially has an LS. There's still a LONG way to go before it runs, but at least it's in the car.
Next up, when I get more time, is installing the 4L60E transmission and the transmission cross member that came with the Muscle Rods kit. More to come...
Attachments
-
 oil-pan.jpg117.4 KB · Views: 201
 -
 EngineFrameMountDriverSide.jpg72.1 KB · Views: 190
 -
 EngineFrameMountPassengerSide.jpg63.5 KB · Views: 191
 -
 EngineInstallProcess1.jpg169.3 KB · Views: 199
 -
 EngineInstallProcess2.jpg170.9 KB · Views: 197
 -
 EngineInstallProcess3.jpg144 KB · Views: 202
 -
 EngineInstallProcess4.jpg162.8 KB · Views: 195
Last edited:
I used all Muscle rods stuff putting an LS3 into my 87 SS Elco. I have told many people the best advice I can give anyone is go with a single fit (mounts, headers, etc) solution to make sure everything is going to work together instead against one another. I have been on both sides of that fence.....The El Camino Officially has an LS!!!
After my son and I got the interior back together, I spent the last couple days of my vacation getting started on the drive train installation. I've never worked with an LS engine, so I'm moving in slowing motion and learning as I go.
I started by removing the stock truck exhaust manifolds. Amazingly, all of the bolts came out without breaking. I really wasn't looking forward to fighting broken bolts. Crisis averted, thankfully.
Next, hosted the engine up in the air so I could pull the stock truck oil pan, pickup tube, and windage tray. I replaced them with a new LH8 pan, tube, and tray from Muscle Rods.
With the bottom end buttoned back up, I moved onto the engine mounts (also from Muscle Rods). The instructions really didn't help much with the position of the engine mounts. Luckily, the bolt holes only lined up one way on the front cross member. I'm including a couple of pictures to help the next guy who uses this kit.
With the engine mounts bolted loosely to the block, I dropped the engine into place. I had to temporarily remove the driver's side accessories (power steering pump and alternator) to avoid bashing the power steering pump into the steering gearbox. With that out of the way, the engine settled down into place. The toughest part of the process was getting the nuts on the back side of the engine mount bolts inside the cross member.
So, the El Camino officially has an LS. There's still a LONG way to go before it runs, but at least it's in the car.
Next up, when I get more time, is installing the 4L60E transmission and the transmission cross member that came with the Muscle Rods kit. More to come...
Ace,I used all Muscle rods stuff putting an LS3 into my 87 SS Elco. I have told many people the best advice I can give anyone is go with a single fit (mounts, headers, etc) solution to make sure everything is going to work together instead against one another. I have been on both sides of that fence.....
If the Muscle Rods mounts work for your LS3, they'll certainly hold down our stock 5.3! On a related note, did you have any trouble with hood clearance? It looks to me like the alternator (with the stock truck accessory brackets) will be too high. I opened a separate thread about it, but I haven't heard from anyone who has used the Muscle Rods engine mounts. Your experience is much appreciated.
Thanks.
John
- Status
- Not open for further replies.
Similar threads
- Replies
- 8
- Views
- 569
- Replies
- 2
- Views
- 269
GBodyForum is a participant in the Amazon Services LLC Associates Program, an affiliate advertising program designed to provide a means for sites to earn advertising fees by advertising and linking to amazon.com. Amazon, the Amazon logo, AmazonSupply, and the AmazonSupply logo are trademarks of Amazon.com, Inc. or its affiliates.