EL CAMINO 1983 El Camino 5.3 Swap / Build Thread

Status
Not open for further replies.
Holy moly, put in a set of 3.42, 3.73's or at least 3.08's depending the size tire you're going to run. A 26" tall tire with 3.42's should work out to about 2k rpm's with the 4L60. Those current gears will be so disappointing that you'll be swapping almost immediately once you get this running. Or you can leave the 2.29's and use OD for land speed records lol.

There are tons of 7.5/7.625" gears kicking around. If you were nearby, then I'd give you a set. If you use your diff for 3.08 or numerically higher, then you need a ring gear spacer or different diff.
 
Are you aware that the late El Caminos came with a TBI 4.3 with an in tank pump from the factory? The tank appears to be readily available. I'm not finding the pickup assembly. If you could find a good used one, you could swap the pump to something like a Walbro 255 or bigger and be good for a stock 4.8. Just thinking out loud.
 
Last edited:
Are you aware that the late El Caminos came with a TBI 4.3 with an in tank pump from the factory? The tank appears to be readily available. I'm not finding the pickup assembly. If you could find a good used one, you could swap the pump to something like a Walbro 155 or bigger and be good for a stock 4.8. Just thinking out loud.

Thanks for that. I wasn't aware that a TBI 4.3 engine was available in an El Camino. Interesting idea. By the time I found a tank, sending unit, and an appropriate pump, it would probably be a wash compared to the setup I have. Assuming the Aeromotive pump works reliably, we'll probably stick with it. If it gives us any trouble, the 4.3 TBI tank would be a good alternative.
 
  • Like
Reactions: Texas82GP
Thanks for that. I wasn't aware that a TBI 4.3 engine was available in an El Camino. Interesting idea. By the time I found a tank, sending unit, and an appropriate pump, it would probably be a wash compared to the setup I have. Assuming the Aeromotive pump works reliably, we'll probably stick with it. If it gives us any trouble, the 4.3 TBI tank would be a good alternative.

The sending unit I posted before is that sending unit. I don't think a baffled tank is made for El Camino, but it will fit in a stock tank. Most guys don't let the tank get to low so they don't have to worry about starving the pump.
 
Update - Fuel Lines and More Suspension

I learned something new today. Actually, I learned several somethings today.

#1 - There is a difference between AN fittings and PTFE fittings. That's probably pretty obvious to anyone who has worked with either of them before, but this is my first adventure with high pressure lines. When I ordered the fuel system from Muscle Rods, I thought it came with AN hose and fittings. But, it came with PTFE hose and fittings. This led to my second lesson of the day.

#2 - How to install PTFE fittings. As I was preparing to build the new fuel lines, I watched a handful of videos on how to assemble AN fittings. I outfitted myself with a pair of aluminum jaws for my bench vise, an adjustable AN wrench and a -6 AN wrench. I cut my first length of line to length, disassembled the first fitting, and discovered a little silver ferrule. Thus, lessen #1. So, I went back to YouTube and watched a couple of videos on installing PTFE fittings. They made it look simple, so I gave it a try. For some reason, the nut wouldn't slide far enough to engage the threads on the fitting. So, I watched a couple more videos. The guys in the videos made it look easy to slide the nut along the hose, but it didn't work that way for me. The nut was tight on the hose and it wouldn't slide with out oil and quite a bit of effort. Then it dawned on me that my hose is black and the hose in the videos was silver. This led me to my third lesson of the day.

#3 - There is a difference between PTFE braided line and coated PTFE braided line. I went back to YouTube for a third time and watched a couple of videos on how to install PTFE fittings on coated braided line. The first video made it look exactly like installing PTFE fittings on regular braided line. By now, about an hour into this process, I'm starting to feel pretty stupid. But, in the second video, the presenter revealed the secret. If you remove the coating on the first 3/8" - 7/16" of the hose, there is a regular braided line underneath. From there, the fittings installed easily. I have no idea if they'll hold pressure yet, but after almost three hours of banging my head against the bench vise, I have the first two fuel lines assembled. They'll get tested out much later in the project when it's time to pressurize the fuel system.

New skills are fun! Not really, but at least I kind of know what I'm doing now.

After wasting most of the morning learning how to build fuel lines, I moved on to something I knew something about. I replaced the worn out factory front sway bar bushings with new Energy Suspension poly bushings. I did the same upgrade on my '81 El Camino about 25 years ago. So, this job was easy. The interesting part was that both of the factory rubber bushings were so worn that they had split across the flat area that rides against the frame. So, when the sway bar flexed, it was actually making contact with the frame. The body roll on this thing must have been scary as heck! No wonder my Dad quit driving it.

I learned one more lesson today. It's actually related to a lesson I learned a few days ago when I learned how to replace a rear end pinion seal.

#4 - I still don't know how to replace a rear end pinion seal! The brand new pinion seal I installed on Thursday appear to be leaking. The leak isn't bad enough to drip, but the bottom of the differential housing has a thin coating of gear oil. I'm going to post a separate thread in the Trans/Rear End/Drive Line forum for advice. If you know the magical incantation to make a pinion seal actually, you know, seal, please share your wisdom.

Thanks for reading.
 
Last edited:
I used the Aeromotive 340 Stealth setup and nylon fuel lines like new cars have... way way easier than messing with building lines, just press the bundy fittings into the lines with an old caulking gun and click into place on the quick connect fittings ICT Billet sells. The El Camino tank sucks to put the stealth kit in and I had the same issues you did. I put mine on the drivers side at the front edge and had to cut the upper support like you did...
 
  • Informative
Reactions: 5spdCab
I used the Aeromotive 340 Stealth setup and nylon fuel lines like new cars have... way way easier than messing with building lines, just press the bundy fittings into the lines with an old caulking gun and click into place on the quick connect fittings ICT Billet sells. The El Camino tank sucks to put the stealth kit in and I had the same issues you did. I put mine on the drivers side at the front edge and had to cut the upper support like you did...

I'm glad to hear that I'm not the only one that had trouble find a spot for the Aeromotive kit. The Aeromotive pump kit and the fuel system kit from Muscle Rods both came with PTFE fittings and lines. So, I'll stick with them unless the leak. Then, I may look into the nylon lines and bundy fittings. Thanks for the tip.
 
  • Like
Reactions: 5spdCab
Floorpan Rust Repair and a Change of Plans

Because I hate it when writers bury the lede, I'll get right to the good stuff first. I got a call from the company we ordered the engine from. Thanks to COVID-19, their supply chain is completely out of whack. Since we placed the order four months ago, they've only seen two 4.8's come through their shop and both of them had problems. One had low oil pressure and the other had low compression on one cylinder. To their credit, they didn't just ship me a busted engine. Instead, they contacted me to discuss options. They may not have any 4.8's available, but they do have 5.3's available. SO, we're getting an engine upgrade. They're inspecting a 2005 5.3 LM7 (I think) with 120K on the clock. Assuming it passes inspection, it's headed our way. Granted, this was a bit of an upsell, but, because they're a stand-up operation, they split the cost of the price difference with me. I'm not happy about the added cost, but my son and I are both pretty excited about the switch to a 5.3. I've had four 5.3's in new pickups. They're more mainstream than the 4.8, so parts are plentiful. And, of course, more power. Theoretically, we should be getting 285hp and 325ft-lb. That should make the El Camino scoot right along.

So, I'm furloughed again this week. Have I mentioned how much this pandemic sucks? Anyway, the unpaid "vacation" has given me some time to get comfortable with the new MIG welder and start patching the holes in the floorpan. I'm not going to include any pictures of my lumpy welds (too embarrassing), but I'm getting the hang of it and there are less holes in the floorpan than there was at the beginning of the week. So, progress. Now, back to the welding and grinding...
 
Last edited:
Sucks about the 2.29 gear ratio, but it should get you by until something better is sourced, betting it will still do sick burnouts tho.

When I did my 4.8 swap I picked up a new TBI el camino tank and sending unit. Popped a walbro 255 in the sending unit and ran -6 front to back. It's been a very reliable system albeit the 255s can be a little noisy. The TBI tanks are sorta baffled, it works and I haven't had any issues with it.

I had a C10 with an ls6 cammed 5.3, 4l60e and it go me in plenty of trouble at 21! Maybe keep the torque management on for the time being lol.
 
  • Like
Reactions: Texas82GP
I'm new to the forum, but I've been reading through old threads as research for a build my son and I are starting. We're doing an LS swap (actually an iron block 4.8L) with an 4l60E transmission swap into a 1983 El Camino SS. This will be my son's first car when he turns 16 in just over a year. Rather than invest in a new (used) car for him to drive, we wanted something that he can use to learn about cars and take some pride in. My dad and I spent lots of time together in the garage when I was young and I want to do the same with my own son. The car/truck has quite a bit of family history, which makes it worth more to us than its paltry market value. Back in high school, I bought a 1981 El Camino from my uncle. I swapped out the blown (thrown rod) V6 and 3sp manual for a 350 SBC and TH350 auto. By the time I was done, it was 400hp street racer. I've grown up now, sort of, and my El Camino is long gone. But, I get to relive my youth vicariously through my son. The 1983 El Camino we're starting with is a gift from my dad to my son. Dad bought it from the same uncle I bought mine from. In fact, my uncle bought this El Camino to replace the one he sold to me! Fast forward WAY too many years and we're back in the G-Body business.

About the car
1983 El Camino SS
Brown on brown on brown (seriously boring!)
Factory 350 Oldsmobile Diesel (Who ever heard of a diesel SS anyway?)
Stock interior, stock suspension, stock everything else.

Our plans
Goal:
Cool old car with modern performance and reliability
Engine: 4.8L Vortec take-out engine. We plan to keep the engine stock. I'm not ready for my son to have a hot rod just yet. The 4.8 will have way more juice than the doggy old diesel anyway.
Transmission: Stock 4L60E take-out. We wanted a modern reliable overdrive transmission. Since the engine will be stock, there was no need for anything beefier than a 4L60E.
Suspension: We're starting with new stock height cargo-control rear springs and air bags (limited hauling capacity was always one of my pet peeves). Next up is a rear anti-sway bar and new poly front anti-sway bar end links (body roll was another pet peeve). The goal is to make it ride and drive more like a modern vehicle. Depending on how it handles, we might replaced the stock front anti-sway bar with something beefier and add front and rear frame braces. It's not intedended for autocross, but I want it to handle better than my old '81 did. While we're under there, we'll freshen up the brakes with new calipers & pads and cylinders & shoes. Again, nothing exotic, just fresh and reliable.
Body: There's a good bit of rust repair needed in the quarter panels and doors. Once the holes are patched and everything is smoothed out, we plan to repaint with the original light brown base color. To liven it up a little, we will repaint the below-the-beltline two tone in dark red (instead of dark brown) with bright red SS stripes.
Interior: The dark brown interior is so retro that it's actually back in style again. It is almost exactly the same shade of brown as my 2015 GMC pickup. And, my son digs the old school bench seat. So, the interior will stay pretty much stock, with a modern touch-screen sound system (of course).
Wheels & Tires: American Racing Outlaw I wheels (my son has the same taste in wheels as his old man!). 15x7 in front, 15x8 in back. Cooper Cobra tires. 235/60-R15 up front, 255/60-R15 in back. We haven't order the wheels and tires yet. If you know of any clearance problems with these sizes, please let us know!

The pile of parts
We're getting the engine, transmission, ECM, and harnesses from Tilden Motorsports. While we're waiting for the engine and trans to arrive, we've starting collecting parts.

Muscle Rods G-Body LS conversion stuff
Engine mounts
Transmission cross member and rear mount
LH8 Oil Pan
In-tank fuel pump kit
Fuel line and regulator kit
Aluminum G-body LS radiator
Trans cooler line kit
Power steering line kit
Electric to mechanical speedometer controller
Moog cc627 Variable Rate Cargo Control rear coil springs
AirLift 60733 1000lbs rear air bags
Energy Suspension poly front anti-sway bar end links
Hellwig 5815 rear anti-sway bar
Stock replacement master cylinder and brake booster (Diesel master cylinder is completely different)
Stock replacement front brake calipers and pads
Stock replacement rear brake cylinders and shoes

That should keep us busy for a while. Lots and lots of details yet to be worked out. I've done lots of engine swaps, but this is my first LS swap. I'm sure I'll have lots of questions for the forum along the way.

I'm including a picture of the car and the proud new owner.

Thanks in advance for any advice you can share. This should be a fun adventure!

John
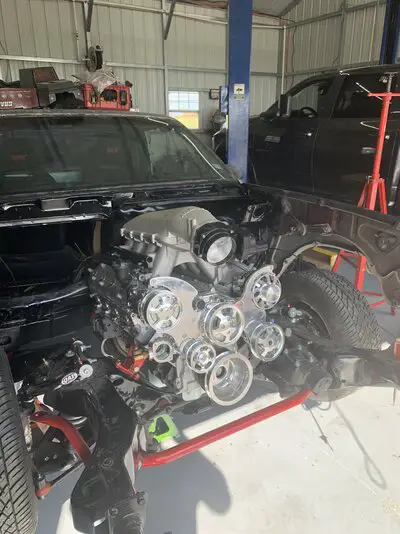
The Muscle rods conversion will make it easy. I am finishing up an LS3 6L80e build now and if I have learned anything it is buy parts designed to work together. Buying all the "good stuff" from the various manufacturer's does not mean they are going to all work and fit well with one another. Here is a pic of mine and you can see how well it all fit, even the much bigger trans.
 

Attachments

  • Motor install.JPEG
    Motor install.JPEG
    1.7 MB · Views: 360
Status
Not open for further replies.

GBodyForum is a participant in the Amazon Services LLC Associates Program, an affiliate advertising program designed to provide a means for sites to earn advertising fees by advertising and linking to amazon.com. Amazon, the Amazon logo, AmazonSupply, and the AmazonSupply logo are trademarks of Amazon.com, Inc. or its affiliates.

Please support GBodyForum Sponsors

Classic Truck Consoles Dixie Restoration Depot UMI Performance

Contact [email protected] for info on becoming a sponsor