BUILD THREAD 1987 Olds 442 Project Build

Heater/AC Box Disassemble: PART 4

Just 2 pieces left: The Temperature Valve Housing (hot/cold door) and the Air Inlet Valve Case

Remove (2) 1/4 screws holding the Temp Valve Housing

1 on the Heater Core side
IMG_4526.JPG


1 on the Evap side. This screw also holds an Air Baffle in place.
IMG_4525.JPG


With the 2 screws out, remove the Air Baffle, but leave the Temp Valve Housing where it is. It's wedged in between the two sides of different cases. It's easier to remove after the next step.
IMG_4528.JPG


Next: Mark the Hot/Cold Door Rod and then pop it out of the clip on the Control Valve Lever (that little swing arm that breaks when you look at it funny).
This will give you an idea of where it goes back (some adjustment may be necessary once reinstalled)
IMG_4527.JPG


Move to the back of the Lower Case and remove (4) 1/4 screws holding the Air Inlet Case

2 below the Air Inlet Door
IMG_4529.JPG


2 farther to the Left on the bottom of the case
IMG_4530.JPG


Remove the Air Inlet Case (may require some gentle prying to get the goo to release)
IMG_4531.JPG


With the Air Inlet Case out of the way, the Temp Valve Housing (Hot/Cold Door) comes right out.
IMG_4532.JPG


There is a clip that's press fit on the bottom of the Temp Valve Housing. Don't lose it, it holds the bottom of the Heater Core in place.
IMG_4535 - Copy.JPG


All done! You should now have 6 very messy pieces to clean up
IMG_4535.JPG


Hutch
 
**Disassembly Sequence Update**

After doing this for the first time, I realized that the Front Plate (that was removed second after the Top Plate) can wait until last.

It's bolted to the Air Inlet Valve Case and can therefore be taken off WITH that case and then removed afterwards. This also negates having to remove the (1) Air Baffle 1/4 screw on the inside

Here's a pic with the two cases joined back together as if they came off as a unit
IMG_4544.JPG


IMG_4543.JPG


I will definitely be putting it back together this way.

If I can get some free time this weekend (not looking good now) I'm going to clean everything up and break this guy out
IMG_4542.JPG


Hutch
 
Helpful tips:

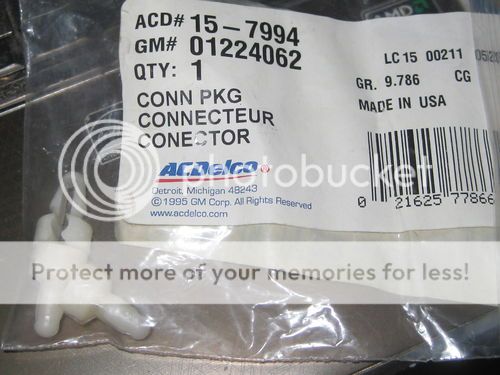
That little rod clip holding it on to the temp door pivot lever- DON'T break it or lose it. You will pay hell trying to find another. The clip basically snaps out of the pivot lever/arm by gently squeezing the bottom of the clip that goes through the lever hole, then you can simply lift it out of the lever, unfold it enough to release it from the threaded rod. Install is just the opposite. You may get lucky snapping it out of the clip without removing it, but IMO it's riskier. If you can find them, they're GM p/n 1224062. Hard to find out in the wild. The rod to door clip is a lot easier to find since it's the same as many door lock rod clips. GM P/N 3035035 or superseded part number 20007898.

heaterclip.jpg


117897


Not recommended to grease the clips/lever, but if you feel you MUST lube something, use the liquid graphite stuff that dries cleanly so it won't collect dirt/grit. I don't know what GM's vendors used on the A/C control heads, but they used a lot of clear greasy crap on the internals. Probably some silicone grease crap.

Keep it up, loving the pics and descriptions. Will come in handy for someone for sure.
 
Oh, yeah, there's supposed to be a seal for the temp door rod. May have it in the seal pack, but if not, you should plug that big *ss air leak. It was only a sponge rubber "seal" like most of the other ones and deteriorates over time and then you get...HOLE.

#55 on the exploded diagram a couple pages back.

Excellent point there! There wasn't even the hint of that seal on mine. If there isn't one in the kit I'll make one to work.

Hutch
 
  • Like
Reactions: Clutch and Rktpwrd
Oh, yeah, there's supposed to be a seal for the temp door rod. May have it in the seal pack, but if not, you should plug that big *ss air leak. It was only a sponge rubber "seal" like most of the other ones and deteriorates over time and then you get...HOLE.

#55 on the exploded diagram a couple pages back.

Just looked through the seal kit. It's there.
IMG_4542 - Copy.JPG


And the red clip in the bag is the threaded rod to Hot/Cold door clip.

There's not enough butyl strip calk with the kit for a full reseal like I'm doing, so I'll supplement with some NAPA Glass Setting Butyl Tape
Glass Setting Butyl Tape.png


Hutch
 
Bonus!! Can't wait to see this refurbished...

Can't you get that skinny strip crap (butyl) to lay in the sealing grooves? 3/8" seems a bit thick. Or are you going to cut that?
 
Can't you get that skinny strip crap (butyl) to lay in the sealing grooves? 3/8" seems a bit thick. Or are you going to cut that?

The butyl strip that comes with the kit will work for the groove that seals the top cover to the bottom.

I'll be using the thicker stuff for the inside to help seal the blower case to the floor of the lower case and for the hot/cold door sealing. In the pics you can see the HUGE amount of that goo in the bottom of the lower case and along the seams of the pieces joined together. The strip tape will allow me to seal these seams a little neater I think.

Hutch
 

GBodyForum is a participant in the Amazon Services LLC Associates Program, an affiliate advertising program designed to provide a means for sites to earn advertising fees by advertising and linking to amazon.com. Amazon, the Amazon logo, AmazonSupply, and the AmazonSupply logo are trademarks of Amazon.com, Inc. or its affiliates.

Please support GBodyForum Sponsors

Classic Truck Consoles Dixie Restoration Depot UMI Performance

Contact [email protected] for info on becoming a sponsor