This only applies to '81-'87/'88 37 & 47 coupes with them being attached frm the outside unlike the '78-'80 37 & 47, all 07 & 27 coupes.I ask because I've read that the rear 1/4 windows are slightly different, the seals actually. Apparently they're a bit thicker to hide a gap that would be there without the vinyl top. Without replacing the windows you can just use butyl tape, or "dum dum".
BUILD THREAD '78 Cutlass Supreme Lichen Edition
- Thread starter doood
- Start date
This only applies to '81-'87/'88 37 & 47 coupes with them being attached frm the outside unlike the '78-'80 37 & 47, all 07 & 27 coupes.
Thanks for the info! I'm still trying to discern all the darn differences between the years and models.... Onions have fewer layers.
Hey doood, I apologize for any confusion.
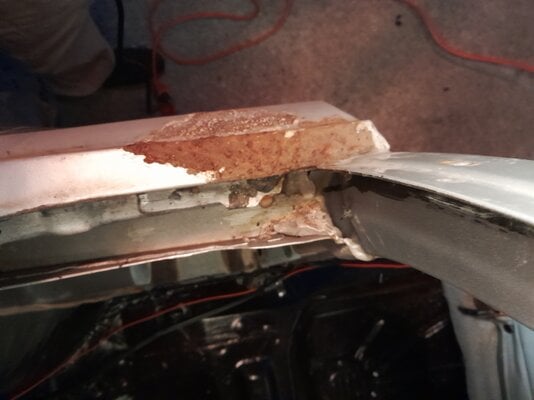
This looks like a win to me. I will put some phosphoric acid to preserve for the rest of the winter, then I'll repair with filler, primer, and a close match spray paint (duplicolor fine silver birch metallic). That weather stripping was toast along the bottom edge - nothing to save. May look into bending a straight piece or finding something without steel.
I really can't see the contrast between the spray paint and the original paint on this header panel that I have repaired. It's not just rattle can ghetto sh*t.


I really can't see the contrast between the spray paint and the original paint on this header panel that I have repaired. It's not just rattle can ghetto sh*t.


Attachments
Last edited:
Right on, man. I looked at using that paint to do a bedside for a truck but never ended up pulling the trigger. I did buy a can to try though and the color was great but it seemed like it was super thin. Was that your experience?
The paint is SUPER thin and I have never put paint on a car before. I'm dipping my feet in on this header panel.... I've got it apart and patched and cleaned and I'm going to Scotch-Brite it, wipe it down with isopropyl, spray it down with adhesion promoter and sandable primer before I put down as many coats as I need to with this thin paint. I'll just take my time with it and keep the coats very thin. When I get it right I'll use spray gloss.Right on, man. I looked at using that paint to do a bedside for a truck but never ended up pulling the trigger. I did buy a can to try though and the color was great but it seemed like it was super thin. Was that your experience?
So I had to patch this header panel and the grill inserts. These are actually replacement grill inserts, that I have repaired, patched many cracks with epoxy and cloth and fiberglass rods. I am happy with their fit and function/strength, but my idea to use chrome paint on them is not panning out. I literally have 6 hours peeling off chrome, cleaning, sanding, etching, bleaching (lye) in that painted grill. I may eventually go for a blackout look or get the chrome paint looking reasonable and seal it with a 2K gloss, because the damn paint makes my fingers chrome after 3 weeks of curing.
I have had various successes though. I managed to get this rubber seal replaced as good as new.


Last edited:
I'd either stitch it shut with the wire speed way down or use the screws + solder. With a welder on hand that would be an easy choice since I've also done the solder work.Don't laugh at me, but I think it makes sense to screw #8 self tapping screw into these landau top rivet holes, cut off the screw head, and then put a tack weld on that, instead of just tacking the hole. What do you think?View attachment 235592View attachment 235593
solder, as in lead? Got it.I'd either stitch it shut with the wire speed way down or use the screws + solder. With a welder on hand that would be an easy choice since I've also done the solder work.
Body solder and plumbing solder are the same thing just a different percentage of lead and tin.* More tin means harder to sand, and body solder is 30/70 tin/lead. Acid core (NO rosin!) solder on a roll was my choice for shaving the drip rails on my '86 C10, but sticks work better. Clean it well prior to sealer by neutralizing the acid/ removing the flux and everything will be smooth and won't crack. One potential drawback is that you can't neutralize the acid that's beneath the layer of lead, and it can possibly lead to rust or early paint failure. The work I did to my truck has held up for many years without issues, though it's not parked outside.solder, as in lead? Got it.
* Today's solders sometimes utilize antimony in place of lead and I have no experience using that for bodywork. There are also lead free solders such as Johnson's #523 Auto Body Solder & Tinning Paste.
Similar threads
- Replies
- 0
- Views
- 100
- Replies
- 4
- Views
- 312
- Replies
- 8
- Views
- 448
GBodyForum is a participant in the Amazon Services LLC Associates Program, an affiliate advertising program designed to provide a means for sites to earn advertising fees by advertising and linking to amazon.com. Amazon, the Amazon logo, AmazonSupply, and the AmazonSupply logo are trademarks of Amazon.com, Inc. or its affiliates.


