79 Cutlass Wagon G-machine build

Status
Not open for further replies.

khan0165

Royal Smart Person
Jul 14, 2008
1,617
16
38
Ontario, Canada
Ben, that is badass... I am very impressed.
is that 1-1/2" tubing? I think with all the angle bracing you've done, this roll cage will be stronger than usual.

great job on the short tube weld... I can't tell that it was done.
 

SRD art

G-Body Guru
Jun 16, 2011
550
443
63
St. George, UT
I went with 1 3/4" .130 wall. For most venues that's an acceptable size. I was concerned that the 1 5/8" would look a little whimpy, but I bought some 1 5/8" for chassis supports and really they're so close I don't think it would've mattered. The outlet where I bought the tube had 1 5/8" too but it was a heavier wall and weighed more per linear foot than the 1 3/4".
 

Longroof79

Rocket Powered Basset Hound
Oct 14, 2008
12,197
9,850
113
Gainesville, Fl
Lookin' good, Ben!
Keep up the great work. I always look forward to seeing your progress reports. :)
 

SRD art

G-Body Guru
Jun 16, 2011
550
443
63
St. George, UT
Thanks all!

A few more pics-

To weld the cage into the car I used our platform mounted plasma cutter on manual mode to cut out some 1/8" thick 4x4" plates and bent them with the metal brake to contour the floor pan.

roll29.jpg


For the back two bars I had to make custom plates that contoured around the body bushing bumps in the sheet metal. To do this I first cut out the shape I needed from white poster board. The light beam follows the lines of the cutout...

plasma1.jpg


...and transfers that to the cutter.

plasma2.jpg


Maybe not as precise as processes like cnc water jetting but it did a great job. I used the machine again to fabricate some brackets for the trailer hitch, more coming on that soon.

plasma3.jpg


Originally I started to rattle can the roll cage satin aluminum but it was too bright and shiny and showed all the nicks and imperfections in the tubing. I decided to go with a more traditional satin black instead. The paint in this photo is fresh so it still looks fairly shiny, but it dulls down a bit as it dries. It should be just about the same sheen as the dash, console, and door panels when dry.

roll30.jpg
 

79loserbluebu

G-Body Guru
May 9, 2009
960
20
18
Illinois
Doing an awesome job as always. This thread proves that do it yourselfers can build cool cars too.
 

SRD art

G-Body Guru
Jun 16, 2011
550
443
63
St. George, UT
Updates- Trailer hitch is in!

A couple pages ago I mentioned that I scored a $25 g-body El Camino trailer hitch from the junkyard. I'll be using it to tow my street/strip Nova to Georgia when I relocate in a few months and to the track when I get the itch to go drag racing again. Two problems with a hitch is there's no room because I will be running the exhaust tips right under the center of the rear bumper and I also don't want an ugly trailer receiver visible from behind. So I decided to figure out how to hide it behind the bumper....
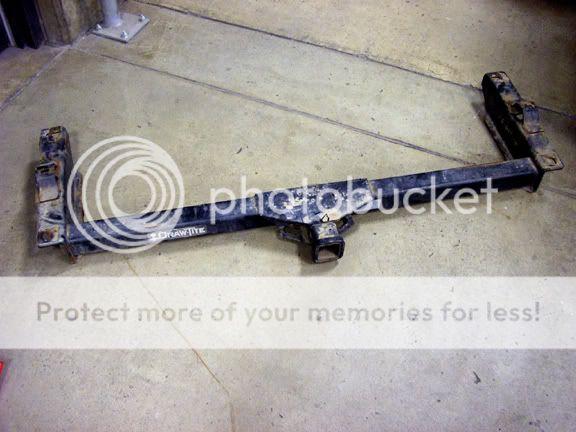
The hitch...

Hitch1.jpg


Here's the original bumper shock/ mount. I used a die grinder to cut a small slit in the body (not visible, it extends about 8" into the frame) to drain the oil. I did this pointed away from me inside the trash can because the oil is a bit under pressure and sprays out. (I learned this by accident practicing on one of the front bumper mounts. Lol, it sprayed about 10 feet in the air and got oil everywhere in about a 4 foot radius!) After the oil was drained I welded up the slit and sand blasted them.

Bumpbracket1.jpg


I then cut off the factory Draw-tite brackets. Using the bumper shocks to help make a poster board template I plasma cut out some C shape brackets from the 1/8" steel sheet and some C shape brackets from the left over hitch brackets. For strength I drilled out all the holes from the smaller metric to 3/8" and used grade 8 bolts. Here it is all welded and in place.

Bumpbracket2a.jpg


For clearance I had to persuade the spare tire well a little with a small sledge.

Bumpbracket2.jpg


Bumpbracket3.jpg


I then cut off the ends of the bumper support bracket and bolted them on.

Bumpbracket4.jpg


Bumpbracket5.jpg


Here is the first test fit with the bumper. It looks like a large gap but once the tailgate and the plastic piece that fills the rest of the gap is installed it looks better. Once all back together I will actually tuck the bumper closer to the body, another reason for draining the oil.

Bumpbracket6.jpg


Measuring out a rectangle in the center of the bumper I cut it out with a die grinder. The cut out piece will be welded to some square tubing that will insert into the receiver when the race tow hook or the trailer ball is not being used. The panel will hide everything except the small gap outline around the rectangle. The bumper will be black so it shouldn't be very noticeable. I got the tow hook from Harbor Freight on sale for $10. Not sure yet if it's SCCA legal but for the price I figured I'd grab it.

Bumpbracket7.jpg


Next I need to build support brackets that will be welded to the hitch and bolted to the frame about 10" inward. More on that soon. Overall I think it turned out great and really ads to the car's versatility without sacrificing a clean look out back.
 
Status
Not open for further replies.

GBodyForum is a participant in the Amazon Services LLC Associates Program, an affiliate advertising program designed to provide a means for sites to earn advertising fees by advertising and linking to amazon.com. Amazon, the Amazon logo, AmazonSupply, and the AmazonSupply logo are trademarks of Amazon.com, Inc. or its affiliates.

Please support GBodyForum Sponsors

Classic Truck Consoles Dixie Restoration Depot UMI Performance

Contact [email protected] for info on becoming a sponsor