79 Cutlass Wagon G-machine build

Status
Not open for further replies.
khan0165 said:
this is gotta be one of my favorite builds... And you too liquidh8
you guys have some real talent! Keep up the great work
==========================================================================================================
X2... 🙂
 
Thanks guys!!

Clean8485, I really appreciate your compliment. You don't own a shop by chance do you? Lol! I'll be looking for a employment doing this full time come end of April. :-D
 
Ben,
I'm flattered, and thanks very much for your comments. If I ever own a shop, it will be in my backyard, and it will be for me. That way, I only have to worry about pleasing myself (and sometimes, that's not too hard!).
Great work on the car. Keep up the good work, photos and updates.
 
khan0165 said:
this is gotta be one of my favorite builds... And you too liquidh8
you guys have some real talent! Keep up the great work


Thank you! I love this thread to. Nice attention to detail. I acquired a set of 18x10 boyds wheels, for an f-body, but they are a nice size i can use for mock up for the wheelwell size. I like how you did yours, great job instead of just tossin a tub in there.

Keep the pics comin, I am at a slow down on mine for now, so i have to follow yours and Jacks, lol
 
i dig it. very nice work
 
Lots of updates- first some dash planning. Pro-Comp gauges have the same font that my factory cluster has...

5447_d.jpg


They only come in 2 5/8" rather than the Sport-comp 2 1/6" so I can only fit 3 across instead of the 4 I originally planned. They also don't have the Diff temp gauge in this line but I can live without it. I'm willing to bet even if I road course the car I won't overheat the rear axle so I probably won't need to keep an eye on it. So here's a very quick photoshop mockup of my dash...

Mods will include a new black complete dash cover, adding the 160 speedo, painting all factory gauge needles red, deleting all dash vents except lower heater and windshield defrost, and all fakie wood grain areas replaced with brushed aluminum. I also have a Grant steering wheel with brushed aluminum spokes. Three center gauges will be Water temp, Oil temp, and Trans temp. Gauge on the left will be a brake pressure gauge. Shift light 3 3/8" tach will go on top of the dash in the left corner by the windshield pillar. On the dual pillar pods will be an a/f gauge along with a digital gear indicator like Ken Block's rally car.

Only thing to decide now is the color of the gauge rings. The Autometer dealios come with a silver bezel, but I'm leaning towards painting them black, see bottom photo. Thoughts?

dashmock01.jpg
 
I found and bought this guy wasting time on ebay today. It lights up and screams at you, perfect for the Pumkinator motif. If it's large enough I'll hang it from the rear view mirror as my new g-force-o-meter for video viewers, if not I'll keep it as a fun key chain.

Pumpkinkey.jpg
 
I took a quick breather recently to update my wagon's concept rendering. Added the brake ducts in the front bumper, the fender vents, factory mirrors, tucked the rear bumper, a new graphic to the side, and of course the new wheels.

I also changed some plans for the front turn signals for two reasons. First, the lenses on my light buckets were only manufactured for two years and they're a bit banged up. Finding nice ones has yeilded pretty much a big zee-ro. I've also been struggling on how to come up with a cost effective ram air hood system and everything I dream up will take too much work time and/or $. So today I removed the turn signals from the light bezels and I liked what I saw.

The turn signal holes will become a ram air inlet with two tubes merging into one near the throttle body. I'm still working out the air filters. I ordered some 6.25" wide combination white daytime driving light/ amber turn signal LED lights today. The holes I made in the bumper are about 8.5" wide, so using the brackets that come with the lights I will mount them "floating" in the center of the holes, and as the air flows through it will still be plumbed for brake cooling. Although it now sort of looks like an strange S10, I think it was a good compromise and a good final design. Let me know what you think, thanks!

WagonOrangefinalnew10.jpg
 
This past Friday I went by the junk yard to grab some parts I scouted out earlier in the week. I definitely scored some great deals.

First off I'd like to thank the previous owner of this early 90s Camaro for installing Edelbrock rear lower control arms before the car made it to the wrecking yard. New price is $205 from Summit, only $10 (!) for the pair from the wrecking yard. Fighting a rusted bolt and 3 very tight ones was absolutely worth the effort.

DonorCamaro.jpg


They have a little surface rust and the paint is beat up but other than that they're in great shape, no dents or other issues mechanical issues.

LCA1.jpg
 
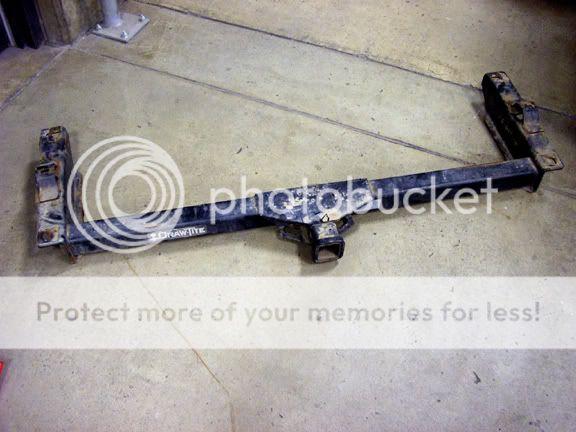
Next up is this trailer hitch I pulled from a 78-79ish Elcamino. I checked Draw Tight's website to get an idea for what a new one is worth, but they don't make the g-body hitch anymore with the larger 2" receiver, they only list a whimpy class 2 with the small 1 1/4" receiver. I made out ok with this too, only $25 and except for paint it's in great shape. My Nova is set up to flat tow with a tow bar so it'll be perfect for that or towing a small trailer or car on a tow dolly. Although the hitch has a decent tongue weight rating I doubt my lowered suspension would like towing something bigger too much.

Plans are to modify the mounts so it's directly behind the bumper rather than underneath. I'll cut a square hole and use a custom ball mount with an SCCA style tow hook attached for racing and of course a ball when towing.

Hitch1.jpg


Got some miscellaneous stuff too. The seat back/ arm rest is from the back seat of an Astro Van. I'll use it in the front between the buckets, and build a simple base so I can have one of my kids sit up front. It'll fold down as an armrest when not being used as a seat back. The vents are from a 79 Pontiac LeMans. I'll have them set up for heating the front and the rear, they're pretty cool because they swivel 360 deg to direct air flow. I grabbed a couple rear marker lights from the El Camino, mine are a little hammered. The jack will fit nicely in my modified spare tire well, and the low profile height will work perfectly with the lowered stance of the car. $10 for everything here.

Miscparts2.jpg


These Caddy engine covers caught my eye as the 2010 Camaro cover I bought just won't look right on the truck intake. Two are plastic and one aluminum, and I thought I might modify them a little. For $10 total for all three I figured it wasn't a big loss if I cut them up and it didn't work out so I went ahead and grabbed them. The runners on the truck intake don't look so bad but everything sticking out of the top looks terrible. I'm thinking to trim down the aluminum one to just the center rectangle to cover the top of the intake, then cut one side off each plastic one to cover the coil pack areas. We'll see how it goes...

Cadcover1.jpg
 
Status
Not open for further replies.

GBodyForum is a participant in the Amazon Services LLC Associates Program, an affiliate advertising program designed to provide a means for sites to earn advertising fees by advertising and linking to amazon.com. Amazon, the Amazon logo, AmazonSupply, and the AmazonSupply logo are trademarks of Amazon.com, Inc. or its affiliates.

Please support GBodyForum Sponsors

Classic Truck Consoles Dixie Restoration Depot UMI Performance

Contact [email protected] for info on becoming a sponsor