79' Malibu Build Thread
- Thread starter 79loserbluebu
- Start date
You are using an out of date browser. It may not display this or other websites correctly.
You should upgrade or use an alternative browser.
You should upgrade or use an alternative browser.
- Status
- Not open for further replies.
The engine mounts are BRP swap mounts for 78-81 G-bodies. I'm not really sure why the separation of years, I would assume it's because the trans crossmember was in a different spot on the frame 82-87 though. The headers are Pacesetter LT's from a 4th Gen F-body. The swap can actually be done for fairly cheap. It's just hard to throw it in without putting some parts on it. The whole "well I'm already here so why not ***" mentality sets in. My buddy that I bought the cracked LS1 from, just picked up a 6.0/6L80E combo from a wrecked 07 2500HD truck. IIRC the Gen IV engines have more base power and better flowing heads than the Gen III.
MN is pretty far, I really want to check out the Car Craft Nationals one year. I'd even love to do a leg of the Hot Rod Power Tour, but they aren't even coming to IL this year.
Forgot to add, I picked up the Spohn steering rebuild kit, and a set of ball joints from Power Performance. The S10 guys have great experiences with this company, and the price is comparible to cheap Moog joints.
It's a little too late to start using the 3 step chassis paint, so I'll have to get cracking in the morning.
MN is pretty far, I really want to check out the Car Craft Nationals one year. I'd even love to do a leg of the Hot Rod Power Tour, but they aren't even coming to IL this year.

Forgot to add, I picked up the Spohn steering rebuild kit, and a set of ball joints from Power Performance. The S10 guys have great experiences with this company, and the price is comparible to cheap Moog joints.
It's a little too late to start using the 3 step chassis paint, so I'll have to get cracking in the morning.
how much u pay for that license plate bucket?79loserbluebu said:Well finally some progress! Ripped the engine and trans out in a couple hours. Made a mess all over the garage floor and left it there for a couple days before I cleaned up today. I bought a blown up LS1 from a buddy who works at a dealership, for $50. He didn't know any specifics of the engine, other than it made noise. Ripped it apart hoping to find nothing, ended up finding several spun bearings, a snapped rod, and almost all rod bolts stretched. The engine had a lifter noise and they decided to tank it and replace it with a GM longblock. Well actually, ended up I made out like a bandit, the engine had an LS6 intake on it so that means it was an 01-02' F-body. Also, the replacement engine must have been an LS6, because he gave me a brand new LS6 valley cover, with the integrated PCV inside to solve oil consumption issues. 8) The valley cover did not fit the LS1 so I was skeptical of notching the block for it on the engine I'm using, however the taller truck block had enough room for the PCV to clear. So JACKPOT!
Anyways, gutted the cracked LS1, used is as an 80lb. mock up engine. Worked out perfect as seen in pictures. Also purchased a rear license plate pocket from blownbigblock over at maliburacing.com. Love the way it looks, a little more adjusting and it'll be perfect.
I read a thread over on LS1tech about a 70' GTO Judge clone, with a turbo LQ4 in it, and the guy bought a dual passenger side outlet rad off eBay. I gave it a shot and got lucky. Had to make some new mounts, as well as modify the core support and isolators. I actually had to cut the rubber pieces on bottom because the rad is much thicker. And then I had to drill new holes on the support to set it in place.
I'm using the largest trans cooler that B&M makes, along with a very large radiator, and an AC condensor from a Regal/Cutlass, needless to say it wasn't going to be easy. The stock "X" radiator support braces weren't going to work, so I whipped up some with the vice and a couple tubes of pretty thick 3/8" steel tubing. I may remake the one going from upper driver to lower passenger because it is a little short. I also had to slightly notch the header panel, but with the grille on you can't tell the difference. I don't really know how much the X support braces help, but I just love the agressive look. It will all be painted black, along with using all anodized black fittings and black braided nylon line.
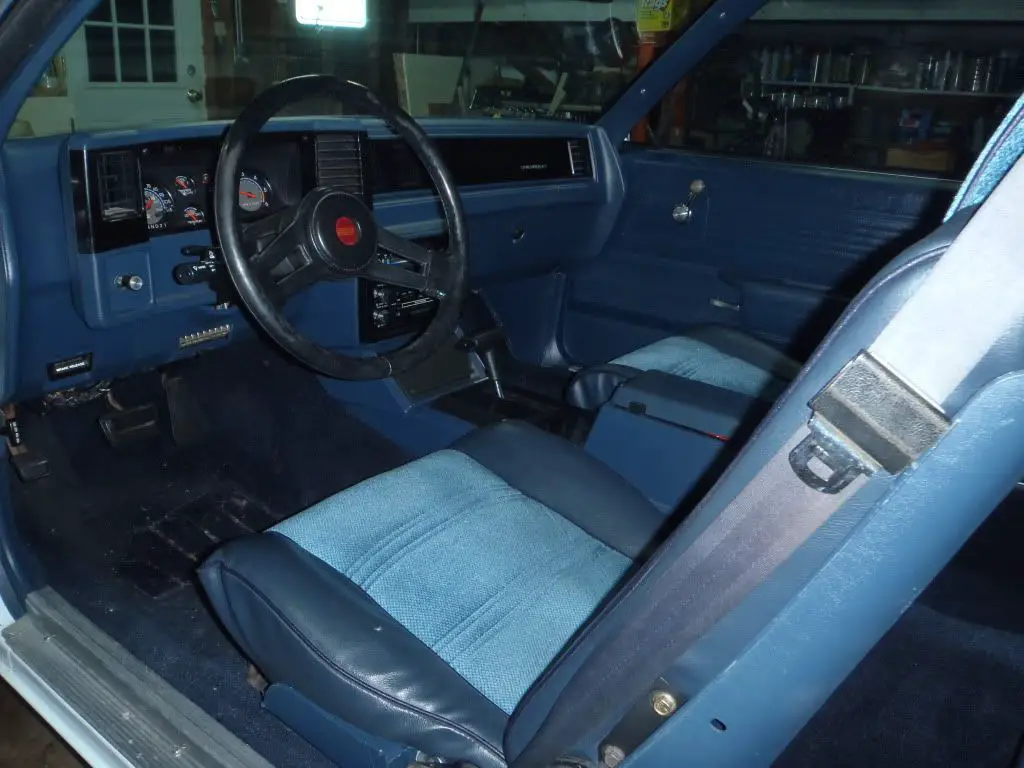
Also included is a couple more pictures of my interior. I am doing some new seat buns, but I don't want to put the seats back in with the reclining backs with no trim 🙁 . I'm having a very hard time finding the trim I need, I may just have to break down and buy the $140 set off of eBay.
Alright enough typing pic time
License plate

Interior


Radiator

Trans cooler, condensor, braces

PERFECTION

Rear end setup

And the ones you've been waiting for


Driver side header

Passenger side header

Firewall

A/C box and coils

And the money shot 8)

The wierd thing about this swap so far is the simplicity of it. Last time putting headers on an SBC in this car, I struggled for hours. This time they fell right in. I will need to ding the primary on each side that touches, but not nearly as bad as the Hooker headers I had last time. I bought them in the crappy paint so I can get them coated and not have to damage the coating.
The best thing so far though, is the fact that for months I worried about A/C heater box clearance. With the F-body coils, shorter spark plugs, and the MSD bendable wires, the wire actually sits in the little indentation on the heater box.I never get this lucky!!
Hope you all enjoy. Progress may be slow for now. I'd like to get a bare 4L60E case so I can mock everything up before painting the frame. I may take the time to figure out the PCM and fuse block mounting, and get my Dakota digital dash set in place and the wiring run for that.
Thanks for checking it out!
I think it was like $50 for the license plate holder. Anyone ever remove their evaporator out of their cars before? I pulled mine because I was disgusted with all the sealer around the evap lines going to the receiver/drier, and uncovering all the goo I found two hose clamps holding what looks like a switch, running down to a little relay sized looking thing. Anyone know what's up? I was thinking it was a pressure switch or a temp switch so the evap core doesn't freeze. Regardless, I think I'm going to go ahead and replace the evap because I was so disgusted with the way the inside of the blower box looked. 

Looking good, you will love your ls powered g body! I skipped out on buying the engine mounts and made my own. I had to modify the coil bracket because of the AC box though. I also wanted mine to be quiet with manifolds and cats since all my others were headers and cams! I have since been thinking of doing those same headers to help clean the engine bay up some but still installing the cats farther down under the car. I will keep following your build and good luck with it. Mine isn't no perfect piece but if I can help out in any way, just let me know! You can look at my previous post to find my swap in the noob section
Just was readig back thru the thread bruh. Lookin SWEET!!! Any updates?
Elco Warren 8)
80zBabiezCC
Elco Warren 8)
80zBabiezCC
Finally making some progress again! Just picked up my trans from FLT in Wood Dale, IL www.finishlinetrans.com . The owner Andy Rizzo is a really good guy and will answer all of your questions and be as helpful as possible. I went with the Level 4 4L60E in an F-body configuration, so I will need to use the F-body shifter with the PRNDL mounted on the shifter. I got a 3600 stall from Yank Performance. I put the entire front end of the car back together, put in a Grand National steering box, and a set of Hotchkis sway bars. Mounted the trans cooler, C5 Corvette filter/regulator, and routed all the braided nylon AN line with black annodized fittings. I'll snap a bunch of pictures after work tomorrow to show all the progress.
- Status
- Not open for further replies.
Similar threads
- Replies
- 1
- Views
- 156
- Replies
- 100
- Views
- 4K
GBodyForum is a participant in the Amazon Services LLC Associates Program, an affiliate advertising program designed to provide a means for sites to earn advertising fees by advertising and linking to amazon.com. Amazon, the Amazon logo, AmazonSupply, and the AmazonSupply logo are trademarks of Amazon.com, Inc. or its affiliates.

