Bernadine: 1978 Buick Regal Restoration/Build

Status
Not open for further replies.
July 27, 2022: I realize it’s been quite awhile since my last update. Luckily though, the lack of posts does not equate to lack of work getting done on the car. Since my last post I’ve accomplished the following:
- the wheelhouse & trunk floor patches have been skimmed with reinforced body filler, sanded smooth, and covered with primer
- all remaining problem areas in the right rear quarter/wheel opening area have been patched, and also skimmed with filler, sanded, & primed
- the firewall is very close to being ready for a coat of epoxy primer
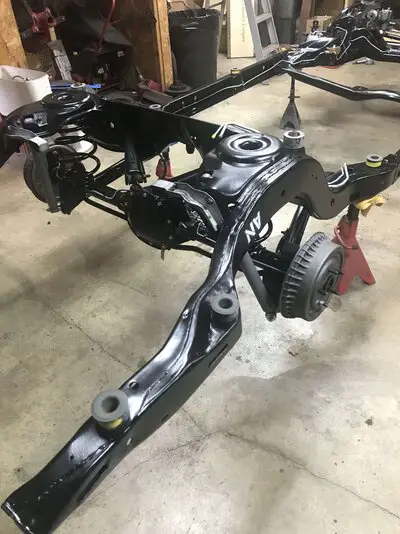
- the oil/grease/grime has been pressure washed off the frame
- the rest of the underbody has had the original undercoating removed

My next steps will be a final cleaning of the underbody and reapplying seam sealer on the underside, wheelhouses, & trunk. After that I’ll get the tub masked up, and I hope to spray the new undercoating maybe Tuesday of next week.
 
  • Like
Reactions: Tony1968
July 27, 2022 (part 2): I’ve also realized I’ve started to get a bit lazy with taking pictures as I move along. But here are some pics I DO have related to my other post from today:

Trunk floor patches in primer. And I have to be honest- I’m very happy with how well these turned out.
B0874D55-F291-457F-886D-9FB107DCF8D0.jpeg

9755A5CD-067F-42C1-AA57-320C100B70D1.jpeg


The last patch I did was this one on the lower right quarter/wheel opening. Here’s a before, a couple during, and a couple after photos.
7D754E6F-3933-405A-A82D-C83B21F710C1.jpeg

AD47A3E6-7C7B-43D0-A4C1-770AA962DF8E.jpeg

235DE49F-B82A-41F6-B6DF-301BE648A367.jpeg

C0C0D620-9BE4-4F24-8576-EC58B090DD96.jpeg

DF278EB1-CB8F-4E1E-BEAC-8AD0A7A397C8.jpeg


The firewall, as it stands now.
3AAC5E64-2E47-447C-B883-C101BB413068.jpeg

0F60FE58-C9C4-4F36-9CB4-127D4F111514.jpeg

2679E9F8-1850-4DAF-B55D-E51EE36439BF.jpeg
 
Doing good work 👏
I remember doing the whole under coating removal. Not easy but then again nothing is really easy with these cars.
 
  • Like
Reactions: Rktpwrd
August 12, 2022: I got new seam sealer on the underbody in the areas where I had removed the old, as well as in the wheelhouse seams, the back seat area, and around the new floor shifter hump. I also put a couple coats of 2K epoxy primer on the firewall since it was 100% down to nice, clean metal.

I did make a change of direction regarding the new undercoating, though. I figured I’d be better off getting the frame done first since I’d be making a sh*t load of dust in the garage, so this past week I moved the body over to my “wife’s side” of the garage and got the rolling chassis torn down to bare frame. I’m out of town this weekend & next weekend, but over these next couple weeks I should still be able to get the frame down to clean metal, primed, painted, and ready to start rebuilding.

Firewall in 2K epoxy primer:
195B3041-9838-4C0F-AA0A-663C4F51ED5A.jpeg


Bare frame, ready for cleanup:
F61CD08A-07FA-4256-A76F-9A60820F41F8.jpeg

9C4D57C6-F4B0-40D6-86DF-5B81592225BD.jpeg
 
November 13, 2022: The reasons I started this build thread were 1) showcase- in somewhat real time- the work I was doing to make my beloved car like new again, and 2) make sure I took the time to photograph the before, after, and everything in between of every step and project throughout the restoration process. Unfortunately over the last couple months I’ve completely failed at updating the build thread, and partially failed at taking pictures of my progress. The upside of these failures is that I’ve spent every possible bit of my “free time” (which has only been about an hour or hour & a half a day, 4-5 days a week) working on the car, and I feel really damn good about what I’ve accomplished.

Over the next couple days I’ll add more posts with pictures and details of the work that went on since my last post back in August, but for now I’ll share these photos from this weekend.

Other than greasing all the front end ball joints, installing new drum brake guts, and installing new parking brake cables, the frame is completely restored and reassembled!
37B7D9F2-B04F-4CBE-A00C-8A8E426BFFB4.jpeg

F60615B5-D334-4905-A9D2-DBB32BCE79FD.jpeg

3B2187A2-F63D-4917-B363-68CCA7E67424.jpeg

4ADA8A97-76BB-470F-8ADD-266B1EDAF8BC.jpeg

A6D3DB94-CA83-4F97-962C-9A80CCAD5844.jpeg

9983C5B1-FDD6-49DF-975B-C30E6C3562B9.jpeg

34E43ACB-ABD7-4F8F-A715-EE8E1609101B.jpeg

205B4EF2-27D5-4882-A93E-6ECEFCE9EE8F.jpeg

0C899422-756F-4C72-8C5A-5A3DAAF592F8.jpeg
 

Attachments

  • 608CC6BA-30A2-4BE6-B6DE-ECACB380985C.jpeg
    608CC6BA-30A2-4BE6-B6DE-ECACB380985C.jpeg
    793.6 KB · Views: 87
November 14, 2022: This is the first of several retrospective posts of the frame restoration. All the following pics were taken between August 16th & August 24th and show the process of getting the bare frame down to bright, clean metal. I used (dozens & dozens of) 40 grit 4” flap discs for this. I also used some grinding discs to get rid of the factory welding spatter and smooth out the night crawler-looking welds. Looking back at these pictures again it’s hard to believe just how much of a mess this all made.

A672BAA0-D9BE-44C0-BFC7-087E5F08696A.jpeg

C6EE8C1B-DAEB-41F5-A0C8-933F43EEDB53.jpeg

032E9A3C-5DDA-4920-B0B9-62A15F123B73.jpeg

E5B831CD-08FD-4C2F-AC60-C2041B853BDA.jpeg

3DFD385E-9EC1-41D4-8728-EF191E53AD91.jpeg
 
Status
Not open for further replies.

GBodyForum is a participant in the Amazon Services LLC Associates Program, an affiliate advertising program designed to provide a means for sites to earn advertising fees by advertising and linking to amazon.com. Amazon, the Amazon logo, AmazonSupply, and the AmazonSupply logo are trademarks of Amazon.com, Inc. or its affiliates.

Please support GBodyForum Sponsors

Classic Truck Consoles Dixie Restoration Depot UMI Performance

Contact [email protected] for info on becoming a sponsor