BUILD THREAD my 1980 Grand Prix w/BBC 454 build thread

Status
Not open for further replies.

454GrandPrix

Master Mechanic
Jul 27, 2016
429
818
93
Lehi, Utah
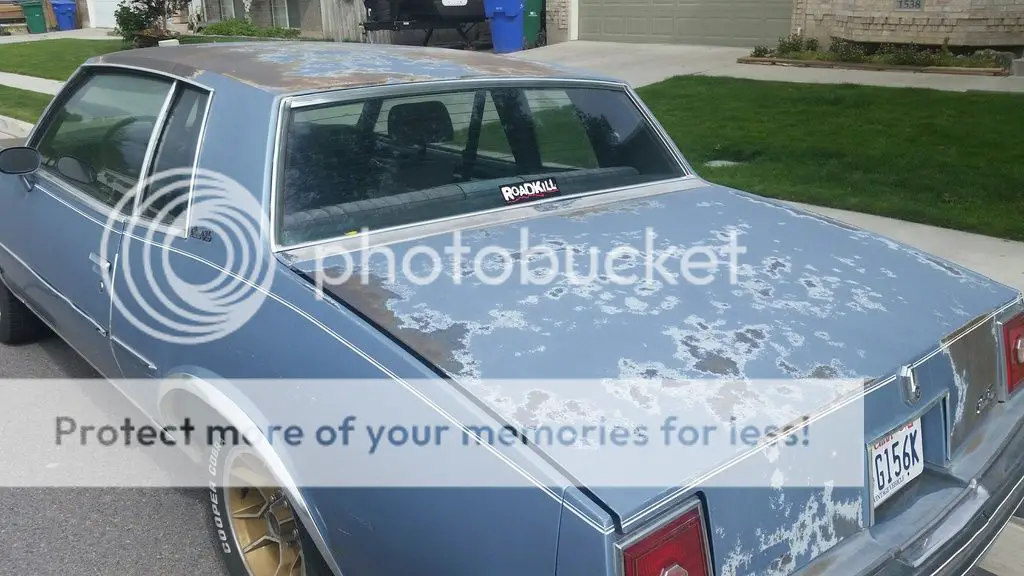
I had wanted a V8 car for some time. After much thought on the matter, I decided a G-body was the right platform for me. I spent months studying the local online classifieds (as well as those of two distant towns where I had relatives who could help me track down a car) waiting for a good candidate to come along. My criteria were simple: must be 1985 or older, under $2000, and no rust. I was open to all brands and all years (within my required age range) Finally in August 2015, I found this GP over the border in Idaho--seller's photos shown here:

80GP2_zpsqk0zdrkp.jpg


80GP4_zpstiawg5i3.jpg


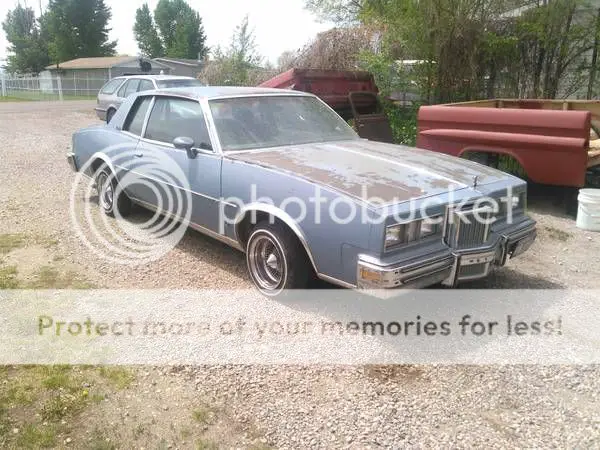
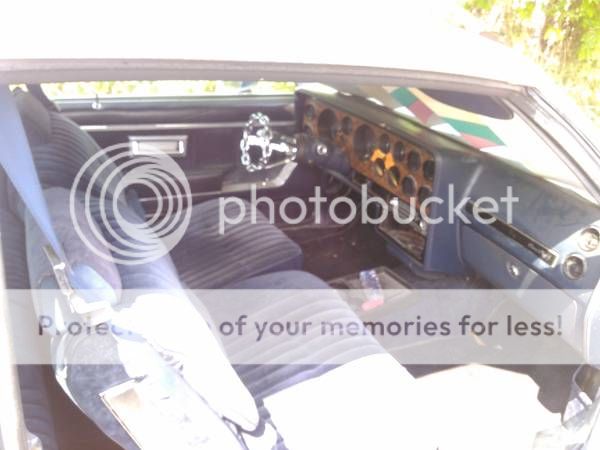
The seller claimed it was originally a Texas car; he drug it home from there years ago. This is why the paint is baked off the horizontal surfaces, but it was rock solid underneath. It had the Buick 231 underhood, but I figured I was going to upgrade the engine even if it were a V8 so who cares. I told the guy I didn't want the wire wheels or the chain steering wheel. He swapped an ugly green Chevy steering wheel into place for me, but didn't have any other wheels on hand... so I knew a wheel swap would be in my future. Happily, it came in well under my budget cap, so I drove three hours to the guy's house and towed it home with my trusty 8.1L Suburban:

80GPonTrailer_zpsube89mue.jpg


Upon first glance, my wife decreed it was the single worst car buying decision I had ever made in my life.

As purchased, the car did run... barely. I was able to drive it onto and off my trailer, but it was not at all ready to go any significant distance. The seller had told me it had sat undriven "for a little while." At the time, I figured he meant 5 or 6 months; eventually I came to realize it had probably sat for 5 or 6 years, if not more.

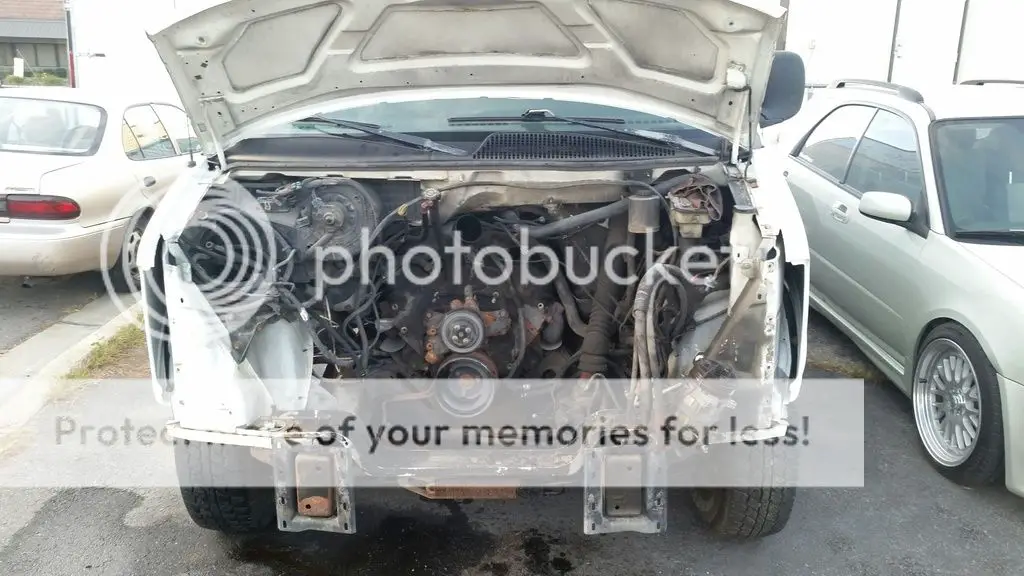
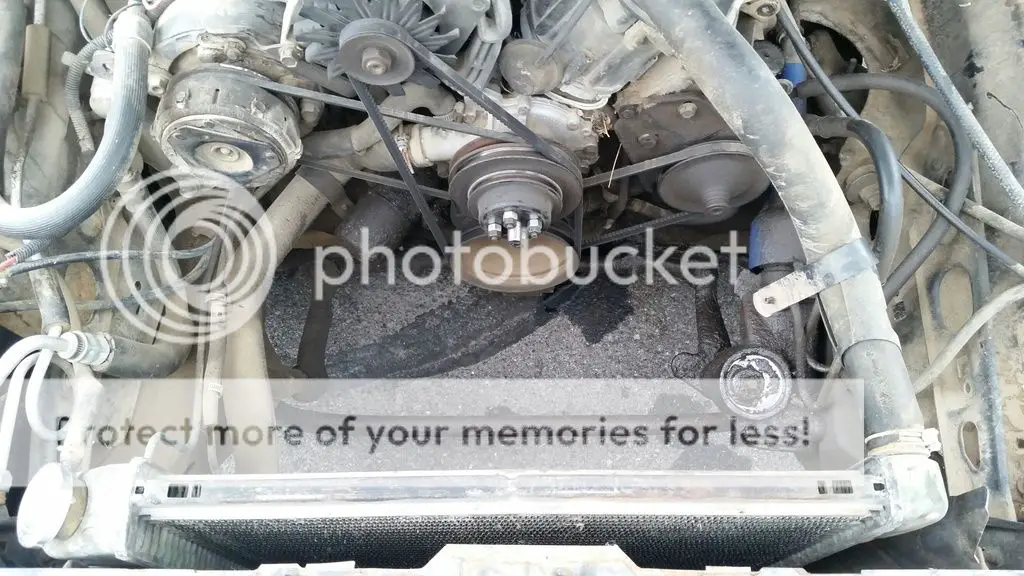
My co-worker Mike (you're going to hear him mentioned in this thread very frequently) and I quickly set about fixing all the vacuum leaks we could find. At the same time, I removed the air pump from the engine. I quickly realized the huge fan shroud was constantly in the way, so I yanked it and the mechanical fan. Wow--suddenly there was a lot of room for working on the engine!

80GPeng2_zpsjyo4pmos.jpg


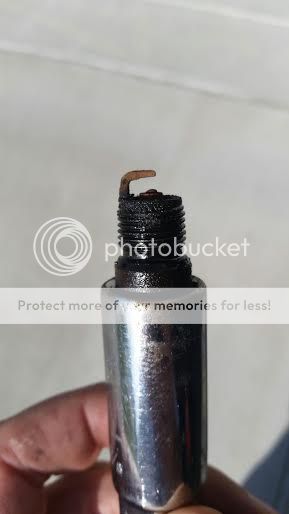
Next, I dumped the Jurassic-era oil from the engine and installed fresh oil and a new filter, plus a new air filter. The fuel pump was leaking, but a new one was only $14 so I did that, too. On a whim, I pulled a random spark plug to see how they looked... and I was greeted by this nightmare. Got gap?

80GPplug_zpspxegkadd.jpg


So in went a new set of plugs. I filled the tank with ethanol-free gasoline, added a can of Sea Foam, and let 'er rip. Now it was much smoother than before, and it would even idle on its own.

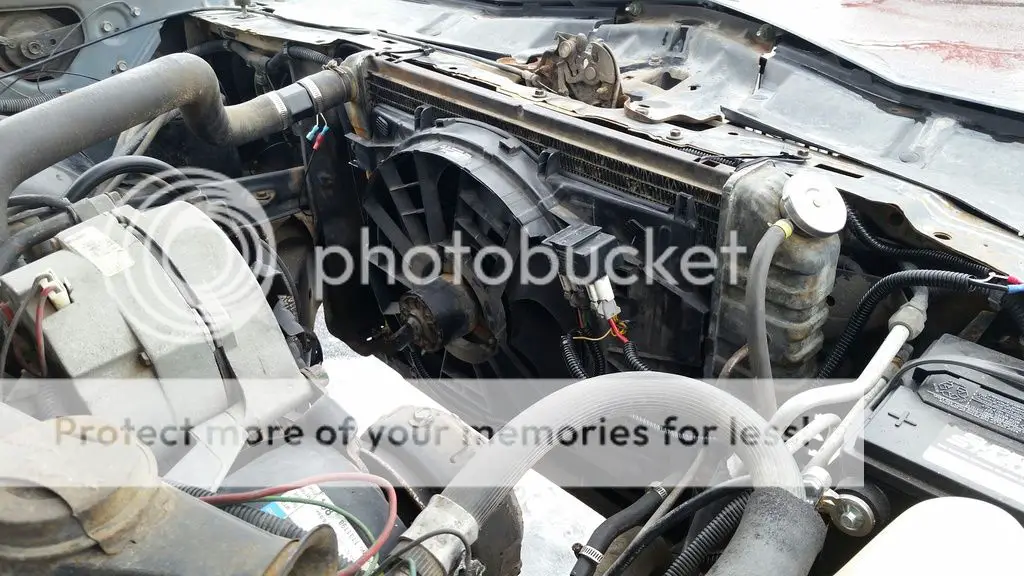
After all that work, I didn't feel like reinstalling the ginormous fan shroud. I had a few electric fans lying around the garage, and one from an old Dodge Spirit looked like it would fit... so I hung that off the radiator. I added a junkyard Volvo fan controller and a toggle switch and we were good to go.

FanConvR1_zps650apl9x.jpg


Now I just needed wheels and tires which weren't dry rotted. A local friend of a friend had a set of 15" alloys from a 1980 Z28; they were cheap, plus they matched the vintage of the car... so that was good enough for me. I wrapped them in a new set of Cooper Cobra 235/60s and--at last--I was ready to try running short errands:

80GPerrands3_zpslcketmxh.jpg
 
  • Like
Reactions: 7 users

454GrandPrix

Master Mechanic
Jul 27, 2016
429
818
93
Lehi, Utah
Why did my car need to be a 1985 or older? Because a few years ago, Utah created a new special classification for license plates (and registration) called Vintage Vehicle. There are a few restrictions for qualification, of course; one of them is that the vehicle must be at least 30 model years old. But if you meet the guidelines, there is a significant bonus: the car does not have to pass any emissions test. This way, it would be easy to play by the rules and perform whatever engine swap my heart desired.

Now that the car ran reasonably well, I was ready to plan out the swap. My very first modification, however, had to be a tip of the hat to my inspiration for this entire project:

Roadkill_zpshxq31hcb.jpg


With that out of the way, I began thinking about the engine. All along, I had kinda figured I'd end up with an old school small block Chevy. For this vehicle, I did not want to fiddle with computers if I could help it. Since emissions weren't a concern, I planned to run a carburetor just for simplicity. Some friends on another forum suggested I go with a big block instead. At first, I shrugged off this idea... but as soon as I learned the Chevy big block drops right onto the same engine mounts as the small block, I began to reconsider. I returned to the local classifieds, looking for acceptable take-out engines; I wanted something with four-bolt mains and, if at all possible, a roller camshaft. All you veterans of the hobby won't be surprised when I decided a Vortec 350 would be great.

As you all know, I wouldn't be able to bolt my V8 engine to my car's wimpy stock transmission. If I need a stronger trans, why not look for a complete vehicle? I began looking at trucks, but that was kinda futile since 95% of the local trucks are 4WD and I needed a RWD transmission. Then inspiration hit me: full-size vans! So I started looking for those. Soon I found this:

DonorVan1_zps9s8c5ndb.jpg


A non-running 1999 Chevy Express 3500. It had a Vortec 454 and a 4L80E, which was fantastic. Seller said it wouldn't start but he didn't know why. The starter was removed and sitting in the van. Hmm. Well, what the heck--it was only a few hundred dollars for the whole thing, so why not? I was afraid it was a bit too large for my car hauler, so my friend Brett graciously hauled it home on his two-car trailer.

DonorVan2_zpsmte8fa3m.jpg


I was giddy like a fifth grader in sex ed class. Why doesn't everybody buy a box van for this project, I wondered. I quickly tore into the van.

Teardown1_zpsxn3upm8d.jpg


It didn't take me too long to realize why everybody doesn't buy a box van for this project: removing the engine from the van sucks. No matter how much stuff you remove from the engine, it still sits way down in there! I decided it was kinda like a Cracker Jack box, just with a really big prize in there... somewhere.

Teardown3_zpsbvrmqsnp.jpg


Then winter came. Since I was forced to work on this thing outdoors, I decided to hold off on finishing the removal until spring.
 

454GrandPrix

Master Mechanic
Jul 27, 2016
429
818
93
Lehi, Utah
Spring 2016. At last, the engine is plucked from the the van.

OldEng1_zpstqva9tgf.jpg


It's a little dirty inside, but there are no signs of sludge so I am initially hopeful. Maybe I can just drop it in the car and go, I think to myself. But just to be sure, I decide to pull the heads for a further analysis.

OldEng2_zpsvdrpuwzp.jpg


Hey, what's going on here? The other seven pistons all look identical, but this one has a distinct shiny shape to its surface. Is it a different piston, I initially wonder. But then I look at the bottom of the head and see the same pattern. My heart sinks. Has this piston been hitting the head? For that to happen, the rod bearing would have to be significantly compromised. Off came the oil pan, where I was greeted by this:

SpunBearing_zpsgop1v1g9.jpg


Ouch! So much for running the short block as is. I dropped off the engine at the machine shop, where my machinist soon determined the crankshaft was toast (as was that connecting rod, of course). The block was fine, and the heads had also escaped unscathed. Thus I began planning out my surprise rebuild. I quickly decided I wanted to rev the new engine past its stock 5000 RPM redline, so piston and rod weight became very important to me. We put one stock rod/pin/piston combo on his scale to see where I currently stood:

PistonRodWeight_zpspdpexj1t.jpg


For the new hardware, I selected forged Icon pistons and forged Scat Pro Series rods. Once the new pieces arrived, we threw a set on the scale to see how I ended up:

PistonRodWeight2_zpsorucgywq.jpg


That's a full kilogram less rotating weight, which has got to make life easier on the crankshaft. Speaking of, I had to buy one of those as well. I spent days sweating out this decision: do I go with a cast replacement, or step up to forged? I'm not planning on forced induction, so I figured a cast crank could survive a few extra RPM... but I would kick myself if I ever had to rebuild this engine because the crank gave out. Despite the fact that the forged one cost double, I decided it was a smarter overall decision, so that's what I did.

Once the machine work was complete, the assembly process began. There was lots of shiny hardware to admire, of course. Things certainly looked better than they used to.

EngNew2_zpsqzxmdz9t.jpg


EngNew4_zpsyqgf8oyc.jpg


As I mentioned above, the heads were in good shape. My long-term plans are to replace them with high-flow aluminum heads, but that money was just diverted into rebuilding the bottom end. Thus my machinist went ahead and rebuilt my stock heads to ensure they were in great condition. The only deviation from stock was a valve spring upgrade, which would be required for the new camshaft I had installed.

EngNew5_zpsbgczjgcp.jpg


Speaking of the camshaft, I had initially decided to run the Comp Cams XM284HR (230/236 @ .050, .547/.547 lift). It is a drop-in upgrade, and I saw an article online where they were able to use it with the Gen VI without modification--it just barely clears the stock intake valves. But just before I was about to order that cam, my friend Mike made a parts trade deal with me... and I ended up with his extra new-in-box Chevrolet ZZ502 camshaft (224/234 @ .050, .527/.544 lift) as well as an oil pan conversion kit for mounting my engine into my car. This cam still seemed to be a decent match for my desired output curves, and the price was certainly right, so I went this route instead.
 
Last edited:
  • Like
Reactions: 2 users

MrSony

Geezer
Nov 15, 2014
6,831
6,741
113
Des Moines, Iowa
Coolio. Looking forward to more pics.
 
  • Agree
Reactions: 1 user

-83MONTESS-

Comic Book Super Hero
Nov 4, 2010
4,570
967
113
Bellevue, Ohio
Anything with a big block has my attention! Keep the updates a coming!
 
  • Agree
Reactions: 1 users

Texas82GP

Just-a-worm
Apr 3, 2015
7,989
18,697
113
Spring, Texas
Nice thread. Subscribed.
 

454GrandPrix

Master Mechanic
Jul 27, 2016
429
818
93
Lehi, Utah
Thank you all for your kind words. Trust me--I have many more photos to share. ;)

I've been storing my engine at a friend's shop, so that means I typically can only get down there and work on it on my day off (assuming I have any free time). That's why progress has been slower than you might expect. Over the last couple months, things have slowly been coming together. First, I installed the rest of the valvetrain.

RockersOn2_zpsc0hbvbce.jpg


At that point, Mike convinced me to paint the engine. I found a light metallic blue that was at least in the ballpark of classic Pontiac blue, so I went with that. Then the valve covers finally got put on. Next came the timing cover, oil pump and pan, completing the bottom end. Up top, I reached a sentimental milestone by dropping the Performer RPM Air Gap into place. Gee, it's starting to look like a real engine.

EngPaint1_zpsfvptckay.jpg


EngPaint2_zpsu6adonjl.jpg


A couple of my stock intake bolts were too short to attach the Edelbrock manifold, so that's where I had to stop that day. I have already run to Ace Hardware and picked up some longer bolts; now I just need to get back there and install them. With any luck, my plan is to physically mount the new engine in the car this month... even if it doesn't fire up until next month.

So that's where the engine is as I speak.
 
  • Like
Reactions: 1 users

565bbchevy

Geezer
Aug 8, 2011
9,614
12,683
113
Michigan
If you haven't secured the intake down yet I would remove those replacement end seals and lay a bead of silicone there in it's place.
Also just curious but since you replaced the rotating assembly why didn't you get the 4.25 crank instead and make a 489/496.
Nice build by the way!
 
  • Agree
Reactions: 2 users

MrSony

Geezer
Nov 15, 2014
6,831
6,741
113
Des Moines, Iowa
Pontiac Blue on a Chevy engine? :O Nice color though. Really makes be want to build a Pontaic.
 

454GrandPrix

Master Mechanic
Jul 27, 2016
429
818
93
Lehi, Utah
just curious but since you replaced the rotating assembly why didn't you get the 4.25 crank instead and make a 489/496.

I put a lot of thought into that, too. In the end, I decided the shorter stroke would be beneficial for longevity at higher RPM... so I stayed with the 4.0" crank.

Pontiac Blue on a Chevy engine? :O

Sshhh! I know I'm offending the engine gods; no need to remind them. (Maybe I'll play dumb and tell onlookers it's a Poncho 455 just to see who can tell them apart.)
 
  • Like
  • Useful
Reactions: 3 users
Status
Not open for further replies.

GBodyForum is a participant in the Amazon Services LLC Associates Program, an affiliate advertising program designed to provide a means for sites to earn advertising fees by advertising and linking to amazon.com. Amazon, the Amazon logo, AmazonSupply, and the AmazonSupply logo are trademarks of Amazon.com, Inc. or its affiliates.

Please support GBodyForum Sponsors

Classic Truck Consoles Dixie Restoration Depot UMI Performance

Contact [email protected] for info on becoming a sponsor