442 Project: Looks can be deceiving

Status
Not open for further replies.
I got my run on issue solved! I isolated the problem to the alternator. No new alternator needed, or fancy fan controller (although after some research I will set up PWM for the fans so the electrical system won’t be so stressed), just a cheap diode! $8 for a plug and play harness is all it took. If Radio Shack sold these like they did when I was a kid It would’ve been fixed for pennies.
EEB31B50-6EF4-4714-A963-34A164EA5816.jpeg

I’m really not sure why Holley doesn’t include any info in their directions about old cars needing a diode so their ignition system will work properly and by properly I mean turn off when the key is in the off position. Apparently some of the MSD 6 ignitions even include a diode! And their instructions talk about the issue I had. I’m thinking I might contact Holleys customer service and let them know and maybe they can update their instructions; which are VERY good otherwise.
 
Not a lot of building going on but a lot of fine tuning. I spent a little bit of money on a good PWM Fan controller. I actually found this auto cool 85 on a mustang forum. I’m pretty happy with it as it is a soft start and runs the fans for 15 secs after shutdown. This should put less stress on the electrical system and prevent alternator failure or making the sniper efi have any glitches from the big instantaneous draw from the fans.

B9605BAB-BC76-47CE-B4BB-9C729D4109F6.jpeg


Besides the fan it was a bit of a learning curve getting the sniper efi and timing all set up. Not really hard just time consuming. I was a bit nervous about valve train noise initially. Turns out the stock valve cover baffle was resting on some poly locks amplifying valve noise. I installed some aftermarket valve covers and the engine was quiet! I’m not super stoked about having chrome valve covers but the kinda fit the style and theme of the car.
81BB49DA-6359-4C83-B4C0-582BDB7A459D.jpeg

E2A2578F-BD88-422A-A578-E1FA947C5277.jpeg

B61A5CD6-FB47-4944-9B21-70C908754386.jpeg

If you look close you can see I have some of the ignition and efi harness routed over the brake booster where the Oe harness was for the ignition but with a couple more looms. The coil is over there as well but I was able to hide the cdi box behind the headlight pretty well. It’s not as clean as a 60s/70s car but it’s not a giant mess and actually doesn’t look like too far off from stock. The aluminum radiator and the intake are pretty big give aways though.

For now I gotta get more miles on it. Once I’ve got it well broken in I’ll fix the A/C and swap out the headers and bring it in for a dyno tune. At the speed this build is going that could be 6-9 months away. Car runs good but is way too quiet and I think some long tubes will help it make some more power.
6FAEAC7F-5CBB-4346-8BD7-BC1BDA3EFE39.jpeg

Not that it needs anymore power.


I finally got around to breaking down the 307.

No wonder the thing always ran like a pig; look at that timing chain stretch! Not only was the timing chain stretched the plastic gear was starting to come apart as well.

9311C9A4-939C-49EF-B815-9B6453254CEF.jpeg
8258F08A-CCBF-4CB0-8EEE-786037437C10.jpeg


There was a little issue with the heads too...
266FE3F7-280D-4304-A462-9F464A796EB3.jpeg

When I first pulled the intake I suspected there was something amiss with a coolant passage.
4CC9EEF2-EFDC-475D-965A-80FFB7F311BE.jpeg

It was A coolant passage but ALL of them that were completely clogged.
C7FFBAE8-04BB-4696-97AD-93AE3EFF488F.jpeg
3161426C-ACAE-4BF2-AA5D-7BD1C98EE629.jpeg

I have idea what product was put into this cooling system but whatever it was it not only sealed the leaking radiator or head gasket it sealed up BOTH heads!

The bottom end wasn’t in bad shape by eyeballing it. I’m on the fence about what to with it. Considering the engine is original to the 442 I’m considering rebuilding it so if I ever sell the car someone might want the original engine over the modified 403...
 
Not sure why ppl use dielectric instead of the correct stuff.
I went back and was re-reading your build back from post 1. Still, very impressive and keeping it Olds.

I did notice the quote above and wondered the same thing. Did a bit of investigating and it's quite possible that dielectric grease is used because it's silicone based. And contrary to popular belief, not all ignition modules came with the little heat sink grease packet. Whether someone at the packaging line forgot to put them in all of them, who knows.

My hypothesis is that dielectric grease, aka "tune up" grease can be widely used for spark plug boot lube, etc., and because many people use it, it gets ingrained into people's minds when it comes to plain dielectric grease that you can use it on all electrical junk. Which is untrue. Sure, it's silicone based. Herein lies the issue. Guys like me always are pointing to the CSM. "Follow the CSM" and you will do it correctly. The 1985 Cutlass CSM says use silicone grease. Issue is, it doesn't specifically say what kind.

In this instance, it's VAGUE. If you look in the CSM, in one picture it shows how to remove the module and reinstall. It shows in the picture..."Silicone grease here" with an arrow. The descriptor says if you're re-installing the old module, don't wipe the grease off the back of it. Ok. Good advice. If replacing with a new module, use the silicone grease packet which comes with the module. So if you use that included grease, it's actually the correct heat sink stuff. Usually, though, it's not always marked. At least not on ACDelco modules. But if the packet is missing?

Dielectric grease does NOT conduct heat or electricity well, but it will do a heck of a job keeping moisture out. This is why the little packet of "dielectric" grease you get to slather on your distributor cap for the center pin rubber disc is great. Because it's mainly for ignition wiring and connectors. Get the right stuff for the right job. And, to make it more confusing, heat sink grease can also be silicone/dielectric as well. So...be careful out there.

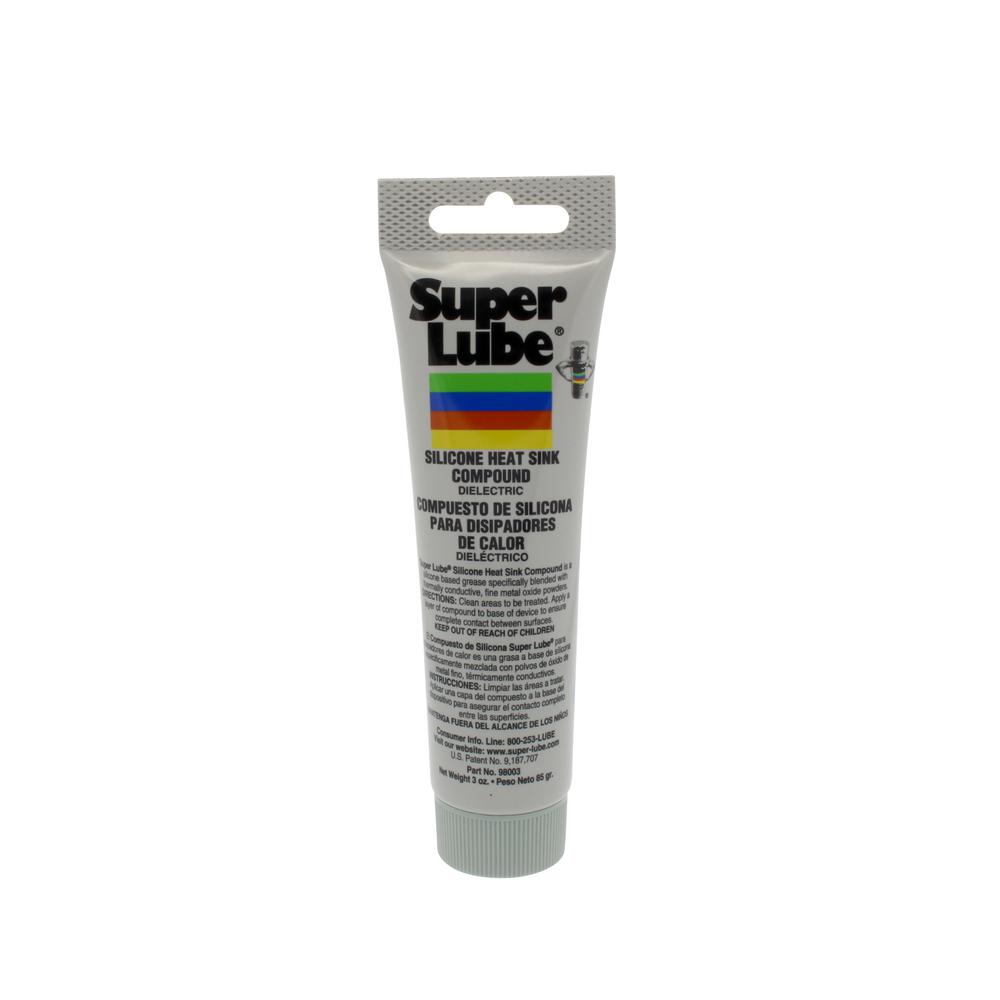
If you buy a tube of this, it'll probably last you for a long time (always make sure it's for heat sink use):
super-lube-lubricants-98003-64_1000.jpg
 
Also glad to see you putting in so much work to keep it original, many would have just dumped it and dropped an LS in it which is also fine but like to see different
 
Your build brings back a lot of memories of my old 403. Nice job on the documentation and research you did. I built mine in the 90s with intent to smoke 5.0 mustangs and Camaros. I’m glad there are more quality engine components to choose from now. What does yours run in the quarter mile?
 
Your build brings back a lot of memories of my old 403. Nice job on the documentation and research you did. I built mine in the 90s with intent to smoke 5.0 mustangs and Camaros. I’m glad there are more quality engine components to choose from now. What does yours run in the quarter mile?
Thanks!

I haven’t had a chance to get it on The track or even tuned at the dyno. It took me more time than anticipated to get the Holley tuning figured out and This summer just flew by and things were pretty hectic here in the late summer with being under constant threat of wildfires. (Excuses I know).

I’m going to be upgrading to some larger headers as soon as I can get them ceramic coated. I’d like to put a couple hundred more break in miles on it before I hit the track. I’m probably only 100-200 miles on this motor so far. Since we’re at altitude the E.T. is not going to be impressive being a NA Engine.

My whole goal of this car is to relive the 90s when I was a teenager and couldn’t afford one of these at the time.
 
What headers are you going with? I bet they are worth at least 20 hp over the 2.25" outlet Thornton shorty headers.
 
What headers are you going with? I bet they are worth at least 20 hp over the 2.25" outlet Thornton shorty headers

I bought the VERY last set of Gbody Olds Hooker Supercomps about a year and half ago for $200 on clearance. I'm guessing you're 100% right that they'll pick up that much power! CutlassEfi said these dyno'd close to the same power as the American Racing headers; although they don't look as good nor will they last as long but hey these were about $1200 less than a set of ARHs! I took Flemming442s suggestion to hack of the flanges and use some 3" Band Clamps along with some reducers, I JUST blasted and repainted them with some ceramic header paint this weekend when we had nice weather and MAYBE I'll get some time to install them in the next couple weeks now that I have all the hardware I need (there's 30"-60" of snow forecasted right now for the weekend so going to be a bit for I get her back on the road).

I'm really itching to get a couple hundred more miles on this thing and hopefully take it to the Dyno for a tuning session this spring. I still have a dented rocker to contend with and need to get the AC working. Body work will probably the very last thing I do and at the rate this project is going will be many more months.
 
Last edited:
Status
Not open for further replies.

GBodyForum is a participant in the Amazon Services LLC Associates Program, an affiliate advertising program designed to provide a means for sites to earn advertising fees by advertising and linking to amazon.com. Amazon, the Amazon logo, AmazonSupply, and the AmazonSupply logo are trademarks of Amazon.com, Inc. or its affiliates.

Please support GBodyForum Sponsors

Classic Truck Consoles Dixie Restoration Depot UMI Performance

Contact [email protected] for info on becoming a sponsor