Replacing body bushings on 1979 Monte Carlo

Status
Not open for further replies.
I looked up the instructions for the Energy Suspension G-body kit on Summit. I wonder if you put a floor jack under the bushings with gaps then and tighten them down. I think originally the body and frame reinforced each other. As the bushings squashed down over the years, the frame may have moved a little. Especially the rear ones where you say the bolts were broken. Let us know what happens.

The washers have a gold zinc coating on them - I think they will be OK.
 
I just went out and checked the 2 x #1 (Rad support) bushings. The pass side has 2 x of the factory shims and the driver's side has 3 x of the factory shims. Is that common? Is there any trick to shimming the rad support #1 correctly?

I might try using a floor jack on the frame for # 6-7 in the back. The pass side has a bigger gap than the drivers side. But the pass side both 6-7 bolts were eaten totally through. At any point should I consider using bushings on any but the Rad support?
 
The kirban replacement frame washers come in at about 14 gauge. That's what I used to fix my frame.

The frame is 14 gauge material. I made my own washers for my frame from 14 gauge and the center that is cut out makes great washers to weld in for the control arm bolts to strengthen that area.
 
The #1 (rad) bushings are shimmed to set the body lines. Start by reusing or replicating the stock stack of shim/washers.
 
I reused the shims when I installed the new bushings. The #1 position is the only one that uses these, correct?

Is there a proper procedure for making sure I get the rad support right?

For the positions #6-7 on the driver and passenger sides, provided I don't open up any gaps at the doors and fenders, should I just add washers or should I just use a jack on the frame to take up the slack prior to securing #6 & #7 on either side? The passenger side has twice the gap of the drivers side between the bushing and the body.
 
A thought on my gap on #1 (Rad support) and the larger gap on #7 passenger side. If I shim the drivers radiator support bushing (it only has 2 x shims as compared to the 3 on the drivers side) will it cause the #7 on the passenger side to get tighter? That would seem to help solve 2 x problems!
 
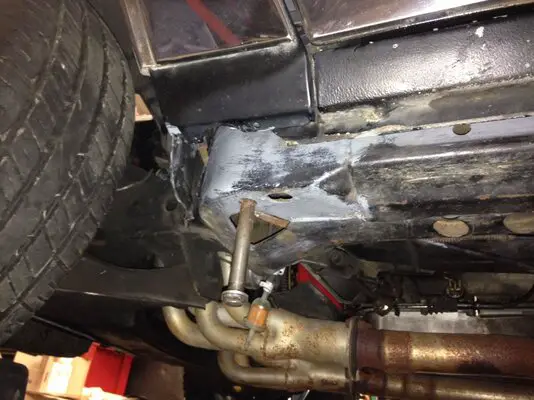
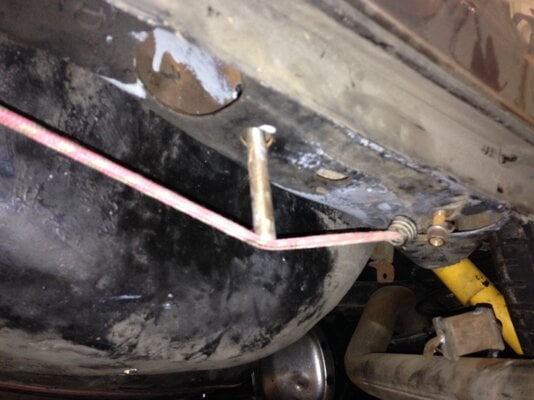
I finally got a chance to finish getting the bushings in, still have to put the bumpers back on. I had gaps on some of mine too, but the frame flexes so much, I just tightened up the bolts and closed the gap back up. I used 10 gauge washers for the fix on mine. Here's a couple pictures of how I lined up the frame to body. Don't poke fun at the bungee, I couldn't get a helper to hold the pin in!

Good luck!
 

Attachments

  • lh front locator.jpg
    lh front locator.jpg
    180 KB · Views: 324
  • rh rear locator.jpg
    rh rear locator.jpg
    131.6 KB · Views: 333
I finally got a chance to finish getting the bushings in, still have to put the bumpers back on. I had gaps on some of mine too, but the frame flexes so much, I just tightened up the bolts and closed the gap back up. I used 10 gauge washers for the fix on mine. Here's a couple pictures of how I lined up the frame to body. Don't poke fun at the bungee, I couldn't get a helper to hold the pin in!

Good luck!

Good pics! So basically I just line one up. Put a bolt in it. Secure it (maybe I'll use duct tape to be different!). Line up the 2nd hole and I'm done? How did you "shift" the body while lining up the holes?

Thanks!
 
I jacked up the LH side, put a pin in the LH alignment hole, then let the body back down hovered it a little over the bushings so I could get the bolts started on the LH side. Jacked up the RH side, and got the RH rear alignment pin in. then let it down and hovered over the mounts, got the rest of the bolts in. Since the body is being held up, the frame will move around a little to get the hole lined up. Then left it down and put the tires all on ramps. Sometime I hope to get back out and tighten them all up. Not sure if I'm going what torque to tighten them to.
 
I should be ready to secure the frame to the body this weekend. I have a couple things I'm still uncertain of.
1. For the #6 and #7 positions on both sides, do I shim them till they are tight or just simply push the frame to the body with a floor jack and snug it down (as they are loose)?

2. Is there a certain order to bolting these in? Do I start in the back and work forward, finishing with the #1 position on either side? What is your "best practice" to assure I have the correct number of shims on the #1 (Rad support) bushing? The factory shims are in place now. 2 on the drivers side and one on the pass side.

3. I think somebody put it in here, but was it 60 lb torque for all of the bolts?
 
Status
Not open for further replies.

GBodyForum is a participant in the Amazon Services LLC Associates Program, an affiliate advertising program designed to provide a means for sites to earn advertising fees by advertising and linking to amazon.com. Amazon, the Amazon logo, AmazonSupply, and the AmazonSupply logo are trademarks of Amazon.com, Inc. or its affiliates.

Please support GBodyForum Sponsors

Classic Truck Consoles Dixie Restoration Depot UMI Performance

Contact [email protected] for info on becoming a sponsor