Roller Cam Retrofit worthwhile ?

Status
Not open for further replies.
Well I got about 90 mins this morning to work on the car. The block and all the parts are painted. I even got a chance to bake the smaller parts at 160 deg for a couple hours at work Friday night and then applied the engine enamel clearcoat which I hope will help with the intake and valve covers staying clean for longer.

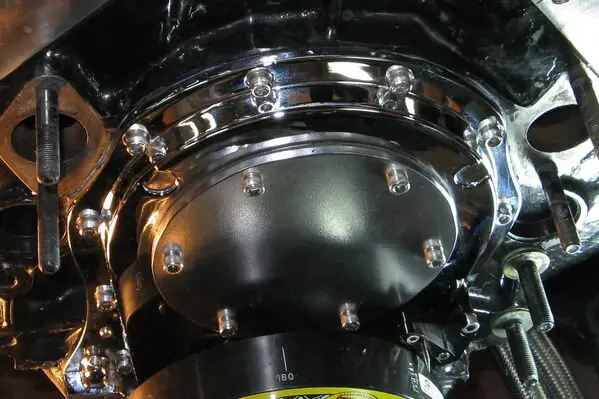
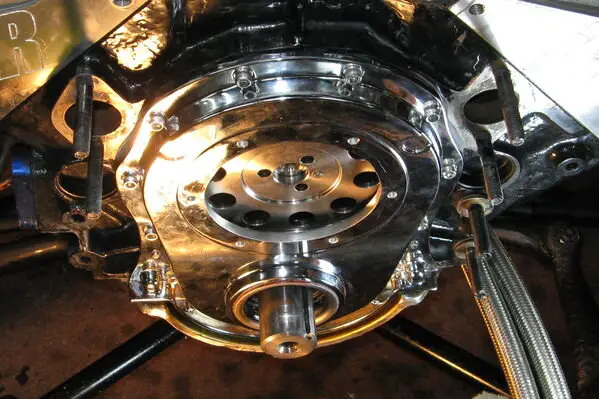
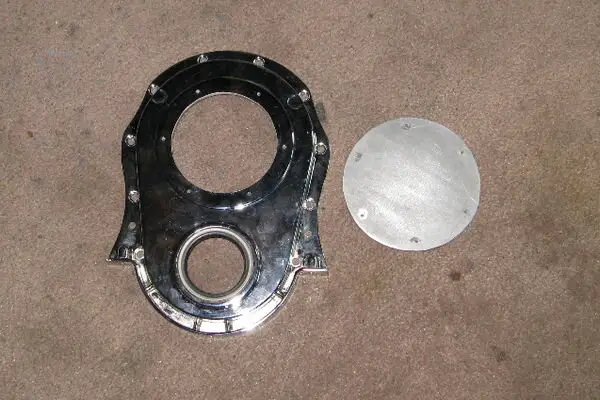
New cam went in without a hitch in a couple minutes. The rest of the time was spent trying to get the darn cam button clearance sorted out. I started with button appx 5/16" too long by installing the cam gear with button and trying to install the timing cover overtop with a couple bolts until it was even all around and measuring the gap. I don't have a lathe and the drill press is at work ( and my micrometer too ! ). Finally I figured to put timing gear in the vice with wood blocks. I cut a circle out of 1/4" plywood and drilled a hole in the centre. The plywood was then placed on the gearface with the cam button popped up in the hole I drilled. This way I could file the cam button straight and smooth as the plywood would keep it both level and square. Once close I stuck some plumbing putty on the backside of the timing cover and kept filing it down until I got it to where there was almost perfect ( where it would push out 99% of all the plumbers putty showing the timing cover underneath ) It took quite a few tries to get it all dialed in. From what I have read the gasket thickness will make up the 0.05 -0.10 clearance I need.

The lifters are now taking an oil bath with the pushrods and I hope to get those in tomorrow night. I am going to enjoy the rest of the day off and head out fishing for a couple hours ! I figure with an hour here and hour there I should have this running by next weekend. The cam button was the only thing that I was unfamiliar with so now that's over and I can make some progress 🙂
 
Really you should have the timing cover gasket on hand so you can verify the thickness before you do your cam button set ups, I have seen timing cover gaskets range from .020-.030 or more for thickness depending on brand and material used and that type of clearance can cause all kind of issues.
When I do mine I set it up with the gasket I am using in place (without sealer) and the timing cover torqued to spec so I get actual compressed thickness.
 
565bbchevy said:
Really you should have the timing cover gasket on hand so you can verify the thickness before you do your cam button set ups, I have seen timing cover gaskets range from .020-.030 or more for thickness depending on brand and material used and that type of clearance can cause all kind of issues.
When I do mine I set it up with the gasket I am using in place (without sealer) and the timing cover torqued to spec so I get actual compressed thickness.

I have the gasket and feels pretty close to the 0.005 feeler guage I compared it to. Tonight I will take home the rest of my parts and the digital caliper to get a more accurate measurement. I figured by zeroing out the cam button on the timing cover then the gasket will give me the req'd tolerence. Seems like there should be a better way to do this without having to buy a $200 timing chain cover.

Parts pile all cleaned, painted, 2x coats of clear then baked. Oh an my peach for lunch LOL

 
565bbchevy you were right ! I checked the thickness of the gasket with the caliper and it was 0.23. Spent another hour last night massaging the timing cover to get the clearance I needed as the 1 shim I happened to have in my toolbox was too thick. By the time I got the cover and balancer on it was dark.

The last pieces of the puzzle arrived ! Intake gaksets and bronze tip fuel pump pushrod are waiting to be picked up from the speed shop.

still to-do
- prime the oil pump
- adjust the rocker arms
- water pump, pullys and alternator
- rad
- intake
- fuel pump
- distributor & wires
 
I modified a $30 Ebay aluminum timing cover just to make this job easier on my big block.
 

Attachments

  • normal_IMG_0437.jpg
    normal_IMG_0437.jpg
    61.4 KB · Views: 541
  • normal_IMG_0431.jpg
    normal_IMG_0431.jpg
    68.7 KB · Views: 536
  • normal_IMG_0428.jpg
    normal_IMG_0428.jpg
    59.5 KB · Views: 549
I would suggest you get a new harmonic balancer that has the degrees marked on it. To set the valve lash on my roller I used this method so it's nice to have the TDC, 90º, 180º and 270º marked on the balancer

Degrees Adj Int Adj Exh

TDC #7 #8
90 #2 #4
180 #1 #3
270 #8 #6
360 #4 #5
450 #3 #7
540 #6 #2
630 #5 #1
 
pontiacgp said:
I would suggest you get a new harmonic balancer that has the degrees marked on it. To set the valve lash on my roller I used this method so it's nice to have the TDC, 90º, 180º and 270º marked on the balancer

Degrees Adj Int Adj Exh

TDC #7 #8
90 #2 #4
180 #1 #3
270 #8 #6
360 #4 #5
450 #3 #7
540 #6 #2
630 #5 #1

I actually have a nice GMPP balancer with the deg marked on it. Funny thing is my stock timing tab covers it LOL.

Tonight after softball I got the lifters adjusted and the intake on before the skies opened up and the rain moved in ( have I mentioned before that I need a garage ?? ). Still shooting to have this fired tomorrow night in hopes to drive it to work for a shakedown on Friday.
 
got it fired tonight just around dusk ( 8:30 or so ). I had the dist 180 deg out and threw up a couple cool fireballs. Once it was set in right the motor fired right up ! There is a definite miss at idle ( maybe a bad plug ) and I only let it run for a minute or so. Still need to get the shroud on, set the timing, and replace the power steering line I bent ( oops ! ). Tomorrow morning I am going to run it for 10 min and swap out the filter again. Then take it to work and back ( 15km round trip in the city with no power steering ). I figure I will change the oil one more time. Then I can swap out the spare dirty old valve covers for the fresh blue ones I painted, while I am in there I can check the rockers to see if they need adjustment.

Motor seems to be OK. No unusual noises, pressure was at just over 50 psi per my stand alone guage at 1200 rpm. Sounds exactly the same as the old cam. This one has more lift a 2 deg more duration.

I had to laugh as once I tried to start the car and threw up the fireball I had my son and 2 of his buddies ( all around 12 ) come running up the driveway suddenly wanting to help.
 
I needed the van for work today so I didn't get to take the monte. After supper I repaired the bend in the PS line topped off the fluids and tried to set the timing. I cannot for the life of me find my timing light :blam: 2 toolboxes and 3 cabinets at home + 1 toolbox and 2 cabinets at work and its in none of them. For now I timed it with the vacuum guage for the highest reading and smoothest idle with an easy re-start without touching the previous carb setting.

I had hooked up my external pressure guage when priming the motor and I have it now under the wiper arm so I can see it when driving . Oil pressure is just over 50 psi cold at idle. That settles to about 20 psi when hot and drops to 15 psi in gear when hot ( all the while the guage on the dash is reading pegged full at cold and 45psi at hot ). I also notice there is a new noise coming from the motor which I can only assume is link bars. I went around with both a stethoscope and a broom handle to the ear ( old school is all I know LOL ) and the noise is def internal.

I took the car for a 20 min "shakedown". There was a little pinging at cruise so I pulled over and pulled back the timing a smidge. Went to the gas station and put $ 60 of fresh fuel in the tank. From there I just putted around the neighborhood. 2 short pulls to appx 4000 rpm with no abnormal noises.

The crusty old valve covers leak oil onto the headers so it smokes a little at every stoplight and sign. Sometime this weekend I hope to check the rockers then put my good valve covers on with one last oil change. I still have a jug of 10/30 Mobil One Synthetic but may just put another batch of dino oil thru it. I also have attached an earth magnet on my drain plug and I am curious to see if it pulls any remaining metal fragments from the wiped cam lobe from the oil.

Powerwise ( aka butt dyno ) this camshaft feels exactly the same as the 268h I pulled out. Maybe I should have gone bigger ?? Maybe next spring I will pull the Edelbrock TEC Headers back to the muffs and run true dual exhaust to see what I am leaving on the table ?

Plan is to take it to the Queensway Car show tomorrow night and see who's there !
 
Status
Not open for further replies.

GBodyForum is a participant in the Amazon Services LLC Associates Program, an affiliate advertising program designed to provide a means for sites to earn advertising fees by advertising and linking to amazon.com. Amazon, the Amazon logo, AmazonSupply, and the AmazonSupply logo are trademarks of Amazon.com, Inc. or its affiliates.

Please support GBodyForum Sponsors

Classic Truck Consoles Dixie Restoration Depot UMI Performance

Contact [email protected] for info on becoming a sponsor