BUILD THREAD Sweet Johnny & Gina: A Love "Two Large" To Fail

I was thinking they were worth about $150 but I don't know why that number came to mind, and anything more than gas money to drop it off is worth it to me.

As for the bezels: Thanks Delta, I only did a quickie job to slightly improve Gina's sex appeal while they were off. I feel like I left a lot on the table there and will likely do a more thorough job when I can focus better. I plan on removing them to properly buff the paint and will likely touch them up at that time. We're moving in the right direction though.
 
It's been a few weeks since I've updated this thread because progress has been slow, but it's time to get you up to speed.

With the new headlights and Flowmaster muffler firmly mounted in place I went for a couple spirited drives to make sure everything was happy in its new home. I drove over potholes, washboard, train tracks, and miles of open highway to cover all the possible hazards of the road. After returning home each time I double checked all of the exhaust connections and only one was leaking- the main connection at the front. I tightened them all by hand and proceeded to tighten the love right outta that clamp with my 3/8" impact.

The following morning I got Gina all fired up and ready to go, and set off on my journey to work. I envisioned the group of smokers outside receiving me with "Aahhs" and applause as I burbled into the parking lot and slid into the primo parking spot by the front door. Reality went slightly different.

It's worth noting that I work on the infamous West Street in Wichita, specifically on "Tractor Row"- most vehicles on West St. are semis or heavy equipment of some kind and that has done a number on the asphalt. There's also one helluva rough railroad crossing, and it was right about here that we experienced a catastrophic failure of the rear exhaust hanger. After 20 minutes of turnpike travel the exhaust was way too hot for me to try and fix, especially this close to work, so what followed was a spectacular cacophony of ear piercing sounds that made all the hair on my arms stand up straight. I drug that Flowmaster for a mile of West, then turned onto the street I work on and proceeded to throw sparks for a city block as I dragged a formerly blemish-free muffler down the roughest pavement in existence. I still got that primo parking spot but there was a distinct shortage of applause. That's partly due to the heretofore undiagnosed clanging sound that I had attributed to a possible cracked flexplate. Even idling in Park sounded horrible again.

After 12 hours at work I had the joy of pulling the exhaust off in the parking lot with the wrong tools, fighting to separate the pieces, and getting everything but the heavy muffler back on without using a jack to raise the car. I could have used the factory one in the trunk but preferred to not risk messing something else up. After an hour I was back on the road with absolutely no bottom end power at all, but at least it had a pipe with a turndown that directed the flow down and out. After getting back home I spent 3 more hours laying on the driveway trying to plan out/assemble a semi-permanent solution that required no drilling/ modification to Gina with parts I had on hand. I ended up putting the Flowmaster back on, stealing some band clamps from Roxanne, and adding an extension between the muffler and turndown. Now the exhaust exits right by the Driver's rear tire, but underneath where you don't see it. It's hung from a frame support by the rear suspension.
 
After that debacle I decided I'd take care of the valve covers that were puking oil all over the place and change out a few vacuum lines on my next day off. Pulling and replacing the vacuum lines went swimmingly as I'd only bought a few at the time, but changing the valve cover gaskets went awry for what's becoming a very common reason: Wrong. Freaking. Gaskets. I was shown various options of Fel Pros at the gettin' place and every one I handled was correct for my application. The only version I didn't personally hold were the rubber units with a thin steel shim inside but no crush preventing sleeves, and considering the man showed me 3 correct gasket sets I assumed that what he placed in the bag was correct as well. I had intended to use those temporarily until I could afford the Fel Pro ‎VS12869T gaskets and had an opportunity to paint the covers. At this time I was blissfully unaware that I had the wrong gaskets.

After paying and promising to return I drove home and went about removing the various obstacles and then the valve covers themselves. I scraped the old cork gasket and glue from the driver's side cover into the garbage and then drowned it in heavy duty oven cleaner. I let it soak, scraped and rinsed it, then cleaned everything I could from it using brake cleaner and a green Scotch-Brite pad. I then grabbed the gasket package, pulled one out, and realized they were for a 307 and not a 305. Super. But again it's my fault for not checking before I left the store.

Believe it or not I had a contingency plan in place for just such an occasion: I still had an old, used set of rubber gaskets with steel shims just sitting on the shelf, but they were a "white box" brand I'd purchased at a swap meet -you guessed it- 20 years prior and used on my '86 C10. They were slightly squished and pretty cracked but were better than nothing (I could have used silicone if I had any at the time).

I took this opportunity to adjust all of the rockers, and while doing so I actually located the infernal sound that had been driving me mad- it was the exhaust heat valve! It's that piece under the passenger exhaust manifold that basically chokes off exhaust flow to keep it in the intake manifold as part of the Early Fuel Evaporation system. It's thermally switched, vacuum operated and the little arm on the diaphragm had rusted quite bit and became a turd. That turd broke away from the lever that operates the valve, and the exhaust gasses were banging the flapper valve off both ends of its operating spectrum, but only when it wasn't wedged in place somewhere between. It's now held in the open position with a short piece of mechanic's wire, the vacuum lines were removed, and the port got capped at the carb. The heat valve was the only thing being operated by the Thermal Vacuum Switch in the thermostat housing.

I managed to get everything back together without bleeding or breaking anything so I topped off the oil and called it a day.
 
Last edited:
  • Like
Reactions: SoFloG
It’s something that you need to eliminate. Now you know. Haha
And that combined with my disdain for EGR valves is really enticing me to swap intakes and add a set of headers- if it's not 100% stock then I might as well customize. But I have self control issues and that will turn into a cam swap with double roller timing chain and a Fel Pro one piece oil pan gasket, and I'd probably also try to talk Eric out of a pair of H.O. 305 heads to go with it.
 
And that combined with my disdain for EGR valves is really enticing me to swap intakes and add a set of headers- if it's not 100% stock then I might as well customize. But I have self control issues and that will turn into a cam swap with double roller timing chain and a Fel Pro one piece oil pan gasket, and I'd probably also try to talk Eric out of a pair of H.O. 305 heads to go with it.
Sounds like a master plan. Start with the headers
 
Who's ready for another update? Come on, you didn't think you were all caught up, did ya?

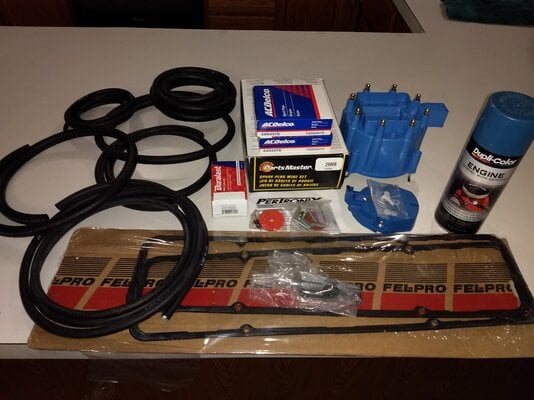
With the exhaust nonsense taken care of it was time to continue the tune-up that I would've loved to do all at once but was unable to. So I bought these.
IMG_20231120_174303265.jpg

All of the hoses got used and I'm still about 12 feet short- not an exaggeration. The PCV valve was another fun lesson in Old School Mechanics 101 for the 2 kids that tried helping me. One such conversation took place at Wal Mart, who used to sell these things right next to the motor oil and filters. When I inquired about them (in the Automotive Department no less) the kid replied "A PCD valve...... is that for a tire?". I gave a very succinct explanation of what it does and what it's for, and this prompted him to tell me that he was restoring a '69 C10. Well alright then, let the conversation blossom! We chatted about his truck and other old cars, moved onto some recommendations for him to look into, and ended with him telling me that his friend worked at O'Reilly's and probably knew what a PCV valve was. As it turns out, this guy's friend is the one who "helped" me when I bought the fuel pump from earlier in this thread.

So I went to Auto Zone hoping to run into the old-timer that just makes my day every time I talk to him but was greeted by another up-and-coming automotive expert instead. Again I went straight to the oil filters and looked for the bevy of valves that used to reside there but was confused when I found none. Did the world forget about old cars? Surely the young man that greeted me at the counter knew where they were, right? Nope, he'd never heard of them either. Millions of them on the road and employees from 2 different parts purveyors looked at me like a cow looking at a new gate when I asked for one. Ever so helpful, he looked them up on the computer and confirmed their existence, but was unable to locate them in the store. It was then that another employee walked up and pointed me directly to them: on the endcap of the electrical component aisle which is nowhere near anything oil related. Sure, that's a logical place for them.

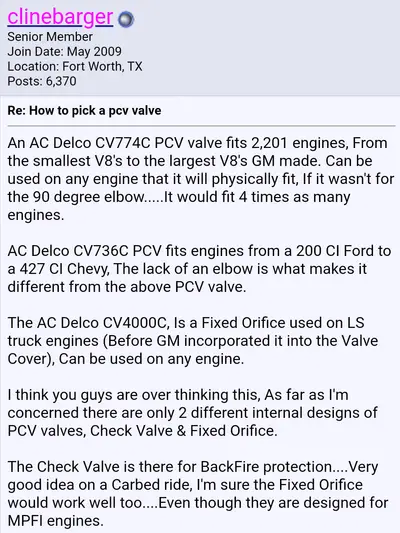
Here's a little info on PCV valves from a man named Clinebarger. If you've never ran across that name before then you've not spent much time researching, as he's active on numerous forums. The guy knows a TON about engines, transmissions, suspension, etc.- if he says something you can bet it's right. He really knows the 4L60e, and has given out a wealth of information on LS1Tech. This is not from there but I forgot exactly which forum it's from.
Screenshot_20231116-200837~2.png

The plugs, wires, and paint came from yet another parts store, but this one pretty much specializes in older vehicles and is supplied by Bumper To Bumper so they've got good quality parts and useful knowledge as well. It's the kind of place you really take your time in. The VS12869T Fel Pro gaskets were $15 cheaper on Amazon, and that's where I bought the Pertronix cap and rotor kit as well.

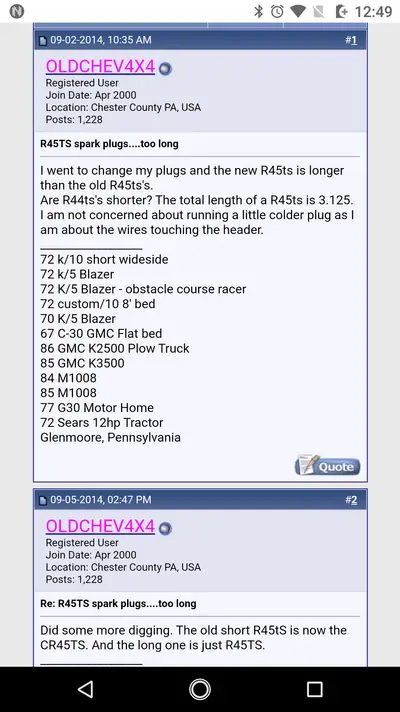
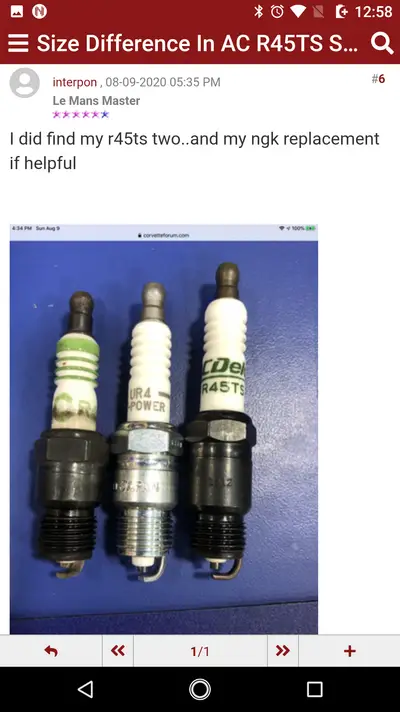
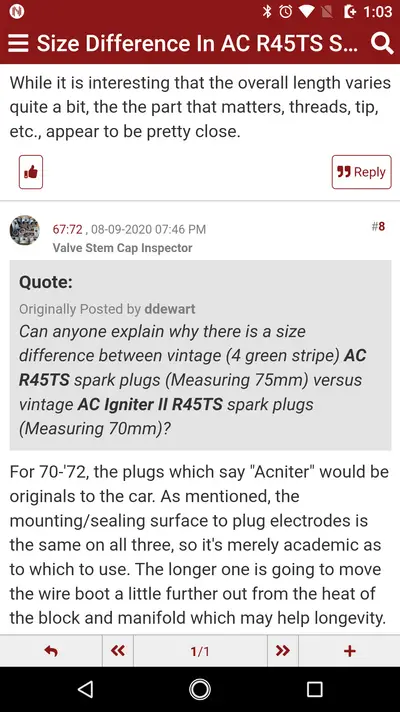
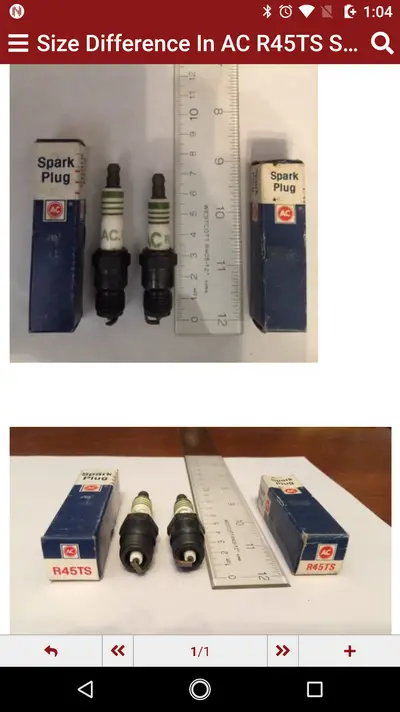
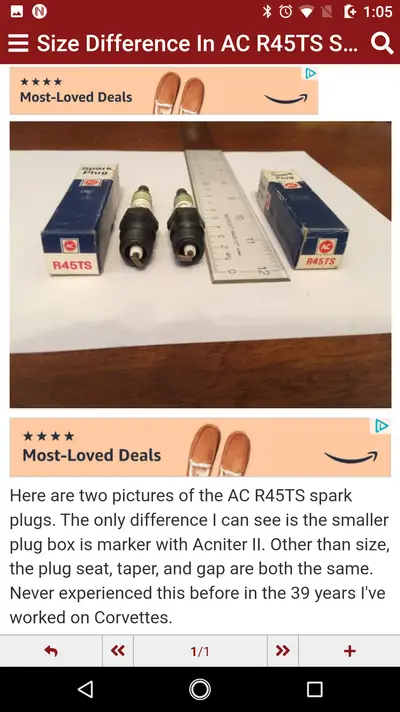
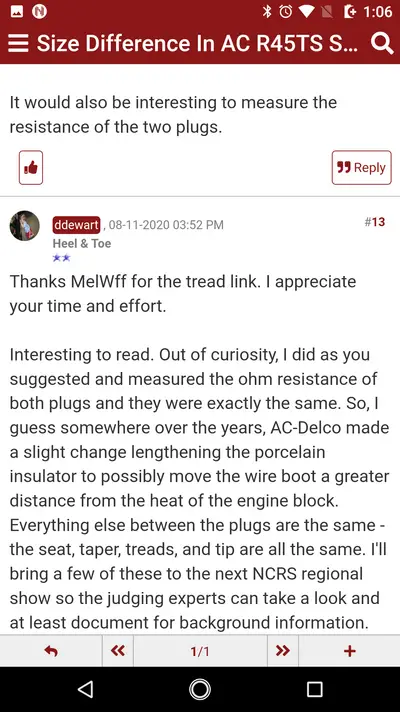
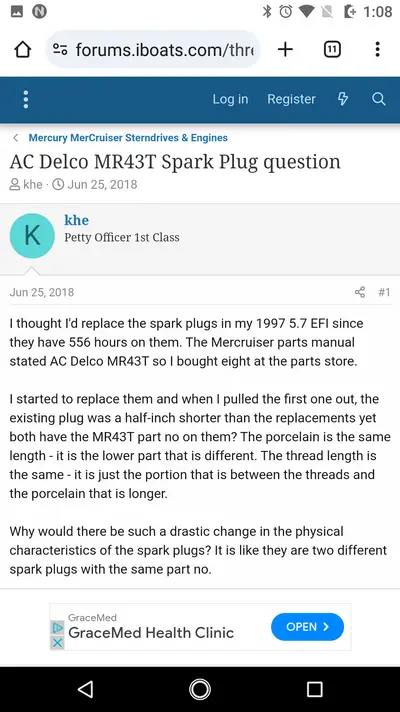
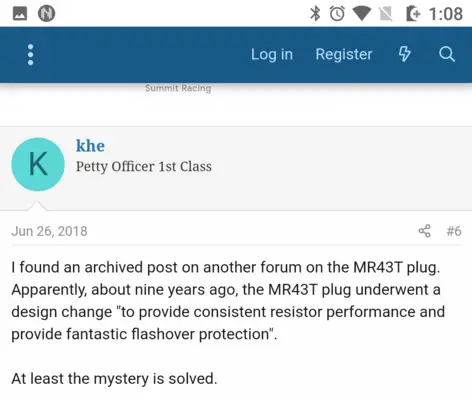
The book called for R45TS plugs which is very common for Chevy smallblocks, but they've changed slightly since that book was published. The "T" and "S" still stand for "tapered seat" and "extended tip" respectively, but the length changed around '09. It seems that they're now roughly 3/16" longer, and that added length is right in the middle. The tip, ground strap, and projection into the cylinder remain unchanged but the added length may cause interference with exhaust heat shields or other items. Apparently the CR45TS plugs are the ones you want if you're after the absolute correct size and heat range. Other plugs changed as well, and here are some screenshots reflecting that information.

Screenshot_20231117-004928.pngScreenshot_20231117-005811.pngScreenshot_20231117-010326.pngScreenshot_20231117-010447.pngScreenshot_20231117-010508.pngScreenshot_20231117-010636.pngScreenshot_20231117-010840.pngScreenshot_20231117-010857~2.png
 
Last edited:
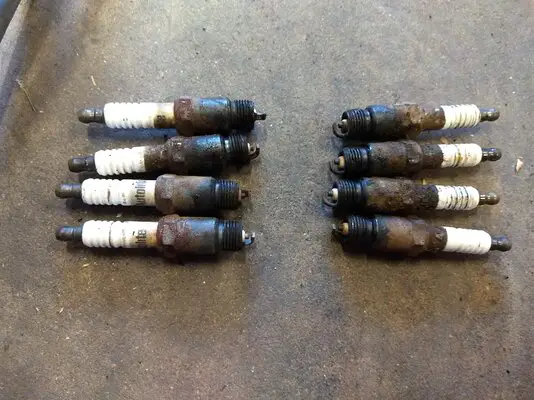
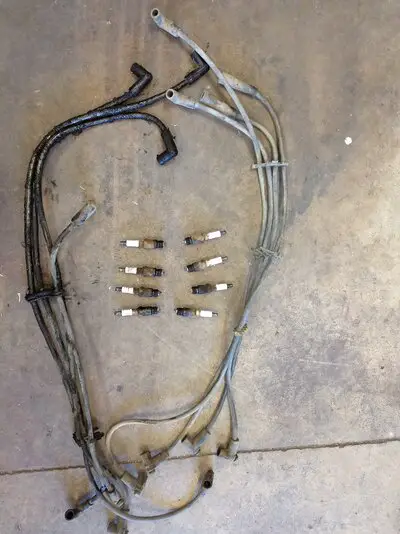
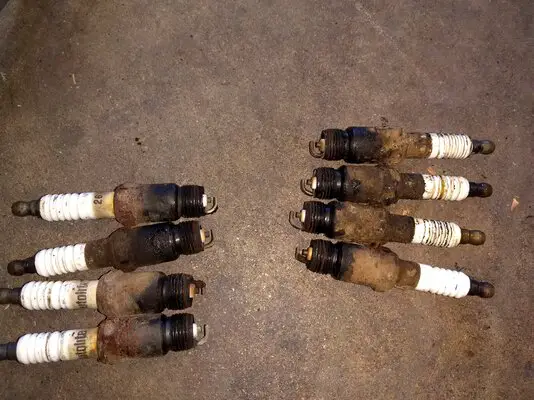
I removed the spark plug wires as complete sets and laid them on the floor, followed by the plugs which were laid in their corresponding places. Driver's side on the left in this photo.
IMG_20231122_141638600.jpg

Here's a couple closer pics of the plugs, driver's side is on the right in these photos.
IMG_20231122_141723213.jpgIMG_20231122_141741149.jpg

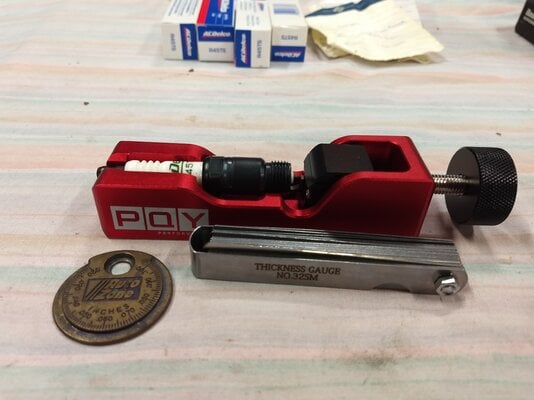
The new plugs came pre-gapped around .040 and the book called for 0.045 but I went with 0.50 for a bigger spark/ flame kernel. You can start damaging your stock HEI components if you go over 0.060 even though GM called for as much as 0.080 before they learned that lesson the hard way. I first spread the plugs wider with the traditional keychain gapper, then used feeler gauges and a much more precise tool to compress the ground strap until I reached my desired gap.
IMG_20231122_143006926.jpg

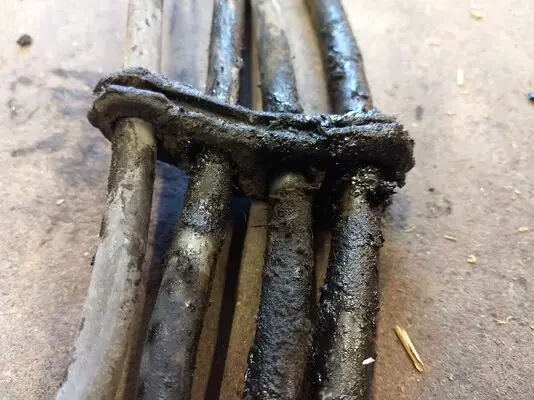
Here's the piece I've yet to replace, the rubber loom for the driver's side plug wires. I haven't seen any on the shelves nor have I received any looms with my plug wires, and I'd like to find one but will admit I haven't looked online at all. This one disintegrated when I tried separating it from the wires.
IMG_20231122_141804872.jpg

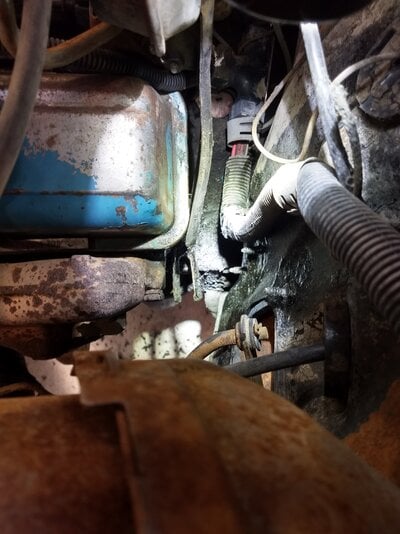
It slides into this "fork" behind and below the valve cover. It's a little hard to see in this picture, but it's the wide grooved item just to the right of the exhaust manifold.
IMG_20231122_141910052_HDR.jpg

Following the installation of the plugs and wires I proceeded to clean and mark the harmonic damper and remove all of the snot from the timing tab as well. This allowed me to actually set the timing visually instead of just by ear, and though it calls for 4°BTDC I have it at 7° initial, total timing is currently unknown. I also temporarily connected a trustworthy AutoGage tachometer since my gauges indicate that Gina idles at 2,200 in park and 1,800 in gear, and was happy to see that my guess of 1K in park and 600 in gear was damn near spot on. I'd tweaked the idle speed adjustment and disconnected the fast idle solenoid in attempts to lower the RPMs since I could tell it was higher than I wanted, but wasn't exactly sure where we were until now. She's right at 1K in park if the throttle sticks (which is almost always), gets down to 850-900 if I wiggle it, and sits at a steady 650 RPM in gear at operating temperature. The fast idle solenoid seems to get us to about 1100 or so, and it has been reconnected.

After this the plan was to do the cap and rotor as well as clean and regrease the ignition module and lube the advance mechanism. But before I changed anything else I wanted to drive the car and see what effect new plugs and wires had. Gina definitely had more power yet was absolutely falling down repeatedly throughout the powerband, but if I continued to drive like an old lady things were just fine. This was the first time that she had enough juice to push me back in my seat but it was sporadic. She'd stand up and lay down over and over again at various RPMs- it was consistently inconsistent, yet I could force it to happen. I was unable to make it through an entire gear at 3/4 throttle before she'd cough and perk right back up, then hang, then take off again.

It was late and dark so I called it quits, planning to get right back at it just as soon as I had the chance. The carb needs rebuilt and I wasn't done with the ignition yet so I wasn't terribly worried about the way she was running, which was was better than before with a few exceptions. Maybe the mechanical ignition advance was hanging up and I never knew because before changing the plugs it only ever had 1/2 the power it should have. Regardless of how much you depressed the pedal you weren't passing anything quickly, before or after new spark plugs.

At this point progress was very slow due to work, the weather, and the holiday, and the cap/rotor and valve cover gaskets have yet to be replaced. Gina absolutely hates the cold weather and now requires starting fluid every time just to get going, she also occasionally dies. I chalked this up to the weather combined with a finicky carb and possibly the ignition, and the weather dictated that I drove to and from work at 25 mph using a propane torch every 2 minutes to keep ice from forming. Driving 20 miles of surface streets took me nearly an hour and a half. I also had to run an extension cord out to the car and leave a hairdryer running inside as the engine warmed and I got ready in the morning. It snowed for 12 straight hours and nothing was done to the roads until days after when it was already melting away.

I soon discovered that a main hurdle to getting the engine started was the fact that the fuel bowl keeps drying up. I verified this by removing the line and nothing coming out. A dry fuel bowl combined with what could logically be a lack of fuel under various load conditions led me to believe that the fuel pump I bought was potentially bad. Or maybe the fuel pump eccentric on my camshaft was getting wiped. Since parts store pumps are all cheaply made (by only 2 companies until Airtex went under, now I think it's just 1) and they started staking the rocker pivots instead of driving a solid pin all the way through it wasn't hard to imagine that I got one with a bad diaphragm or valves with bad tolerances. At a cost of around $20 I decided to just buy one without even testing the old one until later.

I went back to my preferred parts store after calling to ensure they had the correct Carter fuel pump and Fel Pro gaskets. They did, I bought 'em, and they're now on the car.
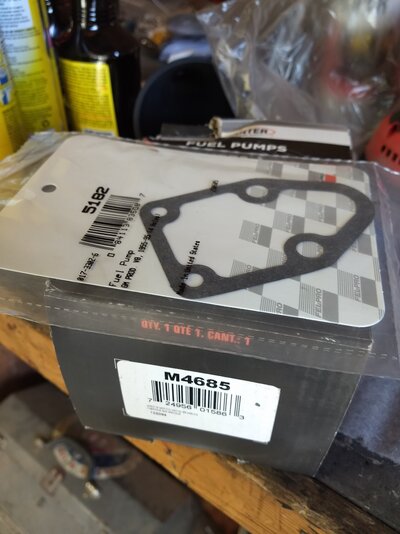
IMG_20231129_141943620.jpg
The Carter M4685 mechanical fuel pump outputs 40gph at a maximum of 7 psi, and it has only 2 ports. There is no return line.

After installation I wanted to take her for a drive after seeing if she'd die from simply idling. That's been happening more and more, especially when in gear. She passed the test but gave me trouble before I made it out of the neighborhood. I was really low on gas so I decided to chance the trip to the station 9 miles away in Derby so I could continue the test & tune session. It wasn't exactly a fun trip and I prayed that the tank didn't run dry while waiting on a train or traffic light, both of which are up a nice hill. I got past those, turned onto the 4 lane highway, and I ran out of gas (or died with 1/8 tank) then coasted into the center pump at the gas station. Lucky!!

I added 5 gallons and started back towards the house to continue working but had trouble immediately. There was definitely a major problem at hand and I had to do everything I could to keep Gina alive and not stall out. This meant I had to keep the RPMs above 1500 (actual) at all times, accelerate extremely slowly, and not try to go over 45 mph or exceed 3k. That was worse than the trip TO the gas station! Gina ended up dying twice on the journey home. What in the world was going on? I had an idea...

When I pulled up to the garage I immediately popped the hood with Gina still idling in Park so I could check something. Since I'd just came to a complete stop then the fuel bowl should be full and I should be able to pinch the rubber feed line to the pump with no effect. It closed obscenely easily and she died. Aha.

That's it, that's what it is: she's starving. If the engine is barely being fed enough fuel from a brand new Carter pump that I pressure checked with compressed air then it's only 1 of 2 things. Either the cam lobe is nearly gone or the pickup tube/ pre-screen filter (a.k.a. fuel sock) is clogged. I removed the gas cap and rubber line from the pump and blew compressed air back into the tank to try and clear any obstructions. I then used a rag wrapped around the air nozzle to act as a gasket and blew air into the tank to send fuel back to the engine bay. Try it, it works. It just takes a few seconds to pressurize the tank and force the fuel to defy gravity.

I reconnected the line, put the cap back on the tank, and took her for a spin after a few squirts of starting fluid. Keeping her at 2k got me out of the neighborhood fairly quickly, and once I hit pavement I hit the pedal. And holy smokes, she left rubber behind!!! And promptly died.

Ladies and gentlemen I believe I have 2 separate problems. The fuel is draining from the carb bowl but is not going into my oil and it's definitely not squeaking by the valves and returning to the tank. It's dripping right into the intake, which explains a couple other very minor things. The second problem appears to be a very dirty gas tank with a clogged fuel pickup point, as repeatedly proven in various ways. So instead of changing out a heater core tomorrow I'll be dropping the tank. At least it only has 5 gallons in it.

Now you're all caught up. Well, almost.
 
Last edited:

GBodyForum is a participant in the Amazon Services LLC Associates Program, an affiliate advertising program designed to provide a means for sites to earn advertising fees by advertising and linking to amazon.com. Amazon, the Amazon logo, AmazonSupply, and the AmazonSupply logo are trademarks of Amazon.com, Inc. or its affiliates.

Please support GBodyForum Sponsors

Classic Truck Consoles Dixie Restoration Depot UMI Performance

Contact [email protected] for info on becoming a sponsor