BUILD THREAD Sweet Johnny & Gina: A Love "Two Large" To Fail

I did some more work to her last Wednesday but never got around to writing about it since it's nothing major. I changed the oil and filter again and continued to play with the timing before finally arriving on something I liked. This required pulling the distributor to adjust the pump driveshaft once or twice, and pulling the cap at least 6 times to swap in different springs as I tried every imaginable combination.

It's now set at 25° initial with the vacuum can providing 20° from a ported source. The mechanical also offers 20° of advance, starts at 600 rpm and comes in fully at 3,600 rpm. The idle is set at 850 in Park and drops to 500 in gear, and the engine pulls a solid 11" of vacuum once there. While cruising at 2k I'm pulling 17" of vacuum (same as idle) and operating with 55° of advance. I melted my kickdown cable so it's currently disconnected, and if I drop the hammer cruising in 3rd there are absolutely no signs of detonation or pre-ignition. While I have 45° available between the base and mechanical the conditions are never right to also have the full 20° from the vacuum can. I could ease off the initial timing by 5° but then I'd have to adjust the idle speed screw, and I try to leave those nearly backed all the way out. I'd also lose some fuel economy on the freeway and that accounts for 50% of my time on the road. Trust me when I say she can take a lot more timing and all I have to do is limit the mechanical advance to never exceed about 55° under load, which is crazy high.

Gina seems very happy with the current timing setup and I'm going to replace the Delco R45TS plugs with some Accel U Groove Shorty Header plugs that I found in a box from years ago. They're new but tucked into a dirty 8198 box- I switched between the 576S and 574S with the engine that's currently in the El Camino and apparently had a spare set I forgot about. I also found my steel pinned oil pump shaft which means there just might be an oil pump somewhere in that garage. New blue Accel plug wires are on order, and the 90° boots will be beneficial in clearing the headers.

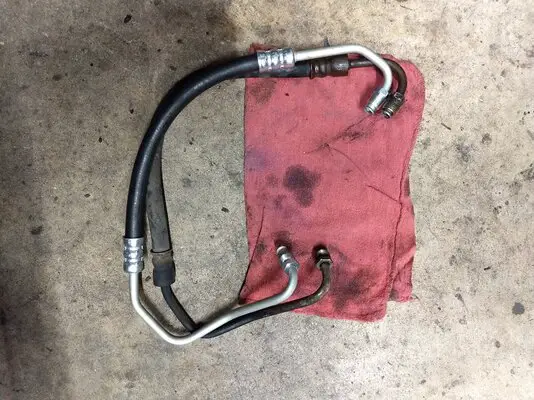
In addition to playing with the ignition I did manage to change out a few old parts for new ones. The power steering hoses finally got replaced, with the pressure side receiving a Duralast 80116 instead of the preferred Edelmann, and the sway bar received new 32 mm greasable polyurethane mounts from Energy Suspension, part # 9.5166R.

As you can see, the Duralast hose is not an exact replica of the one it replaces but it fits.
IMG_20240417_190945901.jpg

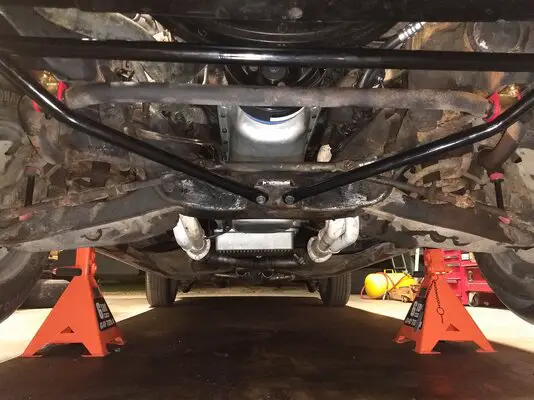
I also reinstalled my jounce bars and added a Grand Prix bar, using the original fat washers as spacers between the two. With those powder coated the sway bar looks horrible, and it'll be receiving some color soon.
IMG_20240417_204957934.jpg
 
I now regret using such short bolts for the intake manifold. I probably could've gotten away with them on one with thinner flanges but I went against my better judgement using them on a thick factory flange and am paying for it. Never before have I used bolts this short and I never will again. I've had to retorque them numerous times and some are a bit difficult to get to with the EGR valve, carb, and factory bracketry in the way which led to me over torquing a few and stressing the threads. A bit of coolant was weeping out at 2 visible locations and I was getting a very small amount in the oil so I had to go back in for another round. The plan was for a new set of Fel Pro 1256 gaskets and longer bolts.

Two days ago I bought new gaskets, pulled it apart again, and ran a file across the intake gasket surfaces again to ensure they were still flat. I managed to make them slightly better than I did the first time I did this, which I was happy with anyway. I also upgraded to 12 point intake bolts from Summit that are 1/8" longer, but I've now stripped out 2 of them entirely due to the damage I foolishly caused earlier. I still leak coolant at the same places as before, albeit less, and also have a new vacuum leak causing me trouble. Hooray.

Now, the bolts I chose are not the source of all my problems but they certainly aren't helping matters by causing a few of their own. I was initially impressed with how cleanly someone removed the rivets for the sheet metal from the underside of this manifold- it was clearly done on a mill. I say that because there are no cut marks, grinding marks, or drill bit dimples to be found at all, and the areas are machined flatter than my home state. It appeared that they cleaned up the flanges at the same time (visible patterns), and they seemed fairly flat and true when I laid a straight edge on 'em weeks ago. Still are.

Because I just seem to have this kind of luck, here's what I think I'm dealing with. Someone milled the flanges ever so slightly to clean them up when it was initially removed, it was later hit with the Dotco before being mounted again, and I filed away those Roloc disk marks and thought all was well before I used it. I'm now wondering if it's possible that they machined this sucker at an angle, whether on purpose or not. I just bought a few new 1 1/4" and 1 1/2" Allen head bolts from a local spot and hope I can swap out the ones I messed up without having to pull the manifold again, even though I should.

This is my first time using the 1256 gasket as well, and while I blame them for nothing I like the Mr. Gasket units with the orange sealing beads on both sides better. I may need to go with the thicker universal Fel Pro gasket or just run the Mr. G Ultra Seals with slightly oversized ports if these bolts don't snug up and cure the leaks.
 
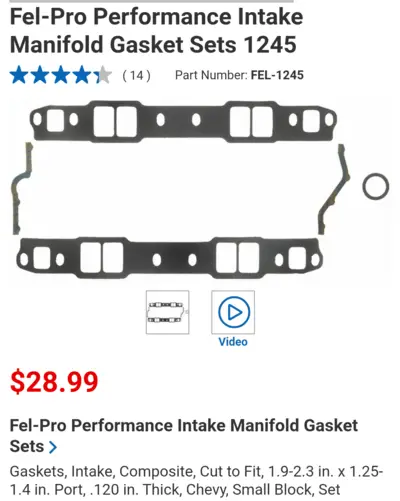
It's official: I'll be installing the Fel Pro 1245 gaskets, as I just can't get these to seal.
 
Good luck. That's my go-to.
I'm guessing you don't typically run the exhaust crossover but I will be for this one since I'll be using the EGR valve. I've never cut holes in an intake gasket for the metal pieces before, am I supposed to put RTV around them? I think I might use some Permatex Spray- A - Gasket on 'em just in case, I'm tired of this already.
 
I'm guessing you don't typically run the exhaust crossover but I will be for this one since I'll be using the EGR valve. I've never cut holes in an intake gasket for the metal pieces before, am I supposed to put RTV around them? I think I might use some Permatex Spray- A - Gasket on 'em just in case, I'm tired of this already.
Typically no, but I have before in years past. I run a bead on the front and rear of the lifter valley and kinda seat the "bottom corner ears" of the gaskets in said RTV bead, with intake/exhaust ports lined up. After letting the RTV tack up for 10 min or so. Then, dab a thing bit of RTV around the exhaust x-over holes on the gasket and place the restrictor plates right on top of the gaskets, and bolt the intake manifold on. Torque the inner bolts in a cross pattern and then work to the outer bolts. I've thankfully never had a leak from the inner bolts on a manifold that I've installed, and only an oil leak by the oil sender port after my brother insisted on using the rubber front and rear valley gaskets.
 
They should provide the metal plates with the holes for using the x-over and the ones without. When using an intake without a x-over you don't even need the plates, but I'd suggest using the ones with holes if using the x-over. Without them in there the gasket life is decreased and they end up burning up around the edges and leaking over time.
 

This is what I used last couple times not the 1245 sorry. If the 1245 don't come with the heat port provision you might want to grab these 90314 instead and save yourself the hassle.
I very seriously considered trying some of those and they're the only ones that come up on the FelPro site when searching by my car. That's a steel core (PermaTorque) which isn't always compatible with an aluminum intake, the only other gaskets I found with the exact proper port size were the 1256 (PrintoSeal), and those are the ones that I need to replace. I've used the steel cores with an Al intake on iron heads before with no issues and even have 3 sets of them in a box but decided a rubber/ paper composite gasket would be better from the start. That sure seems to have worked out well for me, huh?

The ports on the 1245s need to be enlarged by 0.09" height-wise but the width is close enough at 0.02" too large, and being 1/8" thick they're twice as thick as the 1256. I believe I need a thick gasket to accommodate my milled flanges but it has to be able to squish, and do so unevenly. These don't have any holes for the x-over but I've got the metal plates.

Screenshot_20240428-010346~2.png
 
  • Like
Reactions: SoFloG
First thing you do with the 1245 set is get rid of those rubber end strips, aka china rail gaskets. They do not seal well and they will squirm and move on you. The best alternative is a continuous 1/4 inch high bead of RTV in your color of choice. For that get the RTV in the caulking gun version, the long tube, because it is easier to maintain pressure on the trigger as you apply the sealant. Using the smaller tube and hand pressure to get that bead on the back rail can become problematic. The bead should start right at the point where the head meets the block/china rail and continue in a non-stop application to the same point on the other side. Oh yeah, be sure to apply a thin smear of the RTV around the front and back ports where the coolant would be flowing to seal them up. Thing with the RTV is that a little bit can go a long way and it does smush under torque and pressure so will ooze out. ever so little. Once you have your torque sequence done, you can ever so gently wipe off anything that looks unprofessional to get that "polished" look.

Also going to suggest that you consider ARP 12 point intake screws, either black or chrome, as your new fasteners. Not a plug for the product per se, just easier to put a 12 point socket or wrench on them when dealing with tight spaces. As for the tightness, maybe a drop or two of Loctite blue as a bit of insurance.

Just a thought or two here,

Nick
 

GBodyForum is a participant in the Amazon Services LLC Associates Program, an affiliate advertising program designed to provide a means for sites to earn advertising fees by advertising and linking to amazon.com. Amazon, the Amazon logo, AmazonSupply, and the AmazonSupply logo are trademarks of Amazon.com, Inc. or its affiliates.

Please support GBodyForum Sponsors

Classic Truck Consoles Dixie Restoration Depot UMI Performance

Contact [email protected] for info on becoming a sponsor