BUILD THREAD Turning Back Time

Status
Not open for further replies.

ssn696

Living in the Past
Supporting Member
Jul 19, 2009
5,543
6,662
113
Permanent Temporary
It was time to shift the safety upgrades to the rear axle as well.

I pulled the original wagon axle and put in the 3.73 Auburn posi 7.5" axle I rescued from the blue wagon in 1996 when I parted it out. I also had kept the used set of the Hotchkis rear control arms and frame braces. Along the way, I put in a new pair of Superior replacement C-clip axle shafts and fresh brakes.
DSCN3937.JPG


DSCN3938.JPG


The red rust on the left upper rear control arm should set off alarm bells. I might have found the water bed...
DSCN3940.JPG


I swapped in a set of used Hotchkis control arms I had bought for the blue wagon back in 1994. When I parted that one out, I boxed up these, knowing I'd use them again some day. The powder coating has seen better days, but this area won't be seen at car shows...
DSCN3962.JPG


I had to notch the factory frame braces slightly to install the Hotchkis control arm reinforcements. These connect the upper and lower control arm bolts together.
DSCN3952.JPG


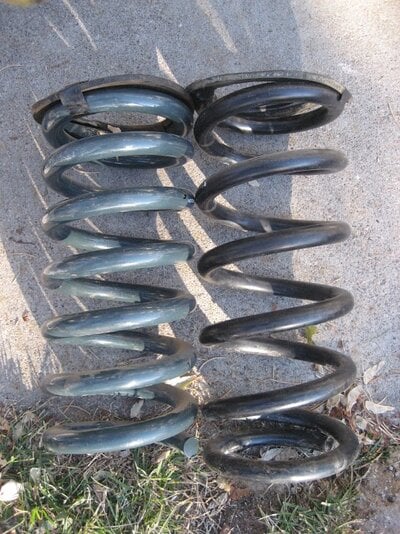
I put the Hotchkis rear coils in and bolted everything together. Unfortunately, the Hotchkis lowering spring kit is meant for coupes. I don't have a photo, but the wagon's extra weight in the rear made it look like it was doing a quarter mile launch - while parked. I'm glad I did not order lowering shocks... The next photo is from after I lowered the rear axle again and put in a set of Moog CC507 CarGo coils. Us wagon guys are on our own - not a lot of pre-fab performance options for wagons...
DSCN3965.JPG


I also added air bags and a painted stock F41 rear sway bar. The Hotchkis arms have sleeved holes in the stock sway bar location. Finished the job with a pair of stock-height Bilstein shocks to match the Car-Go coils.

And we're still not done yet...
 
Last edited:

ssn696

Living in the Past
Supporting Member
Jul 19, 2009
5,543
6,662
113
Permanent Temporary
The wagon ended up with more rake than I liked. For my next try, I had researched the coil spring data on a couple sites and settled on a pair of Moog 5660 coils. The wire diameter is slightly less, and the coil is taller unloaded.
IMG_2508.jpg

I read several Forum members had good luck taking out a quarter coil or so to get the right ride height. Uncut, they looked about right to me with the CarGo Coil 507s.
IMG_2512.JPG


Further upgrades would be Moog 5662 or 5664. Go here for more information: http://jeffd.50megs.com/Moog_Spring_Page.htm
 
Last edited:
  • Like
Reactions: 1 users

ssn696

Living in the Past
Supporting Member
Jul 19, 2009
5,543
6,662
113
Permanent Temporary
The wagon sat for a while. I debated whether to continue or to bail. I solicited some ideas from the Forum on the transmission. I considered a manual conversion -- I have a World-Class T5 and all-new Tremec gears to replicate the 1991 Camaro V8 2.95/0.63 gear ratios, plus all the pedals, linkage, bellhousing, etc. In the end, I did not want to cut up the floor to go manual. Since I already had a 3.73 rear ratio, I decided on a TH200-4R over the 700-R4. I researched and hunted, and located one from a Grand National courtesy of Forum member TobyP. It was supposedly rebuilt by AAMCO....fingers crossed...
DSCN5573.JPG


It is a real BRF code unit, supposedly rebuilt with a new torque converter.
DSCN5575.JPG


After putting it upside down on an engine stand, I pulled the pan and cleaned it up.
DSCN5574.JPG


TobyP made sure I knew it did not come with its lockup solenoid, but I planned on converting it to a non-computer setup, so no problem. I put in a Painless Wiring torque converter lockup kit. This stupidly expensive kit has everything needed, including the vacuum and brake pedal switches.
DSCN5588.JPG

DSCN5592a.JPG


Shiny pan, plus new yoke seal.
DSCN5601.JPG


I also replaced the front seal and filled the torque converter with 2 quarts of Dexron.
DSCN5658.JPG


I knew my transmission lines were toast, as well as for a TH200C, so I ordered a kit from Inline Tube in Michigan. The extra line on the right is a rear brake line. Talk to Customer Service - they can a-la-carte any kit they sell.
DSCN5708.JPG


Up next - a heart transplant.
 
Last edited:
  • Like
Reactions: 1 user

ssn696

Living in the Past
Supporting Member
Jul 19, 2009
5,543
6,662
113
Permanent Temporary
While I was deciding what to do about an engine, I explored converting the wagon to fuel injection. I picked up a new Spectrum tank for just over a hundred dollars. Based on a recommendation from Liquidh8, I also ordered an Astro van 4.3 fuel injection / level sender.
DSCN5255.JPG


The tank has a structural baffle, but it will not solve the fuel starvation problem when the fuel level is low.
DSCN5253.JPG


The wagon tank is about 16 inches deep.
DSCN5251.JPG


But, the sender is about spot on. Way to go, Jim!
DSCN5266.JPG


The big pipe is a vent - I'll either cap it or see if I can use it with the stock fill pipe later.
DSCN5260.JPG


The sender indexes the wrong way, but I filed the alignment tang on the sender so I could rotate it 180 degrees and drop it in.
DSCN5258.JPG


Now the outlet faces about perfectly at the factory hose location.
DSCN5261.JPG


For now, I boxed up the new tank with the sender installed. I plan to go carbed for a while until I decide on the EFI system I will use.
 
Last edited:

ssn696

Living in the Past
Supporting Member
Jul 19, 2009
5,543
6,662
113
Permanent Temporary
In March, my friend Florian planned a week in New Mexico to help me work on the Malibu. I helped him a few times, and I was really psyched to have an equal turning wrenches. The plan was to R&R the engine in four days, including a cam swap and a few other details

First, we disconnected the plumbing and wiring, and drained all the fluids. I had already cut off the exhaust a while back.
DSCN5578.JPG


As darkness was falling on the first day, we pulled the motor out.
DSCN5580.JPG


The next morning, Florian kindly scraped and degreased the engine bay.
DSCN5581.JPG


A trick I learned from a Forum member is wrapping things in foil rather than masking tape. As long as it's not windy, it's fast to put on (and take off afterwards).
DSCN5590.JPG


DSCN5591.JPG


Then I hit the frame with Eastwoood's Under Hood Black. Did the firewall and transmission tunnel, too.
DSCN5593.JPG


It sure looks nice, but we would discover during installation, it scratches easily.
DSCN5594.JPG
 
Last edited:

ssn696

Living in the Past
Supporting Member
Jul 19, 2009
5,543
6,662
113
Permanent Temporary
While the paint dried (and on into the night) Florian and I worked on the new engine. A little explanation is required first.
I assembled the motor a few years ago as a 330HP 350, using GM's 24502476 camshaft. The block was a crate 1-pc rear main 350 with the fuel pump pad drilled for a mechanical pump. The PO spun a bearing four-wheeling in the arroyos. I had it bored +0.030, and carefully chose the pistons to closely match the dish in GM's 330HP to match its 9.1 compression. Since I was planning to go to fuel injection down the road, I collected the parts to replicate the long block under GM's Ram Jet 350. Both engines use stock GM 8060 Vortec heads. I had to swap the cam, lifters, timing chain, and pushrods.

Here's where we started.
DSCN5091.JPG


Next, we pulled the balancer, water pump, intake manifold, oil pan and timing cover. The pedestals in the lifter valley show that this is a roller cam block. Note the (budget) Morse-link style timing chain.
DSCN5606.JPG


I had to pull the hydraulic lifters out of the way with a pick. Since the engine was never run, I can reuse the cam and lifters.
DSCN5611.JPG


Using the cam sprocket as a handle...
DSCN5614.JPG


The GM 14097395 roller cam used in the HT383 and Ram Jet 350. It's a marine cam, and is compatible with the 0.465" lift limit of the stock 8060 Vortec heads. The hydraulic cam is cast iron while the roller cam is billet steel. The distributor gear will need to be changed.
DSCN5619.JPG


I used a GM the single roller timing kit specified in the RJ350 parts list.
DSCN5620.JPG


I found 16 Federal Mogul roller lifters on EBay - Made in USA!
DSCN5625.JPG


The other hint that this is a roller block are the flats machined at the tops of the lifter bores. The alignment guides just drop over the lifters.
DSCN5628.JPG


The roller cam does not have an angle ground in the lobes to draw it against the distributor gear, so it needs the retainer plate installed. The retainer feature is another sign this is a roller cam block.
DSCN5621.JPG
 
Last edited:

ssn696

Living in the Past
Supporting Member
Jul 19, 2009
5,543
6,662
113
Permanent Temporary
After putting the timing cover back on, we worked together to install the oil pan. This time around, I used a Fel-Pro one-piece gasket. Much fewer leaks than the old cork/rubber/RTV route of the past.

I chose to use GM's own intake manifold gaskets for the Vortec heads. These have silicone embossed on the plastic frame, with metal crush-limiters to save you from yourself. I still put a dab of RTV below, around, and above the tabs at each end of the gasket. Note the lifter guide retainer 'spider' held down by three bolts. I used lock washers to make sure they stayed put.
DSCN5636.JPG

After laying a 1/4" bead of RTV on each block bulkhead, I guided the intake manifold in place. With one hand on each end, I use my pinkies to feel where the bulkheads are so I drop the manifold straight down into the RTV. I hate cleaning it off and doing it over. Note the eight vertical Vortec intake bolts at the extreme ends of the block. I put the valve cover on lightly, as I still need to prelube the engine and adjust the rockers
DSCN5638.JPG


With the fuel pump, water pump and balancer reinstalled, we are back in business.
DSCN5641.JPG


Next, I started working Camaro the serpentine pulley system. I will use a mechanical fuel pump and carburetor for now, so I needed to devise a fuel line that fit under the A/C bracket. I used an old coat hanger to bend a prototype, then spend an hour forming a 3/8" brake/fuel line with a bender and my bare hands. A lot harder later...
DSCN5642.JPG


Here's the almost-finished product, buried under the bracket.
DSCN5643.JPG


Here are my little helpers removing the engine stand bolts. Note the tongue of concentration.
DSCN5647.JPG


And ready for a stabbing. Loctite the flexplate bolts. The flexplate itself will come back to haunt me later.
DSCN5650.JPG


Hold for a photo, guys....you missed a belt loop, dude.
DSCN5653.JPG


And...done.
DSCN5655.JPG


Cheers!
DSCN5657.JPG

What a day and half.
 
Last edited:
  • Like
Reactions: 1 user

ssn696

Living in the Past
Supporting Member
Jul 19, 2009
5,543
6,662
113
Permanent Temporary
And now, the transmission. Taped a trash bag over the shiny oil pan, and slid it under across a big sheet of cardboard.
DSCN5660.JPG


The Jeg's crossmember was on backorder, so we used a TH350 crossmember I had in the shed. With a cardboard shim, good enough to hold it up.
DSCN5664.JPG


Remember the flexplate? I carefully hoarded a piece of junk for years. No idea when the damage happened. That was at least a bad vibration in the future.
DSCN5727.JPG


And the Inline Tube transmission lines went in with just a little massaging by hand.
DSCN5732.JPG


And two days after we finished up...
DSCN5755.JPG
 
Last edited:

ssn696

Living in the Past
Supporting Member
Jul 19, 2009
5,543
6,662
113
Permanent Temporary
While I waited for the backordered Jeg's 200-4R crossmember, I painted the radiator support.

With all the mechanicals out of the way, it was a good time to get into the nooks and crannies with POR15 and arrest the rust.
DSCN5805.JPG


I brushed it rather than spraying it, so I could get behind the header panel, but dirt kept dropping out of the hood sound deadener panel. I will probably sand the part around the fan shroud one of these days and shoot it with Underhood Black.
Rad Support Paint.jpg


The Jeg's crossmember showed up a few days later. It was not very useful.
DSCN5809.JPG


The hump under the driver's side just barely clears...as long as the driver's side sits on a brick, not the frame rail. I made a frame rail extension out of a 20 inch piece of 1x2 box steel. If I bolt the Jeg's crossmember pad UNDER the extension, it does not hit the driver's floor board. But it holds up the trans for now.
DSCN5811.JPG


It's one weird design.
DSCN5814.JPG


Probably cut it and lower the driver's hump about half an inch.
DSCN5815.JPG


The instructions suggest that interference is likely due to sagging body bushings. I have to start working that problem.So now the wagon build thread is up to date. Stay tuned.
 
Last edited:
  • Like
Reactions: 2 users

liquidh8

Comic Book Super Hero
Sweet! I just had to catch up this morning on the updates.
 
Status
Not open for further replies.

GBodyForum is a participant in the Amazon Services LLC Associates Program, an affiliate advertising program designed to provide a means for sites to earn advertising fees by advertising and linking to amazon.com. Amazon, the Amazon logo, AmazonSupply, and the AmazonSupply logo are trademarks of Amazon.com, Inc. or its affiliates.

Please support GBodyForum Sponsors

Classic Truck Consoles Dixie Restoration Depot UMI Performance

Contact [email protected] for info on becoming a sponsor