What did you do to your non-G body project today? [2021]

Status
Not open for further replies.
Could become a pull apart pocket item

I would have done that today but given how mine both disintegrated upon contact I can only assume the rest will too. Dude on Trailvoy found a GM part, trying to see if it's the right one now. Sure looks like the ones I removed.
 
  • Like
Reactions: ck80
Good deal! Also, random question for all of you:

Does anyone have a good part number for windshield washer nozzles for an Envoy? The universals I just installed spray the roof. Old ones had a 12, new ones say 16. I was led to believe that this is the width of the pattern, but am beginning to suspect it pertains to the trajectory?

The dual sprayer GM part #15878745


  • Like
Reactions: Texas82GP
Swapped out the fog lights for LEDs on my F150. The factory halogens were awful so I swapped the low beam/DRLs for Morimoto 2 Stroke 3.0 LEDs a while ago. They weren't cheap but they dim down for DRL mode, they don't flicker and they don't blind oncoming traffic.

The fogs aren't as important and don't get as much use but I want them to match so I went with Sylvania Zevo bulbs for about 1/3 the price of the Morimotos. Eventually I'll do the high beams too.
20211219_162634.jpg

Halogen on drivers side, LED on passenger side.
20211219_155602.jpg

Both swapped.
20211219_162526.jpg
 
Finished the complete breakdown on that T56 and got a really close inspection.

So here's the thing with these for any of you who want to run one: 5th & 6th are NOT gears you run under power in. They are for cruising. Here is what happens when you do, the 5/6 Cluster Gear which is normally pressed on the Mainshaft will wear the splines out as you can see here. Both are trash.
2nd Gear synchro friction ring came apart also, probably from sitting up since I found it like that, if it was ran there would be galled metal everywhere. This is another good reason to tear one down and inspect it before running it.

20211219_160221.jpg
 
The dual sprayer GM part #15878745


You're the second one to spit out that part number, the first seemed to find conflicting results on whether or not they'd work, but they sure look like the ones I took out.
 
  • Like
Reactions: 5spdCab
Since I'm headed to da U.P. MI, with all of its glorious lake effect snow, I decided it was time to get off my lazy @$s and fix the 4wd. I'd tried pulling codes for it and it said everything was fine. The switch panel would come and go, and it doesn't throw a code for that so I popped the switch out of the bezel, plugged the electrical back in, and flexed the switch around. With this, I could repeatably get it to come and go so I ordered the switch. It came in today.

PXL_20211221_214901588.jpg

PXL_20211221_214935017.jpg

200 (5).gif


Button clicks are a bit crispier too. Next I went for another cold weather annoyance: the squeaky blower motor. I've been extra lazy with this one. It's been squawking the last couple of winters when cold. Turn it on high for a minute and it shuts up. I tried the cheap way and it seems to have worked. Yoinked the motor and put a couple drops of ATF on the easy to see bushing. Next I decided to see how filthy the HVAC box was. These GMT400 trucks are notorious for plugging these up.

PXL_20211221_224754098.jpg


Mine really wasn't that bad.

Edit: I didn't look at this pic close enough, that left row is slammed shut with dust!

I still hosed it out though. Thinking back I should have hit it with some simple green before the hose, but too late now. After 2 easy wins, I went for a 3rd. My radio cuts out when it's cold and I hit a bump. Suuuuuper annoying. I popped its single DIN face off and the contacts on both sides look healthy. I ran a pencil eraser over them, thinking that's not it. It does look like the Metra bezel fits a bit tight on the left side and that's the side you push on to pop it out. I suspect it pushes the face over a little bit onto the plastic separator dealies? Who knows, gotta get it to mess up first then try something else. I think I'll try and shim the radio over to take some pressure off of the bezel against its face.
 
Since I'm headed to da U.P. MI, with all of its glorious lake effect snow, I decided it was time to get off my lazy @$s and fix the 4wd. I'd tried pulling codes for it and it said everything was fine. The switch panel would come and go, and it doesn't throw a code for that so I popped the switch out of the bezel, plugged the electrical back in, and flexed the switch around. With this, I could repeatably get it to come and go so I ordered the switch. It came in today.

View attachment 188821
View attachment 188822
View attachment 188823

Button clicks are a bit crispier too. Next I went for another cold weather annoyance: the squeaky blower motor. I've been extra lazy with this one. It's been squawking the last couple of winters when cold. Turn it on high for a minute and it shuts up. I tried the cheap way and it seems to have worked. Yoinked the motor and put a couple drops of ATF on the easy to see bushing. Next I decided to see how filthy the HVAC box was. These GMT400 trucks are notorious for plugging these up.

View attachment 188824

Mine really wasn't that bad.

Edit: I didn't look at this pic close enough, that left row is slammed shut with dust!

I still hosed it out though. Thinking back I should have hit it with some simple green before the hose, but too late now. After 2 easy wins, I went for a 3rd. My radio cuts out when it's cold and I hit a bump. Suuuuuper annoying. I popped its single DIN face off and the contacts on both sides look healthy. I ran a pencil eraser over them, thinking that's not it. It does look like the Metra bezel fits a bit tight on the left side and that's the side you push on to pop it out. I suspect it pushes the face over a little bit onto the plastic separator dealies? Who knows, gotta get it to mess up first then try something else. I think I'll try and shim the radio over to take some pressure off of the bezel against its face.
Since you did fix it to travel to MI, maybe it could be covered on your travel expenses when you submit it.
 
  • Like
Reactions: Clutch
Since you did fix it to travel to MI, maybe it could be covered on your travel expenses when you submit it.

I could write it off. . . if I had flowed that expense through the LLC. But I ran it dry being the end of the year so nothing leftover to wet my own beak with.
 
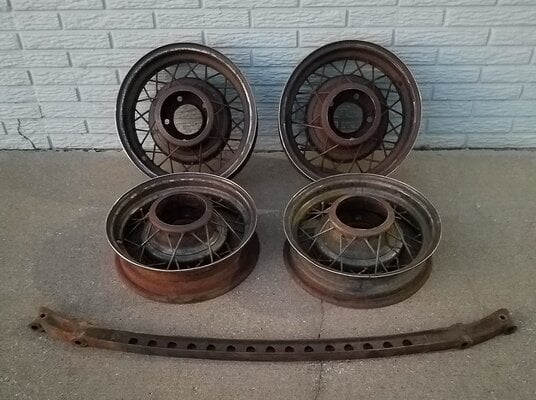
Started yesterday on one of the 'so-so' Model A wheels from our recent acquisition, Straightened the spokes that were tweaked/bent & hammered & dollied out the tweaked/bent portions of the outer lip. After that it was inspecting & correcting the tweaks/bends/dings on the other 3 'better' wheels where I tagged them for damages while watching them rotating on the balancer. After cleaning up as many of the noted spots as possible, I ran a 60grit flap disc over the front-side/back-side outer rim edges to clean them as much as needed for a clean consistent edge. After that, I sprayed them down w/some HD over cleaner to sit overnight.

This AM I headed straight to the one decent old-school coin-op car-wash that actually still has heated water. I spent $5 rinsing the 4 wheels under high pressure. Amazingly, 2 of the wheels still had a lot of layers clinging on. Another $5 & they didn't look much better. Back to the shop & another round of the HD over cleaner.

While that was in time-out mode, I put my '99 CC shorty on some jack stands to determine the source of a fuel leak noticed in the last couple of weeks. I checked the lines & found the leak @ the filter housing. Apparently the guy cranked so hard on the fittings he must have tweaked one side (inlet side) & after enough vibration it cracked. So I picked up a new fuel filter, air filter, oil filter & oil for some maintenance. Fresh oil, fresh filters, & no-more gas leak. Hopefully my in-city milage will go back up to 11-ish.....🙄

Once that was done, I returned my focus to the wheels. I decided to hit the stubborn two w/a small wire brush to help speed the removal of the multiple layers. Geezus, what a mess. I took the wheels across the street to my work & hosed them down w/some 130°F water & one was still had residual paint/funk. So, one more round w/the over cleaner & I'll see where that last one is in the AM. If it looks decent, I'm going to run them by the dealership to get my buddy to put them on the balancer again & see if there's any visual improvement.

As I was closing up shop, another part was dropped off as well.... My buddy is always scouring the Model-A pages (his passion). He came across someone he knew selling a 32 front axle for cheap. 1st to respond & we got it; cheap. On top of that, the guy already drilled the beam so that made it an even better deal! With that sourced & a pair of '32 spindles, that's roughly 2" of front drop vs. the stock '30 front axle. Now I'll order a Posies reversed-eye drop spring for ~4-5" of front drop w/o having to cut on anything. I'll get some rear springs to match & the height of things will be mo-better (again, w/o cutting up an OG steel car).

Edit for Wednesday..... Two rounds of stripping w/Aircraft paint stripper & a wire brush got the rest of the old paint off.
 

Attachments

  • 20211222_174503.jpg
    20211222_174503.jpg
    289.8 KB · Views: 78
Last edited:
Slow day in the shop today so one of my guys helped me with this front plate. It had some metal ground out of the ring from the previous owner because of the slave cyl they were running.

Prepped and welded in the spots, and I machined it down flush and concentric. I'll fix the hole when I get it on the transmission. Should work fine to mount the LS slave cyl.

PLATE.jpg
 
Status
Not open for further replies.

GBodyForum is a participant in the Amazon Services LLC Associates Program, an affiliate advertising program designed to provide a means for sites to earn advertising fees by advertising and linking to amazon.com. Amazon, the Amazon logo, AmazonSupply, and the AmazonSupply logo are trademarks of Amazon.com, Inc. or its affiliates.

Please support GBodyForum Sponsors

Classic Truck Consoles Dixie Restoration Depot UMI Performance

Contact [email protected] for info on becoming a sponsor