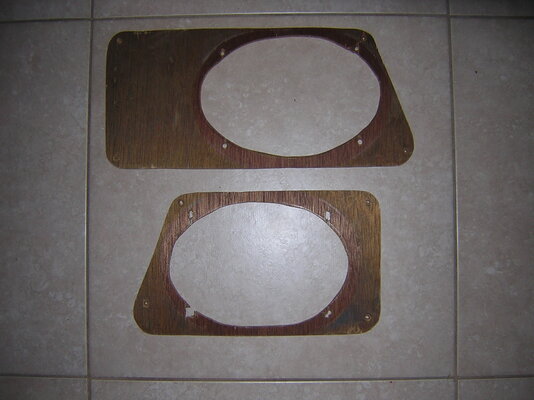
1980 Pontiac LeMans Station Wagon - G-T-faux (stuck with it, and can't shake it... like a bad case of herpes)

Status
Not open for further replies.

motorheadmike

Geezer
Nov 18, 2009
8,976
27,522
113
Saskatchewan, Truckistan
ssn696 said:
30 years ago, I made inserts for the storage cubbies in the rear of my 83 Malibu wagon. The LeMans and Malibu interchanged a lot of parts- maybe yours has those too? I fit 6x9s in there no problem. I might even have the plywood panels stashed somewhere still.

Great minds think alike. I already have the sketches and MDF ready to go. ;)
 

motorheadmike

Geezer
Nov 18, 2009
8,976
27,522
113
Saskatchewan, Truckistan
Ran State-side (again) this morning to pick up a pretty large order of parts: more stereo equipment, more sound deadener, more engine crap (fittings, air filter, 4 aluminum intake piping, 3" v-bands, etc), transmission cooler, LS1 front brake conversion parts, and some dress-up parts.
 

Attachments

  • 1620817_10152259923098885_1964731458_n.jpg
    1620817_10152259923098885_1964731458_n.jpg
    131.5 KB · Views: 920
  • Like
Reactions: 1 user

ssn696

Living in the Past
Supporting Member
Jul 19, 2009
5,543
6,662
113
Permanent Temporary
Sounds like I'm too late, but sure enough, I found the inserts. While I was looking for something entirely else! 25 years later they look like crap, but I was rather proud of my design back then.

Today I redecked a friend's 6x12 trailer, then he helped me load two 14-bolts, three 10-bolt fronts, and a Dana 44 front. The hoarding is showing signs of improvement. Who needs a gym membership?!?
 

Attachments

  • DSCN5061.JPG
    DSCN5061.JPG
    362.8 KB · Views: 878
  • DSCN5062.JPG
    DSCN5062.JPG
    317.6 KB · Views: 881

motorheadmike

Geezer
Nov 18, 2009
8,976
27,522
113
Saskatchewan, Truckistan
Thanks for the visual!

----

It has taken me nearly two days to methodically cover the interior with sound deadener (GT Mat "Onyx" in the front and Eastwood brand in the back; The GT Mat "Onyx" is far superior in both quality and ease of installation IMO). I still have a few details to go over as well as the inside of the doors and the tailgate.

Oh, and here is the new spare tire hatch cover (I still need to laminate two pieces of 1/2" MDF together - that is the top curing its Tremclad top coat)... I have big plans for this thing.
 

Attachments

  • 75080_10152263250313885_203189393_n.jpg
    75080_10152263250313885_203189393_n.jpg
    127.2 KB · Views: 873
  • 1800491_10152263250558885_700016749_n.jpg
    1800491_10152263250558885_700016749_n.jpg
    119.3 KB · Views: 879
  • 1554362_10152263250718885_1217364258_n.jpg
    1554362_10152263250718885_1217364258_n.jpg
    120.5 KB · Views: 861
  • 1622638_10152263250838885_1358784459_n.jpg
    1622638_10152263250838885_1358784459_n.jpg
    108.7 KB · Views: 872
  • Like
Reactions: 1 user

ssbrewskyaz

Master Mechanic
Dec 29, 2010
472
102
43
New River, Arizona
Damn Dude, You hauled *ss on that sound deadener! Wish I had two days in a row to work on my junk. Did you say you're not doing the ceiling? What about the doors and tailgate? Can't really tell how your hatch lid works yet but I definately get the reason for doing it that way. Looks good, keep plowing along, you should beat me to the finish line handlley.

Scott, ...

:arrow: :arrow: :arrow: :shock:
 

Longroof79

Rocket Powered Basset Hound
G-Body of the Month
Oct 14, 2008
12,156
9,762
113
Gainesville, Fl
Mike,
I assume you're eliminating the rear cargo floor section with the spare tire hatch?
 

motorheadmike

Geezer
Nov 18, 2009
8,976
27,522
113
Saskatchewan, Truckistan
ssbrewskyaz said:
Damn Dude, You hauled *ss on that sound deadener! Wish I had two days in a row to work on my junk. Did you say you're not doing the ceiling? What about the doors and tailgate? Can't really tell how your hatch lid works yet but I definately get the reason for doing it that way. Looks good, keep plowing along, you should beat me to the finish line handlley.

Thanks! I have suffered death by a thousand cuts, but it is in there. I will not be doing the inside of the roof skin with any sound deadening product; the doors and tailgate will follow when I have a spare moment, and are easily added later on. My whole rationale for adding the sound deadener/insulation is to improve over what the factory gave us - not create the Cone of Silence effect (for the younger folks who don't get the reference: http://www.youtube.com/watch?v=HWtPPWi6OMQ); so I focused on areas subject to radiant heat, vibration, or impact. After that it is just a question of getting the best return on reducing resonance on large surface areas (inside the doors, tailgate and quarter panels) which will aid in the quality of the stereo system; to this same end I may add some small strips in the bottom of the spare tire well.

I hope to have the car on the road by May.

Longroof79 said:
I assume you're eliminating the rear cargo floor section with the spare tire hatch?

Yup, now I have a big useless chunk of sheet metal wasting away in the garage... no jokes. ;)

I should have some updates by the weekend.
 

motorheadmike

Geezer
Nov 18, 2009
8,976
27,522
113
Saskatchewan, Truckistan
Finally got the damn thing back together for the last time... and this was on top of wiring the whole car for sound. A picture is worth a thousand words, see attached.


We still need to upholster the hatch before final installation. And if I am right I have left just enough room for a 10lb bottle of button induced fun (which is also why there is a power and ground distribution block back there); please don't tell my wife. :rofl:

I've also cut my templates and started fabbing up the "cubbie hole" MDF mounts for the rear woofers. Making surprisingly good time on this despite that I hate working with wood (*cough*MDF*cough*). I should have pics soon for those who are interested.
 

Attachments

  • 1016253_10152278414128885_967721325_n.jpg
    1016253_10152278414128885_967721325_n.jpg
    111.5 KB · Views: 754
  • 1782072_10152278414038885_1690759567_n.jpg
    1782072_10152278414038885_1690759567_n.jpg
    129 KB · Views: 771
  • Like
Reactions: 1 user

motorheadmike

Geezer
Nov 18, 2009
8,976
27,522
113
Saskatchewan, Truckistan
When you are on a roll you go with it... Tada! cubbie hole speaker plates.

They are made out of 5/8" MDF and came out rather well all things considered. They are getting prep'd for paint and upholstery as I write this; and obviously the interior panels will need some cutting to fit.


I am thinking that, other than some sound deadener on the inside of the quarter panels, I may try my hand at using some polyfill (aka synthetic pillow stuffing) to tighten up the sound. The passive cross-overs for the component speakers will be mounted on the backside of the cubbie speaker plates.
 

Attachments

  • 1660374_10152280293143885_1196723064_n.jpg
    1660374_10152280293143885_1196723064_n.jpg
    101.6 KB · Views: 759
  • 1897796_10152280293033885_544409489_n.jpg
    1897796_10152280293033885_544409489_n.jpg
    100.9 KB · Views: 750
  • Like
Reactions: 1 user

Longroof79

Rocket Powered Basset Hound
G-Body of the Month
Oct 14, 2008
12,156
9,762
113
Gainesville, Fl
Are the interior panels going to be re-installed, or are you just going to modify them to accommodate the speaker enclosures?
From how it appears, it looks as though you're going a slightly different route.
 
Status
Not open for further replies.

GBodyForum is a participant in the Amazon Services LLC Associates Program, an affiliate advertising program designed to provide a means for sites to earn advertising fees by advertising and linking to amazon.com. Amazon, the Amazon logo, AmazonSupply, and the AmazonSupply logo are trademarks of Amazon.com, Inc. or its affiliates.

Please support GBodyForum Sponsors

Classic Truck Consoles Dixie Restoration Depot UMI Performance

Contact [email protected] for info on becoming a sponsor