79 Cutlass Wagon G-machine build

Status
Not open for further replies.
Ok everyone, I finally found the box that had my camera in it so I'll be posting more of the build items real soon. For now, here's a teaser of where it's at right now...

I was playing around with a can of orange spray paint for some stripes on my temporary rattle can semi gloss black paint scheme a couple days ago. The driveway at my new home made the perfect photo opportunity...
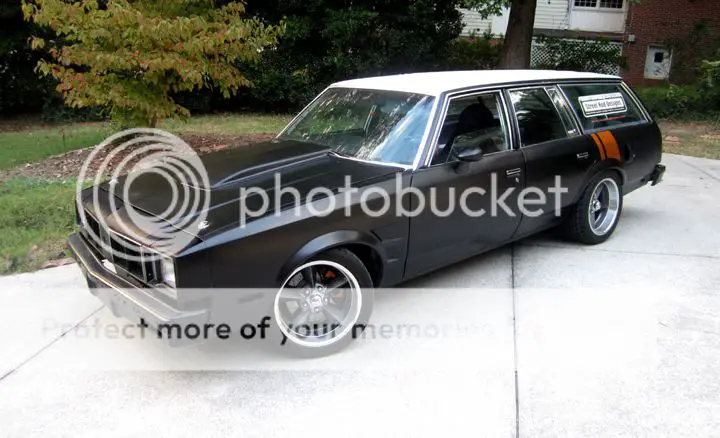
3-4shotsmall.jpg
 
Couple photos from the road trip from Utah to Georgia. First photo was in Colorado, second was in Kentucky I think. Notice on the roof of my Daewoo is the new sub frame for the Nova, lol...

Tow2.jpg


Tow1.jpg
 
Ben,
The wagon actually looks good in semi-flat black. It must have been quite an adventure caravaning halfway across the country with your vehicles in tow. I assume you hired a moving company to move the rest of you possessions.

Hope things are going well for you and your family.

Thanks for posting pics. Keep 'em coming. 🙂
 
Yeah you just made my mind up, I am definitively going to buy an Olds wagon. Even though its missing stuff it looks flat out awesome.
 
81 Cutlass- Yeah, it's got a long way to go, particularly body work and trim, but even "in progress" it looks pretty cool.

Blake- Not bad at all. I have a 12:1 ratio steering box so it's pretty touchy and having the weight on the tail end made it a bit more so, but generally it was a pretty relaxed ride. I think if I did this with stock suspension and 14" tires it would've been a totally different story though.
 
Looks good, loving the fender scoops. I have the GNX ones, and was contemplating that style, looks like you beat me too it, lol. They flow nice. :mrgreen:
 
Thanks everyone!

OK, finally I have some spare time for updating, going back in time to Utah and the front suspension assembly...

This shot shows the Speedway Motors circle track "spindle savers" installed. Not sure they're necessary but they're a little extra inexpensive insurance and should eliminate any potential flex in this area.

spindle01.jpg


...and my custom front 10mm thick, hub and wheel centric spacers for the front wheels. Next to them is the universal 3/4" spacer I used with the GTA wheels. With the custom ones there's no slop in mounting, so there's no driving vibration caused by the spacers getting offset when mounting the tires.

spacers002.jpg


I measured, re-measured, and repeated the process several times to be sure I had something that would fit without issues. It paid off, there's barely room between the caliper and the wheel but it keeps the wheel/ tire assembly neatly tucked under the fenders and now there's no rubbing while turning.

spacers003.jpg
 
After I got the front suspension done I moved to the dash wiring to get the later model steering column and switches installed. The main reason for swapping these was because my 79 column was damaged pretty heavily when the car had been stolen and I really couldn't stand not having wiper delay.

I did a lot of research on this and read that it was kind of a pain to swap these over. I was a bit nervous about the whole process but once I got in there what I found was that it was a relatively very simple swap. Anybody with an early g-body could do this...

First off, the steering column wiring is almost exactly alike between my 79 and the 85 Cutlass columns. The 85 column had some sort of additional plug near the bottom that took a little research to figure out. It went into the engine computer and after a little debate on the g-body forum and a bunch of research with different wiring diagrams I finally found it safe to assume it was a simple gear indicator switch and I could leave it unplugged in my car. My guess was correct, it didn't affect function at all.

Next on the list was to swap the headlight switch wiring. The 79 dash had the typical push/ pull headlight switch with the dash light dimmer activated by turning the knob. The junkyard 85 Cutlass switch is a push button with a separate wheel that adjusts the dimmer. I think just this alone will give the interior a cleaner more modern look.

headlightswitch01.jpg


Here's a photo comparing the wiring for the newer switch and the 79 wiring. Notice they're the same.

headlightswitch02a.jpg


I pulled the pins from the 79 switch and trimmed and spliced them into the wires for the 85 switch. Pretty basic wiring here.

dashwires02.jpg


The process was basically the same for the wiper wiring, wherein the wiper switch is now on the column rather than on the dash. I did this back in August, so if memory serves me right, the 82+ g-bodies got a re-designed wiper motor that has reversed polarity. To do this steering column swap YOU ABSOLUTELY MUST SWAP TO THE NEWER WIPER MOTOR TOO. On the right is the wiring from the column, the left is the 79 wiper switch. The main difference is the green delay wire, which needs to be wired directly to the green wire coming out of the newer wiper motor rather than spliced into any dash wiring. On the switch in the photo you also see a black and white wire that is the light for the 79 switch. I left this unplugged and eventually conveniently spliced into it as the power and ground for my aftermarket gauge lights.

dashwire03.jpg
 
Status
Not open for further replies.

GBodyForum is a participant in the Amazon Services LLC Associates Program, an affiliate advertising program designed to provide a means for sites to earn advertising fees by advertising and linking to amazon.com. Amazon, the Amazon logo, AmazonSupply, and the AmazonSupply logo are trademarks of Amazon.com, Inc. or its affiliates.

Please support GBodyForum Sponsors

Classic Truck Consoles Dixie Restoration Depot UMI Performance

Contact [email protected] for info on becoming a sponsor