Build Thread: '87 442 . . . Time to turn and stop

Status
Not open for further replies.

Canon_Mutant

Royal Smart Person
Aug 15, 2015
1,159
1,420
113
US Mags would not fund me having their wheels polished locally nor would they pay for the return shipping to do it right. That's beyond a dick punch. But, I had my local guy look at them and he suggested the Meguiars Brilliant Solutions Metal Polishing Kit would go a long way to removing the scratches these wheels have. So, I will give it a try. And, if they need more TLC, I've done enough business with them that they said $30/wheel max would cover it.

Given the 1/2 *ss polish job, I got concerned about the over all construction quality so I went ahead and had the wheels spun today for true-ness, and then had them put the Bridgestone RE760s on. Worst wheel required only 4 1/2 oz., [2] wheels were just less and just more than 2 oz., and [1] wheel just required a 1/2 oz. That ain't bad. These wheels are quite heavy. So I at least got some well made wheels for my money. They just half-assed the final polish.

So, once I get a satisfactory finish, I will go ahead and apply the 442 tape stripe around the periphery of the rim lip and then . . .

We are indeed building adapter caps for the factory SSIII 442 caps to snap on to. I took all of that stuff to a shop in town today too. Should be done mid-next week. I was ready to just mill the centers of the US Mags caps down enough to apply an adhesive backed 442 center to but this is proving problematic with the way US Mags chamfers the outside periphery of their center cap. By the time you get about .060 out of the center to accommodate the adhesive backed 442 overlay, there would only be between .020-.030 of material left around the edges. So, the first time you have to remove the cap, you tap on the back a little too hard and you might well bust through that thin of material just trying to get the rather tight [o-ringed in] center cap out. So, they will indeed look like this [minus the scratches]!

IMG_0735.JPG


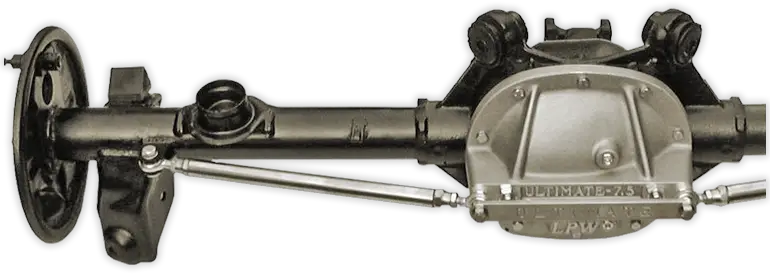
Beyond that, the rear end is STILL NOT in town. I have had too much other general life stuff and my health getting in the way of that. Seems like I have been in "next week" mode for 6 months on that rear end even though I've only had all the rebuild parts for less than a month. I guess truth be known, about 6 months ago was when I tried to etch/paint the entire rear end and put on a TrickFlow cover and discovered all the metal filings in the rear end fluid. Not to mention that etch/paint product didn't work very good. So, blast and coat and a complete rebuild is the way to go anyway.

I did work some more on the power shelf and the interior. Console is ready to pull and the door panels are completely loose just hanging there. Almost ready to slap dynamat everywhere. Then I can try one more time to get that ABS headliner up.

That reminds me I need to take before and after pics of the dynamat and soundsystem install.

:worthless:

And, I got new knobs for my Retro head. They don't quite match the factory knobs but I like them better than the cheap black plastic button type knobs that came on the unit. What do you think?

IMG_0768.JPG
 
Last edited:
  • Like
Reactions: 3 users

Canon_Mutant

Royal Smart Person
Aug 15, 2015
1,159
1,420
113
Just for anyone that might consider this . . . rather than trying to mill the US Mags cap so my SSIII cap will snap onto it [like it would the SSIII wheel], my machinist friend is removing the 5 tab snap on ring from the SSIII cap and replacing it with a round 1/4" thick slice of 6061 aluminum with mount points for the 5 screws that hold the snap ring on. Then just 2 holes through the aluminum mating to 2 holes in the US Mags centers so the SSIII cap will screw solid to the aluminum which will screw solid to the US Mags center caps which very tightly o-ring into the wheel center. Some head scratching required cost us a day so it may be late this week before I have the finished product.

Side note: my 30 year old SSIIIs are so scratched, weathered, rusted on the edges, etc., I splurged and ordered a new set from gbodyparts . . . $220 ca-ching!

I will keep my old SSIII caps for the old SSIII wheels though . ..

I do have a set of sticky back 442 center overlays I will not be using after all if anyone wants them? $45 new, $30 shipped. I will open an appropriate for sale thread but thought some following this thread might want first dibs . . .
 
  • Like
Reactions: 1 user

Canon_Mutant

Royal Smart Person
Aug 15, 2015
1,159
1,420
113
EDIT: I somehow managed to post this in the "what did you do today" completely by accident . . .
I'm becoming an e-danger to my e-self! :doh:

Since about everything that can get in the way of getting my rear end done has happened, I went ahead and got one of these on the way. Supposed to be here tomorrow or Saturday. This should hopefully help my probably completely unjustified paranoia over my tiny tubes deflection perhaps causing some of that metal that came out when I popped the cover though over 500 lb.ft. probably was also involved. Nice thing about it is you just put on the cover [temporarily] and assemble the rest of the kit and where the tabs need welded to the tubes becomes something even and engineer like me can do . . . [FWIW, this pic from their site is a 7.5 pic]. Probably overkill but this combined with the protouring anti-sway setup that clamps the axle tubes forward and up to the frame, boxed lower CAs, adjustable upper CAs, and lower to upper CA reinforcement brackets from UMI should firm things up nicely.

lpw_axle_tube_housing_brace_kit-png.66430

I will attempt to do a review on this . . . if I ever get my rasto frackin motso blackin 442 actually back on the road.
img_0370-jpg.66431

Believe it or not I did make progress this week . . . fellow whipper snappers! Finally ready to slap the Dynamat down, up, and sideways throughout the interior [prep is everything and a bit more time consuming than one might think] and I am picking up my 442 center cap converters for the Sabers tomorrow. Tires are on the wheels and I rolled the wheels up against the car that is on jack stands with no rear end under it, front end partially disassembled . . .
and made varoom noises!
burnrubber.gif
 
  • Like
Reactions: 1 user

Canon_Mutant

Royal Smart Person
Aug 15, 2015
1,159
1,420
113
Well, the converter caps were indeed done today. The factory snap ring on the left of pic one is replaced by the 6061 ring that was milled the right thickness to place the SSIII cap at the right point. So, the 442 caps have the 6061 rings mounted in them, you put the US Mags caps back in the wheels, then bolt the US Mags caps to the 442 caps from the rear. As tight as these US Mags caps are in [when the o-rings are good], stealing the caps will about be impossible. You have to have the wheel off and tap quite hard on the US Mags caps to get them out.

Unfortunately, this is my first experience with o-ringed center caps and I have already learned that the rubber o-rings are only good for one insertion-extraction. So, I will need to get additional o-rings for each time I need to remove these for any reason. Fortunately, that should not be a regular event.

So, next step on the wheels front is to give them a polish worthy of a $3K set of wheels, put the 442 gold tape stripe around the lip, and then all I need . . . is a completed car to put them on . . .
frusty.gif


Sigh, pretty soon . . .

IMG_0777.JPG

IMG_0779.JPG


IMG_0781.JPG
 
Last edited:
  • Like
  • Winner
Reactions: 4 users
Oct 14, 2008
8,823
7,775
113
Melville,Saskatchewan
Those look fantastic, almost stock but subtly different.
 
  • Agree
Reactions: 1 users

SoFloG

Royal Smart Person
Mar 9, 2016
1,107
1,258
113
South Florida
Had a local friend suggest that this abs cover may muffle the reflective sound from the subwoofer. The sound will project backwards through the hole in the cover, disperse, reflect, and get muffled on the rebound by the cover. He suggested I do the shelf only [no cover]. Any of you audio experts know if this might be true? I guess I can always just take it off if this ends up being true?
Do the shelf, with the enclosure and cover, but flush the cover to surface of the enclosure. Even if you just scoot the enclosure rearward to the trim cover it vwould drastically eliminate the risk of cancellation. Just make sure there's a solid seal between the trim cover and surface of the enclosure. Maybe even use it as a mounting point.
 
  • Like
  • Informative
Reactions: 1 users

Canon_Mutant

Royal Smart Person
Aug 15, 2015
1,159
1,420
113
You know, that's a good idea . . . In addition to being the exact right height for that shelf area behind the seat, that Rockford Fosgate enclosure looks like it was made for the Gbody rear seat angle so the intent was to have it sitting right against the rear seat but I took some measurements and [I think] I can just slide it back 1", turn the amps sideways, the batteries won't be a problem, and then I don't need the extra bracket extending out from the top of the sub enclosure to attach the cover to. I can just attach the cover right to a couple of L-brackets from each rear corner of the sub enclosure.

Surprised I don't have the CAD file changed yet . . .

Thanks a bunch!
 
Last edited:
  • Like
Reactions: 1 users

Rktpwrd

Builder of Cool Shjt
Supporting Member
Feb 2, 2015
4,167
23,917
113
Calgary, Alberta, Canada
Unfortunately, this is my first experience with o-ringed center caps and I have already learned that the rubber o-rings are only good for one insertion-extraction. So, I will need to get additional o-rings for each time I need to remove these for any reason. Fortunately, that should not be a regular event.

The O-rings need not be a one time use only item. Simply apply a little lube to the o-ring, and it will not tear itself up every time you go to install/remove it. I use an o-ring specific lubricant called SuperLube, but Vaseline or any other similar product will work as well.
 
  • Informative
  • Like
Reactions: 2 users

Canon_Mutant

Royal Smart Person
Aug 15, 2015
1,159
1,420
113
The O-rings need not be a one time use only item. Simply apply a little lube to the o-ring, and it will not tear itself up every time you go to install/remove it. I use an o-ring specific lubricant called SuperLube, but Vaseline or any other similar product will work as well.

Sigh . . . so you are saying I have indeed reached that age where ointments are pretty much required on everything I wanna do, huh?
:doh:
Seriously, also a good idea. There are a couple of sharp edges however that the o-ring can catch on so it may continue to be a problem even with lube. But, I guess the wheel folks would also prefer to sell o-rings . . . they also said the idea is for the cap to be really tight.

Thanks!
 
Last edited:
  • Like
Reactions: 1 users

Canon_Mutant

Royal Smart Person
Aug 15, 2015
1,159
1,420
113
On the shelf front, I still had the M2100 amp models in my shelf CAD model above so I don't even have to worry about spinning them or moving them to the cover for it all to fit. Here is an updated pic with both M100-2 amps. Remember about 27 pages ago when I ordered 2 of these amps from Crutchfield and since the M100 is the replacement for the M2100, they just sent one of each? I have since gotten the M2100 sold though and have both M100s ~ smaller form factor. Of course, all wiring will have to be in behind now ~ I wanted most of it just behind the cover for serviceability but I can wire it all up, slide it in, it drops down over 2 pegs on each rear corner to hold it in place, hook up the primary 1/0 AWG wires to the engine bay, and close the cover. Also, I already made the 12" deep shelf but I have a plastic cutter wheel for my table saw so I can rip it down to what should be about 9 1/2" now so I won't waste what I already made [sorry it's out in the shop]. I may have to rotate the batteries 90 toward the sub to get that wiring to fit but that is not a big deal either . . .

Now, if I could fix my iphone5S focusing problem when it is using flash . . . I know, get the 7!

Shelf Components.jpg
 
  • Like
Reactions: 2 users
Status
Not open for further replies.

GBodyForum is a participant in the Amazon Services LLC Associates Program, an affiliate advertising program designed to provide a means for sites to earn advertising fees by advertising and linking to amazon.com. Amazon, the Amazon logo, AmazonSupply, and the AmazonSupply logo are trademarks of Amazon.com, Inc. or its affiliates.

Please support GBodyForum Sponsors

Classic Truck Consoles Dixie Restoration Depot UMI Performance

Contact [email protected] for info on becoming a sponsor