Fabricating New Harness from C100 Bulkhead Connector to Engine, A/C, Etc.

Status
Not open for further replies.
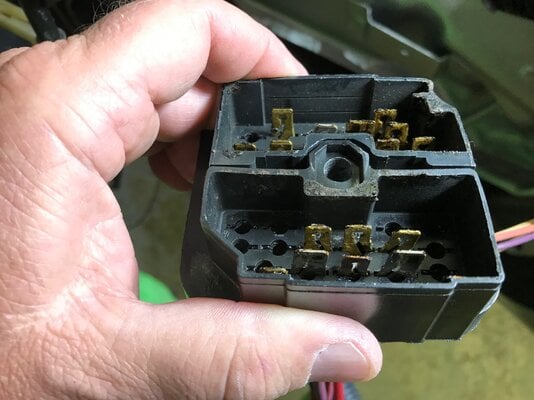
I soaked the C100 engine harness connector in gasoline (in an old steel coffee can) for 24 hours. When I took the connector out of the coffee can this morning, I found the connector intact but the tar/undercoat had turned into a thick gelatine. I have now transferred the connector to a crockpot* set on low with a 50/50 mix of ZEP purple degreaser and water. My intention is to leave the part in the crock pot for 24 hours on low and attach a shake-and-bake sander to the crockpot for the last hour or two. I will likely update tomorrow on whether this has worked effectively and without damage.

*- the crockpot is a $5 crockpot from the local flea market (not my wife's crockpot for cooking dinner).

View attachment 152469View attachment 152470
I was considering gasoline when I do mine as well, but maybe I will try something a bit more 21st century first. If that doesn't work, I will resort to the more old school tactics.
 
I soaked the C100 engine harness connector in gasoline (in an old steel coffee can) for 24 hours. When I took the connector out of the coffee can this morning, I found the connector intact but the tar/undercoat had turned into a thick gelatine. I have now transferred the connector to a crockpot* set on low with a 50/50 mix of ZEP purple degreaser and water. My intention is to leave the part in the crock pot for 24 hours on low and attach a shake-and-bake sander to the crockpot for the last hour or two. I will likely update tomorrow on whether this has worked effectively and without damage.

*- the crockpot is a $5 crockpot from the local flea market (not my wife's crockpot for cooking dinner).

View attachment 152469View attachment 152470

Why would you go through all that when a can of contact cleaner and a couple of brushes would have cleaned all that right off ? I dont think its tar. I think its dieletric grease thats packed in from the factory and gets crappy over the years. This is what mine looked like after being partially cleaned.
 

Attachments

  • IMG_0387.jpg
    IMG_0387.jpg
    637 KB · Views: 206
See link and tell me if these are the crimpers that you are recommending.
Link: https://www.summitracing.com/parts/aww-510586

Many thanks.

PS Why two crimpers?

Yup. Those are the crimpers. I bought the second pair because the first pair didnt crimp 12AWG. It was only good for the smaller AWG sizes. They say the larger crimper crimps up to 18AWG but after using it once Im glad I had both of them. You cant crimp larger wire with the one. Each one does a factory crimp. Like I said, watch the video first.

You can buy the Packard terminals here. Theyre pretty nice people to deal with. They have both sizes. 56 and 59. You will need both sizes ! It depends on the wire size.


Why would you go through all that when a can of contact cleaner and a couple of brushes would have cleaned all that right off ? I dont think its tar. I think its dieletric grease thats packed in from the factory and gets crappy over the years. This is what mine looked like after being partially cleaned.
The tar/undercoat/sealer on my C100 connector was still very solid yesterday (a 95F day). No biggie soaking in gasoline and now degreaser. There will always be more than one way to skin a cat.
 
Check out mine. This is why I bought a reproduction harness....
20171229_172525.jpg


That together with it being a diesel harness and I decided it would be easier to start over.
 
The tar/undercoat/sealer on my C100 connector was still very solid yesterday (a 95F day). No biggie soaking in gasoline and now degreaser. There will always be more than one way to skin a cat.

BTW, I didnt really mention this but the first crimper I bought was for the 10-18AWG. It worked great with heavy wire. When I tried to do the smaller gauge wire the tabs on the terminals kept folding over and not crimping right. I wasted quite a few before I said screw it and bought the other crimper. The die for the terminals is a lot narrower on the second one and the terminals bend around perfectly. I didnt really want to drop the extra cash but Im glad I did and now I can do it all without getting ticked off.
Just make sure you watch the video so you can see how its properly done as far as stripping the wire and how its placed in the terminal. I found a few terminals in my harness that werent crimped right from the factory. The rear terminal tabs go around the insulation. Some of mine had all the tabs on the copper.
 
Status
Not open for further replies.

GBodyForum is a participant in the Amazon Services LLC Associates Program, an affiliate advertising program designed to provide a means for sites to earn advertising fees by advertising and linking to amazon.com. Amazon, the Amazon logo, AmazonSupply, and the AmazonSupply logo are trademarks of Amazon.com, Inc. or its affiliates.

Please support GBodyForum Sponsors

Classic Truck Consoles Dixie Restoration Depot UMI Performance

Contact [email protected] for info on becoming a sponsor