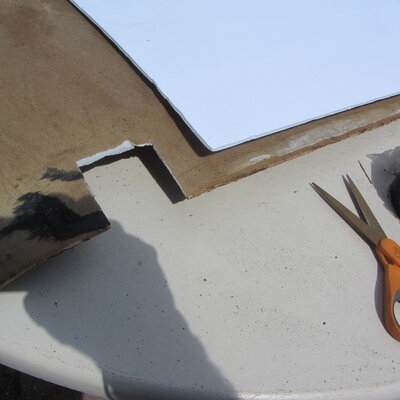
Just dropped the headliner- YUCK!

Status
Not open for further replies.

Bonnewagon

Lost in the Labyrinth
Supporting Member
Sep 18, 2009
10,564
14,298
113
Queens, NY
So I started on the small extension to see what is involved. I used a hand sized wire brush to get as much of the foam/glue off as I could. YUCK! Then I cut out damaged areas and filled with common foam board they use in schools. I have some industrial strength duct tape that does not deteriorate like Home Depot grade stuff. IMG_0412.JPG IMG_0413.JPG IMG_0414.JPG IMG_0415.JPG
 
  • Like
Reactions: 1 users

ck80

Moderator
Moderator
Supporting Member
Feb 18, 2014
5,743
9,121
113
I see the new foam backed fabric for sale everywhere, even Auto Zonedout. Anyone do their's with new fabric? Any tips? My front clips are OK but the side clips over the doors are shot.
I've done a number of them, even did a writeup post here on how to do it at one point.

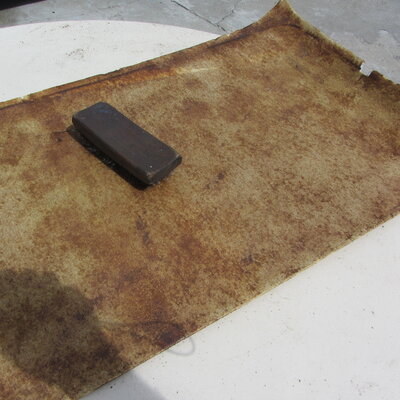
Step one is getting as clean as possible. Dollar tree lint roller lost a lot of the loose foam. Nest step would be wear latex or equivalent gloves and gently rub back and forth the old foam on the surface. It will "pill' up. More lint roller time. Then use a thin fabric tape behind cracks or eeak areas - want it to be able to be impregnated with the next step. Now that you've taped back on as many broken pieces as possible, if any are missing make a patch. Now I put coats of fiberglass resin on the board using a normal bristle brush, not foam. It'll suck in pretty quick. I kept applying coats, then letting dry, then repeating. First few coats everywhere will need it. By your 4th or 4th coat you'll see areas it doesnt sink in, no need tobapply to those areas. Once a part of the foam is hard due to impregnation if there was a dimple or depression I applied glazing/spot putty to fill the problem area. Then, you guessed it, hit that spot with resin to seal it in. By the end you will have slightly heavier but hood and stuff board back, better heat and noise proofing IMO. I super lightly scuffed with around a 3000 grit sandpaper and wiped down the surface to remove dust.

Then it's 3M trim and fabric adhesive, liberally applied to the backing board. Started from one corner, say 9 o'clock, the moved to the matching end 3 o'clock, then down the board. When gluing I follow the directions about both surfaces. I also cut the fabric to be about 2 inches bigger than the backing board. The, I trim it on the corners and overlap wrapping it onto the back side about 1.5 inches on all 4 sides

Go slow applying the fabric, once it's down there's no readjusting the material if you start to make a wrinkle so just go slow and steady, smoothing along the way. If you're careful it can easily ne a one man job
 
  • Like
Reactions: 1 users

Bonnewagon

Lost in the Labyrinth
Supporting Member
Sep 18, 2009
10,564
14,298
113
Queens, NY
That is very interesting. Fiberglass the foam board and make a nice hard shell. I never thought of that. As for "pilling" yikes what a mess. I scraped and scraped and it seemed to turn to snot and re-adhere everywhere. I can also see how the guy that did it for me last time used too much glue in some spots and not enough in others. Once again, if you want something done right- do it yourself. i have to figure a work-around for the side clips. I used all I had from my old Malibu wagon the last time. I broke two this time. A guy on fleabay is asking $40 for ONE!?!
 

ck80

Moderator
Moderator
Supporting Member
Feb 18, 2014
5,743
9,121
113
That is very interesting. Fiberglass the foam board and make a nice hard shell. I never thought of that. As for "pilling" yikes what a mess. I scraped and scraped and it seemed to turn to snot and re-adhere everywhere. I can also see how the guy that did it for me last time used too much glue in some spots and not enough in others. Once again, if you want something done right- do it yourself. i have to figure a work-around for the side clips. I used all I had from my old Malibu wagon the last time. I broke two this time. A guy on fleabay is asking $40 for ONE!?!
Well, no need for the glass-matting, more just resin impregnation. But, since you effectively are 'glazing the outer surfaces after first stiffening the core board and sealing any repair tapes and materials behind more resin, you get stiffening action that mere taping repairs don't give you. Once you crack the board it's a flimsy mess, but, this fixes that problem. It also gives a nice clean surface to glue to without having your new foam backed fabric partly sticking to board and partly glued to degraded foam particles - which is one of the reasons recover jobs sometimes fail too soon after being redone. Gluing to old foam is like painting over a dirty car surface, tends towards lifting.

Looking back at the earlier post apologies for the many typos... it's what happens when you combine posting via phone and being dead tired ready for an afternoon nap!
 

CopperNick

Comic Book Super Hero
Supporting Member
Feb 20, 2018
3,357
3,018
113
Canada
Corrugated Plasticized Board?? Sounds about like what I used to replace the lower tiers of glass panelling in my Dad's old greenhouse; got the stuff from Home Depot.

Am in about the same boat as all above. My replacement roof liner spewed foam when I extracted it from the donor car. I was wondering if it could be sprayed with mold release and then a layer of Plaster of Paris like gets used for statues or casts for broken bones gets applied to it to create a mold that could then be used to lay 'glass and create a new liner shell. Thinking it would take 4 layers of glass, an outer layer of glass cloth, two inner layers of matte, and an inner layer of cloth. The cloth gives up a better looking appearance and the matte provides the strength. It would take a 6 pack of mold spray and at least 32 feet of cloth x 8 foot wide and the same of the matte. That would be for a coupe roof and, yes, there would be excess or scarf to cut away but better too big and trim to size than too small and have to add to it. Only thing about the plaster mold is that it might have to be reinforced somehow as it could end up being flimsy based on size and too heavy to use if too much cast material gets slathered on.


Nick
 

Bonnewagon

Lost in the Labyrinth
Supporting Member
Sep 18, 2009
10,564
14,298
113
Queens, NY
I went back and re-read what you posted. OK so you are just using the resin to stiffen and seal the foam board. Got it. I do that with plywood to make it last in salt water on boats. The edges are where the water soaks in through capilary action. You seal the edges and the plywood is almost waterproof. Hmmmm. I can see where using resin on the foam board would make a much better surface to glue the new headliner to. I am still struggling to get all the foam snot off.
 

ck80

Moderator
Moderator
Supporting Member
Feb 18, 2014
5,743
9,121
113
I went back and re-read what you posted. OK so you are just using the resin to stiffen and seal the foam board. Got it. I do that with plywood to make it last in salt water on boats. The edges are where the water soaks in through capilary action. You seal the edges and the plywood is almost waterproof. Hmmmm. I can see where using resin on the foam board would make a much better surface to glue the new headliner to. I am still struggling to get all the foam snot off.
I've never gotten 100% of the old foam off. The benefit of the lint roller approach once you rub the 'pills' into existence is that it's adhesive itself, so the attraction/adhesion between the sticky 'pill' and sticky paper is stronger than the sticky 'pill' and the neutral backerboard. Helps to some degree to pull the old foam material away.

It may depend how badly the old material had failed too. I know when I've done them the stuff has gone bad for quite some time usually. So I scrape with plastic, then rub, then lint sheet, then rub by hand wearing gloves. Then lint roll again and repeat till I can't get much more off. By that point there's usually very little left, and, it becomes one with the resin where it can't hurt anything else. Sort of an encapsulation principle at that point since you'll never get 100% off of it. You can get pretty close though.

I've got a couple spare boards in storage... I may make up a thread and do another one pre-emptively once I get above water on some projects around here. Longer away than would really help you much I'm afraid, but I've really got to get the new floors laid down and paint work done before the 21st, no matter how much I'd appreciate an excuse not to.

If it's not done before furniture arrives, the job will just get harder, much harder....
 

Bonnewagon

Lost in the Labyrinth
Supporting Member
Sep 18, 2009
10,564
14,298
113
Queens, NY
So I see they are making a complete replacement headliner for the hardtop G-bodies. Are two and four doors the same? Expensive but probably nice to have. https://www.ebay.com/itm/203848104354?hash=item2f764b39a2:g:fecAAOSw4kRiHi- Image is copywrited so just hit the link. I myself finally found the light blue matrial so I am ordering some. The last time I did it the shop guy said this color was tough to find- he wasn't kidding.
 

Bonnewagon

Lost in the Labyrinth
Supporting Member
Sep 18, 2009
10,564
14,298
113
Queens, NY
I am getting ready to do the headliner. I found a place with the light blue cloth. My concern is being able to move it around and smooth it before it gets hard. I have been reading up on all the glues and there is a difference between sticking and curing. Some sound like they stick so fast they are one shot only deals. You goof- start over. Some take 24 hours to cure. I need to use a slow sticking glue that is re-position-able for a while. What do you guys recommend?
 

CopperNick

Comic Book Super Hero
Supporting Member
Feb 20, 2018
3,357
3,018
113
Canada
Take a trip down to either your local Upholstery Shop or a custom shop that does interiors and find out what they use. Have watched some of the shows like the Kindig and Counting Cars and similar and they use some kind of spray adhesive for attaching padding and upholstery to the backer material.

Maybe check 3M on line as I have several of their spray adhesive products and the "77" product might be what you are looking for.


Nick
 
Status
Not open for further replies.

GBodyForum is a participant in the Amazon Services LLC Associates Program, an affiliate advertising program designed to provide a means for sites to earn advertising fees by advertising and linking to amazon.com. Amazon, the Amazon logo, AmazonSupply, and the AmazonSupply logo are trademarks of Amazon.com, Inc. or its affiliates.

Please support GBodyForum Sponsors

Classic Truck Consoles Dixie Restoration Depot UMI Performance

Contact [email protected] for info on becoming a sponsor