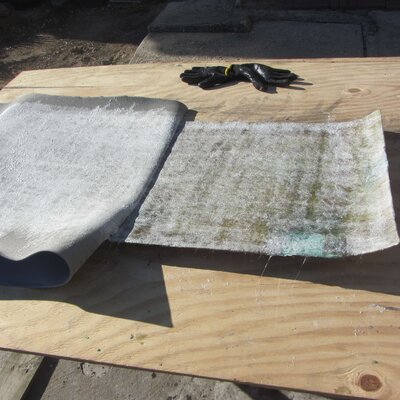
Just dropped the headliner- YUCK!

Status
Not open for further replies.

Bonnewagon

Rocket Powered Basset Hound
Supporting Member
Sep 18, 2009
10,536
14,217
113
Queens, NY
I line up my fabric center with my backer board true center, then apply glue as I work outwards from center towards one side edg

CK80- I get the idea of starting in the middle and working out to the curved edges. But the wagon board is 6 ft long with a hump in the middle. How would you keep it going smoothly? I can get a helper. How do you apply the glue? Spray as you go? Videos show them spraying a large area, letting it dry a bit, spraying the foam side, dry, then wroking it into place. How would you work out evenly to the edges unless you glued a bit at a time? Spray a couple of inches the whole length? Then lay the fabric that few inches at a time?
 
Last edited:

Longroof79

Rocket Powered Basset Hound
G-Body of the Month
Oct 14, 2008
12,156
9,762
113
Gainesville, Fl
Mark,
When I did mine, I pretty much laid the fabric out first and cut it to size to coordinate with the headliner board....leaving a few extra inches of fabric all around. Once it's all glued down the excess can then be trimmed. I've also done it by folding the glued sides over the sides of the panel or trimming it at the edge.
It helps having a helper. I had my wife help hold the fabric up after it was glued. If I recall, I folded and worked on a side at a time. They recommend gluing both the board and the fabric. Once you slowly and carefully lay the fabric down, you use the palms of your hands to gently spread the fabric out. Again, that's when an extra set of hands comes in handy. I had picked up a few good tips on You Tube.
 
  • Like
Reactions: 1 users

ck80

Moderator
Moderator
Supporting Member
Feb 18, 2014
5,742
9,111
113
CK80- I get the idea of starting in the middle and working out to the curved edges. But the wagon board is 8 ft long with a hump in the middle. How would you keep it going smoothly? I can get a helper. How do you apply the glue? Spray as you go? Videos show them spraying a large area, letting it dry a bit, spraying the foam side, dry, then wroking it into place. How would you work out evenly to the edges unless you glued a bit at a time? Spray a couple of inches the whole length? Then lay the fabric that few inches at a time?
8 feet isn't so much different than 5+ feet but I get what you're saying. Definitely easier with a helper, even at a 5+ footer.

For me, I used the 3m trim and spray adhesive that comes loaded in aerosol cans. So yes, I spray a section on the board, spray a section on the foam, it tack tries quickly, then mate the sections together. It was the process the can recommended. If you thought work times were short on the resin, you've seen nothing till the adhesive. Virtually no period to fix an 'oops'.

I did areas probably 6 inches deep by about 2 feet long at once. When I sprayed instead of ending in a straight 90* angle line I tapered at an angle towards the board.

Not: _________|---------------

More like ________/----------

Except angle wise much more gradual, more like 30*

Then as I went to spray the next section there weren't unglued pockets. Could you do the whole length? Probably. I'd be more comfortable doing short distances of 6-8 inches at a time whole board length with 2 people than 1. But I did mine alone and adapted.

You want some irony, once they tell me spend more time on my feet I'll probably try doing these thatve piled up over the years here. ... I've got a c10 that needs it (easy), a c10 that could use one instead of metal roof, (easy), 3 spare gbody boards that beg to be stabilized (lota of repair), and, an 87 suburban that NEEDS it (master class, lots of real-estate to cover on that bad boy.)
 
  • Like
Reactions: 1 users

Bonnewagon

Rocket Powered Basset Hound
Supporting Member
Sep 18, 2009
10,536
14,217
113
Queens, NY
For me, I used the 3m trim and spray adhesive that comes loaded in aerosol cans. So yes, I spray a section on the board, spray a section on the foam, it tack tries quickly, then mate the sections together. It was the process the can recommended. If you thought work times were short on the resin, you've seen nothing till the adhesive. Virtually no period to fix an 'oops'.
OK now I get it. Small areas at a time, working towards the edges from the center. I will definitely need a helper. Jack I bought a 9x6 foot piece of fabric. I figured 6 feet for the main part and 2 feet for the extension, with some excess to be cut off. So the difference is either folding it in half and working from the middle to the ends, or folding it in half and working from the center out to the edges. Jack when you worked out to the edges did the curved up sides give you trouble as CK80 mentioned?
 
  • Like
Reactions: 1 user

Longroof79

Rocket Powered Basset Hound
G-Body of the Month
Oct 14, 2008
12,156
9,762
113
Gainesville, Fl
OK now I get it. Small areas at a time, working towards the edges from the center. I will definitely need a helper. Jack I bought a 9x6 foot piece of fabric. I figured 6 feet for the main part and 2 feet for the extension, with some excess to be cut off. So the difference is either folding it in half and working from the middle to the ends, or folding it in half and working from the center out to the edges. Jack when you worked out to the edges did the curved up sides give you trouble as CK80 mentioned?
Mark,
It certainly sounds like you have enough fabric to complete the job. Better too much than too little. I don't recall the amount that I ordered at the time, but there was enough to recover my sun visors as well. As for the curves along the sides. I think I just slowly and methodically worked the sides. However, you can't goo too slow or else the adhesive will dry up. I think my headliner shows signs of the adhesive dry out in the curves. I may end up having to redo mine eventually. One drawback is, possibly breaking some of my new clips, that I don't have to tell you, were a bear to find.
When I redid the headliner on my Olds Ciera, it actually came out much better. I guess I obviously got practice doing my wagon headliner first. Plus the Olds headliner wasn't quite as long and cumbersome as the wagon's main headliner. The rear portion was easier. I would start with that first to help get the hang of it and then go for the main headliner.
I'm trying to remember if I folded in half the long way and worked a side at a time, or folded in half from front to back.
I suppose you can do a dry run first before applying the adhesive. It would give you a feeling which way you'd find more comfortable.
 
  • Like
Reactions: 1 users

Bonnewagon

Rocket Powered Basset Hound
Supporting Member
Sep 18, 2009
10,536
14,217
113
Queens, NY
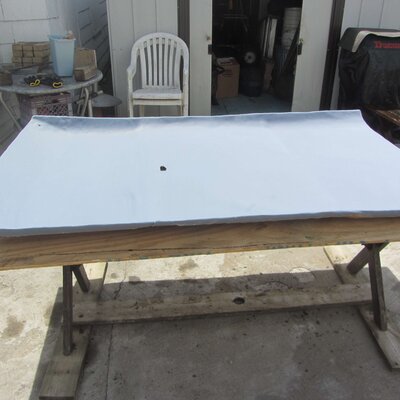
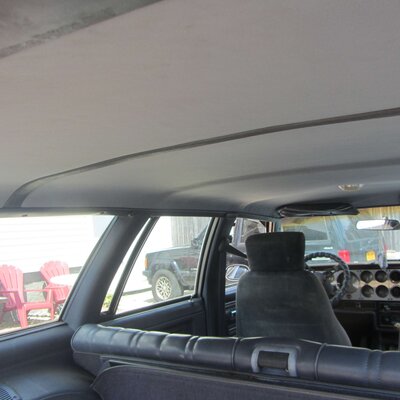
Well the oven finally shut off so I finished the job. I laid out the board on a plank of plywood and glued the cloth on a 1/3 section at a time. I used the Permatex [27828] headliner glue. The directions said to apply at least three coats but I think that is excessive. I thought two cans would do but I ended up getting a third can. By the end I found a thin first coat then a thick second coat worked better. If I did that first then two cans would have been enough. Just be sure to get real good coverage. My "helper" managed to get a couple of wrinkles in it too so be careful who you draft for this job. It went back up on the roof OK but of course the clips and moldings fought me all the way. TIP: begin reinstalling the moldings from the FRONT and work your way back. As hard as the plastic clips are to find it took me a while to locate some 1/8" push nuts for the roof courtesy lamp. Dorman makes an assortment kit [13441] but only the store that the interwebs said didn't have it- had it. Another tip is to locate the holes for the sunvisors and coat hangers FIRST or you will be stuck later. I screwed up and now I can't find the coat hanger holes. I also used some flat head screws instead of the rear molding plastic clips as mine all broke. Otherwise it is all done and man am I glad. Nothing worse than a drooping headliner. IMG_0445.JPG IMG_0446.JPG IMG_0450.JPG
 
  • Like
Reactions: 4 users

ck80

Moderator
Moderator
Supporting Member
Feb 18, 2014
5,742
9,111
113
Well the oven finally shut off so I finished the job. I laid out the board on a plank of plywood and glued the cloth on a 1/3 section at a time. I used the Permatex [27828] headliner glue. The directions said to apply at least three coats but I think that is excessive. I thought two cans would do but I ended up getting a third can. By the end I found a thin first coat then a thick second coat worked better. If I did that first then two cans would have been enough. Just be sure to get real good coverage. My "helper" managed to get a couple of wrinkles in it too so be careful who you draft for this job. It went back up on the roof OK but of course the clips and moldings fought me all the way. TIP: begin reinstalling the moldings from the FRONT and work your way back. As hard as the plastic clips are to find it took me a while to locate some 1/8" push nuts for the roof courtesy lamp. Dorman makes an assortment kit [13441] but only the store that the interwebs said didn't have it- had it. Another tip is to locate the holes for the sunvisors and coat hangers FIRST or you will be stuck later. I screwed up and now I can't find the coat hanger holes. I also used some flat head screws instead of the rear molding plastic clips as mine all broke. Otherwise it is all done and man am I glad. Nothing worse than a drooping headliner. View attachment 204742 View attachment 204745 View attachment 204746
Looking good! If you're lucky, maybe lasts 15-20 more years as well
 
  • Like
Reactions: 1 users

Longroof79

Rocket Powered Basset Hound
G-Body of the Month
Oct 14, 2008
12,156
9,762
113
Gainesville, Fl
It looks great, Mark.
Nice job. Makes me want to do mine over again....but not looking forward to it. :(
Don't feel bad, I ended up not reinstalling the coat hooks. All the years I owned this car I never used the coat hooks, or hung garments.
 
Last edited:

Bonnewagon

Rocket Powered Basset Hound
Supporting Member
Sep 18, 2009
10,536
14,217
113
Queens, NY
Thanks guys. It was a lot more aggravating than I remember. Or maybe I am getting crankier in my old age. :rant:
 
  • Haha
  • Like
Reactions: 1 users
Status
Not open for further replies.

GBodyForum is a participant in the Amazon Services LLC Associates Program, an affiliate advertising program designed to provide a means for sites to earn advertising fees by advertising and linking to amazon.com. Amazon, the Amazon logo, AmazonSupply, and the AmazonSupply logo are trademarks of Amazon.com, Inc. or its affiliates.

Please support GBodyForum Sponsors

Classic Truck Consoles Dixie Restoration Depot UMI Performance

Contact [email protected] for info on becoming a sponsor