Project Knightmobile

Status
Not open for further replies.

IronCastKnight

Apprentice
Sep 8, 2012
94
0
0
Tulsa, Oklahoma
That's my dad's project, a 1981 Harley Davidson Sportster with a hard tail and a springer front end. The hard tail was something he bought off of eBay, then spent an assload of time cutting, adjusting, rewelding, and modifying to suit his purposes, and the springer front end is something he completely built himself(sans springs) based loosely on the Rude and Crude Old School Springer Build.

Said Harley is also the bike the bike that slightly curbed my enthusiasm for two wheeled vehicles, along with giving my right palm a nice collection of scars and a few permanently embedded small stones. I like it much better in its new form.
 

Attachments

  • 2013-11-15_14-38-18_899.jpg
    2013-11-15_14-38-18_899.jpg
    441.6 KB · Views: 799

IronCastKnight

Apprentice
Sep 8, 2012
94
0
0
Tulsa, Oklahoma
Minor update: Been working on the heads, figuring out how to polish the ports without dicking over the valve job. I have come to the net result of putting some masking tape on the valve seats to act as a warning zone while applying assloads of care and caution. Also nabbed what seems to be a nodular iron 350 crank, on account of the bigass N on the first counterweight, off of ebay. Of course, based on the pictures, the crank isn't machined for a manual transmission pilot bearing, but I found a blueprint detailing the needed work done, so having the engine machinist take care of that while it's being ground for my heretical Chevy rods and balanced for my lighter components shouldn't be too much of an issue.

Plus, provided the nodular crank is in workable condition(always a dubious prospect with ebay), it should be more than durable enough to handle any further power-adding upgrades I do in the future.

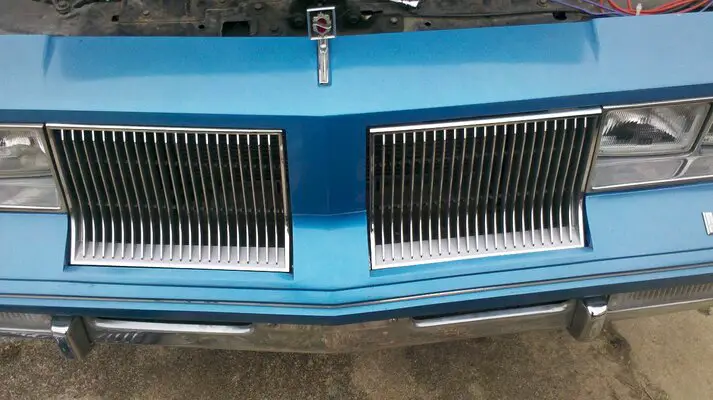
Also did some experimenting on the front clip to try to get my '86 blade grills to align better. First I tried an adjustable setup with springs inbetween the clip and the grills, which kind of maybe helped a little but was overall unsatisfactory, on account of the springs being way too light to properly tension the grill and keep it from flapping around. Though, with some heavier gauge springs, some washers, and longer bolts this may have potential. Second I tried shimming them with washers, which provided much better results, though still nowhere near where I'd prefer them to be. I suspect that it may be necessary to precisely dremel some reliefs in to give the proper angle and protrustion, which is going to have to wait until I take the front clip off when I pull the engine.

Also, the 28 year old plastic the bolts screw into isn't holding up so well, so when I pull the clip I'm going to drill them out and install some form of threaded insert with ample loctite/super glue to discourage pulling out. Of course, good old Helicoil is under consideration, on account of that I used them at work sometimes, and they're cheaper. On the other hand, their spring-like design seems like it'd allow them to uncoil themselves right out of the plastic when any kind of torque is applied, which is sort of an undesirable outcome. Or I could just JB Weld the holes then run in a self tapping screw.
 

Attachments

  • 2013-12-01_14-29-27_343.jpg
    2013-12-01_14-29-27_343.jpg
    400.6 KB · Views: 703

IronCastKnight

Apprentice
Sep 8, 2012
94
0
0
Tulsa, Oklahoma
Or I could save the nodular iron crank for later, in case the grey iron one detonates or I decide to do something completely batshit like a supercharged 350 for a car sturdier than the Knightmobile. Hm, choices.
 

IronCastKnight

Apprentice
Sep 8, 2012
94
0
0
Tulsa, Oklahoma
Every time I go out to the garage to polish the ports on the 350 heads I feel the ghost of Ransom Olds punch me repeatedly in the junk until I stop pls help

But seriously, why are these exhaust ports so swoopy and long and hard to get cartridge rolls in? Does Oldsmobile hate me, personally? Also the cast iron is tough as balls and laden to the brim with nickel and quality, which isn't helping in the slightest.

On the plus side, I took advantage of UMI's winter sale to grab a set of their delrin bushing tall ball jointed upper and lower tubular a arms and a front anti-sway bar, so I'm looking forwards to the eventual major upgrade of mu front suspension.
 

DRIVEN

Geezer
Apr 25, 2009
8,079
14,556
113
*CENSORED*
IronCastKnight said:
Also the cast iron is tough as balls and laden to the brim with nickel and quality, which isn't helping in the slightest.
:lol: Someone is quite the wordsmith. Your thread is a great read. Keep it coming. Oh, and pics don't hurt either.
 

IronCastKnight

Apprentice
Sep 8, 2012
94
0
0
Tulsa, Oklahoma
Not much done this weekend so far on account of it being cold as balls yesterday and my having a vicious headache today, but I did slot in a console, courtesy of QS442, and used some white printer paper to rough-mock up three possible options for stylizing it to match the rest of my interior.

My three possible choices are thus:

Stock style with the default blue arm rest pad, though I'd need to recoat it with something as the foamy faux-vinyl covering is slightly worn off.


Stock but with a white armrest pad, either kitbashed together out of white vinyl and wood, or coated with whatever coating I'd use for option 1, except white. Possibly plastidip?


Finally, no arm rest, just a long strip of white vinyl. Less comfy and more flat that the previous two options, but would allow my installing a hand-operated parking brake lever without having to maul the console quite as much as I would otherwise need to.

Also pictured: One of the damn few Grant steering wheels I find even somewhat acceptable looking. Pretty comfy too, though it currently sits about 30 degrees off when I'm driving in a straight line on account of my being an idiot. Also a blob of PlasticWeld on the console, which I glopped on to repair the sole bit of damage to the console. That'll be dremel'd flat and smooth then painted to match later.
 

Attachments

  • 2014-01-25_17-07-50_992.jpg
    2014-01-25_17-07-50_992.jpg
    226.6 KB · Views: 554
  • 2014-01-25_17-07-32_434.jpg
    2014-01-25_17-07-32_434.jpg
    270.1 KB · Views: 564
  • 2014-01-25_17-11-15_848.jpg
    2014-01-25_17-11-15_848.jpg
    269.9 KB · Views: 553
Oct 14, 2008
8,828
7,785
113
Melville,Saskatchewan
Cool build. Those #8 heads will serve you well. Hopefully you went bigger on the intake valve and are consentrating on the bowl area. Very nice combo with the better pistons and rods. Did you go 374 ci? :roll:
 

IronCastKnight

Apprentice
Sep 8, 2012
94
0
0
Tulsa, Oklahoma
It's at 355 unless the crank grinders did an offset when they ground it to accept Chevy rods, which I kind of doubt they did, as it's just .03 overbored with standard 6" center to center rods.

Honestly, at this point I'm having a damn hard time not chucking the heads into a nearby river and buying a set of Performer RPM aluminum heads, so I've lowered my goals for the porting and polishing to just "better than it was". Which, considering the bigass smog humps I ground out, is an easily achievable goal. If I decide I need MOAR POWERR later, I'll just swap out heads, have those decked more aggressively than the present heads, and slap on one of FAST's EZ-EFI self tuning kits.
 
Oct 14, 2008
8,828
7,785
113
Melville,Saskatchewan
I am not going overboard on my #8 heads, just bowl work, air bumps, 2" intake valves and a .030" mill. My build is a 425 ci, 403 based stroker.
 
Status
Not open for further replies.

GBodyForum is a participant in the Amazon Services LLC Associates Program, an affiliate advertising program designed to provide a means for sites to earn advertising fees by advertising and linking to amazon.com. Amazon, the Amazon logo, AmazonSupply, and the AmazonSupply logo are trademarks of Amazon.com, Inc. or its affiliates.

Please support GBodyForum Sponsors

Classic Truck Consoles Dixie Restoration Depot UMI Performance

Contact [email protected] for info on becoming a sponsor