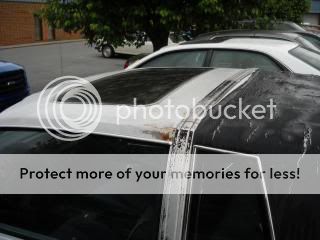
BUILD THREAD Project Olds Cool (Recognition!!)

As promised, completed pics with the second patch welded in and completed!

IMG_2862.JPG


IMG_2863.JPG


And with a test fit of the window moulding:

IMG_2859.JPG


IMG_2860.JPG


Overall, considering the lack of good parent material I had to work with, I'm very happy with the result. The second upper patch I welded in is a little low behind the moulding, but not terrible. After the area is skimmed with filler and blocked out, it'll be just fine.

The shop has been getting a little unruly lately, what with every tool I own out and on the benches. Not to mention all the grinding grit, slag, seam sealer, and general dust so thick on the floor it's becoming a hazard!
So I reconnected the battery, fired her up, and backed it out into the alley for a long overdue clean and sweep of the floor.
Of course, with the car now outside and the sun shining, I just had to take it for a spin...

Where to? Well, the most Canadian of destinations of course...

IMG_2864.JPG


Tim Hortons for a coffee and sandwich!!
:rofl:

Thanks for checking back.
Have a great weekend everyone!

D.
 
thought it was to the liquor store, then I remembered "that's the most southern of destinations" ! :friday:

the repair is looking better and better! 😎
 
  • Winner
Reactions: Texas82GP
That small piece definitely was a life saver Jim. An even bigger time saver. I obviously would've preferred if it was a bit bigger to replace the entire rusted section, but I'll take what I can get!


Thanks Mike!
Yeah, it was sheer luck that I had enough there to get me outta trouble. Thank you Brown Bomber indeed!
Glad I inspire you guys, go out there and just do it! It's only metal, it can be added to or cut back out if you screw up! That's why I far prefer metal to wood.
😉


Oh, very pun-ny!!
Can't believe I missed out on that opportunity given my penchant for all things pun related...
Good one!


Thanks for the encouragement Jack.

It feels good to be ridding the car of its cancer. With every little bit I do, it's slowly looking better and better.
🙂
Yes, hopefully David makes out ok with his roof swap. We're all here for him if he has any questions or concerns tho. I have faith in him, he should be able to make a go of it either way.


Awesome!!
:rofl:
(Couldn't agree more, but that's just 'cause their selections SUCK lately!)


Kevin,
Please don't feel bad. It's no problem whatsoever. Given the accelerated timeline that I'm trying to complete this on, waiting for patch panels or other parts likely would've been a problem anyways. Not to mention the added cost, shipping, etc etc.
Things happen for a reason, and usually find a way of working themselves out. I sincerely appreciate your concern and offers tho, thank you!

As for the other parts we've been talking on, there's no rush on those ones yet either. Whenever you can, will work for me.
Speaking of parts tho, do you recall offhand if you have any Claret interior parts in your stash(es)??
Specifically, I could use better condition bucket seat upper seatbelt guides, a good condition lower door panel, and driver's side front bucket seat seatbelt. The ones I have are ok, but I'm always on the hunt for better condition stuff. Let me know when you have a chance.

Thanks for the compliments and comments everyone!

Donovan
The rest of that left quarter would look really good on my daughter's car lol
 
Given all the recent late evenings, coffee makes more sense.

You might have noticed that all your detailed posts forced me to get off the dime and resume telling the story of my voting-age coupe project. I hope the car is self-propelled before it's old enough to drink!
 
thought it was to the liquor store, then I remembered "that's the most southern of destinations" ! :friday:

the repair is looking better and better! 😎

Thanks Darin! Yup, I agree, with every patch I complete and bit of rust I remove, it keeps on looking better.

It's soooo time consuming tho, I really thought I'd already be onto the filler and blocking work by now.
And I haven't even started to look at disassembling the AstroRoof to refinish the steel outer panel and recover the headliner fabric on the inner...
:doh:

The rest of that left quarter would look really good on my daughter's car lol

I bet it would, but sorry, no can do amigo!
Those quarters have been set aside and slated for a very special modification I have planned for The Juggernaut. If all goes well when I get to that stage, it will have been WELL worth hanging onto them all this time!

Given all the recent late evenings, coffee makes more sense.

You might have noticed that all your detailed posts forced me to get off the dime and resume telling the story of my voting-age coupe project. I hope the car is self-propelled before it's old enough to drink!

Actually, I did notice that Quinn!
I wasn't sure my influence had anything to do with it, but regardless, I'm happy to see you back updating it. I'll be continuing to follow along and look forward to hearing the rest of the story!

D.
 
It's soooo time consuming tho, I really thought I'd already be onto the filler and blocking work by now.
And I haven't even started to look at disassembling the AstroRoof to refinish the steel outer panel and recover the headliner fabric on the inner...
:doh:


D.

make sure you document that as well... still wrestling the decision on the fate of my 86 salon astroroof car with title issues... has the factory astroroof installed by asc/tops &trends, and would love to keep it, if I decide to jump through all the hoops to get the title for it, this is one of the things it needs
 
make sure you document that as well... still wrestling the decision on the fate of my 86 salon astroroof car with title issues... has the factory astroroof installed by asc/tops &trends, and would love to keep it, if I decide to jump through all the hoops to get the title for it, this is one of the things it needs
The asc was an aftermarket roof like the sky top my neighbor installed them new if you have questions about them I'll ask him
 
The asc was an aftermarket roof like the sky top my neighbor installed them new if you have questions about them I'll ask him

I always thought it was a Gm roof installed by asc... learn something new every day!

and it is a sky roof, always thought that was what they meant by astral roof...
 
make sure you document that as well...

Will do Darin.
I have the 1979 Body by Fisher assembly manual that covers the sunroof/moonroof options, and just skimming through that section it looks pretty complex and more than a bit intimidating. But I'm going to try anyways.

I'm not sure my posts on that would be of much help to you anyways, my AstroRoof is factory GM, and not done afterwards like your ASC one. They might be quite different, or they may not!

and it is a sky roof, always thought that was what they meant by astral roof...

To the best of my knowledge, SkyRoof denoted the ones with glass panes, while AstroRoof meant it was the ones with the steel panel instead.
I could be wrong here, other more knowledgeable members might chime in...

D.
 
  • Like
Reactions: Texas82GP
Well, my week of holidays is over.
So that means no more 3am updates on the thread, I'm going to have to get back to more civilized hours again!

I did manage to get a little more done this weekend. With the quarter glass opening now pretty much entirely rebuilt, I moved onto the last bit of structure that needed replacing on the driver's side. This is at the back, just beside and below the rear window.

After the rusty section was cut out, I masked off the opening and shot more zinc weld-thru primer on the underlying metal:

IMG_2865.JPG


IMG_2866.JPG


After that, it was time to recreate the piece that would be needed to replace it. More work with the shrinker/stretcher, and even then I still had to make some relief cuts in it to get the shape I needed.
This was a devil of a piece to try and recreate, there were compound curves upon compound curves.

Here it is upside down, with its own coating of zinc primer:

IMG_2867.JPG


An idea of where it's got to go, many MANY test fits were needed here!

IMG_2868.JPG


Starting to tack it in...

IMG_2869.JPG


...and fully welded. I had to weld up the relief cuts after it was tacked into place. The metal just had to be manipulated in too many different directions to do it beforehand.

IMG_2870.JPG


The money shot. All dressed down and cleaned up:

IMG_2871.JPG


A look at the inside flange (this was all rusted out too, leaving rusty stain marks running down the inside of the trunk gutter):

IMG_2872.JPG


And the side profile:

IMG_2873.JPG


Continued >>>
 

GBodyForum is a participant in the Amazon Services LLC Associates Program, an affiliate advertising program designed to provide a means for sites to earn advertising fees by advertising and linking to amazon.com. Amazon, the Amazon logo, AmazonSupply, and the AmazonSupply logo are trademarks of Amazon.com, Inc. or its affiliates.

Please support GBodyForum Sponsors

Classic Truck Consoles Dixie Restoration Depot UMI Performance

Contact [email protected] for info on becoming a sponsor