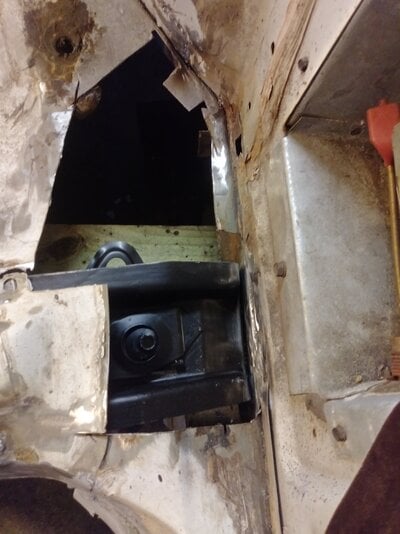
BUILD THREAD Rustier then I thought!!!

Status
Not open for further replies.

RabbitHoleSS

G-Body Guru
Dec 8, 2019
712
2,105
93
Indianapolis
Well I had time to work on the car since corona.. I used it to get out all the seat brackets. They came fairly clean with my home made sand blaster. The abrasive wore a hole in my blow gun nozzle so I couldn't finish.
20200313_144459.jpg

I taped off the spot weld holes and sprayed with rustoleum 2 coats.
20200316_211434.jpg

Since I got the flux core wire I decided to tackle the frame body mounts. I ran it with lower wire speed like turbo zach recommended and it worked out pretty good. Im not sure the best way to enlarge the holes to fit the washer so I used a grinder with a tiny cutoff wheel.
I cut the circular outline and then made relief cuts to the line and broke them off with pliers.
20200316_194650.jpg

Once they were all broken off I used a die grinder and cheap HF black rasp. 10 for 5 bucks.Theyre not very sharp.
Passenger #6 mount
20200316_211901.jpg

Passenger #4
20200316_211907.jpg

Passenger #2
20200316_211838.jpg

Driver #2
20200316_211830.jpg

Driver #6
20200316_211849.jpg

There's also this passenger #7. Its questionable I thought about leaving it. What do you guys think.
20200316_204651.jpg

Still waiting on my last seat bracket and rear seat crossmember. Im cutting the old one out tommorow. Im gonna hit it hard while on coronacation. Social distancing self quarantine type situation 😁
 
  • Like
  • Winner
Reactions: 7 users

RabbitHoleSS

G-Body Guru
Dec 8, 2019
712
2,105
93
Indianapolis
I've had plenty of time to work on the car since corona. I got my driver seat bracket and rear seat crossmember.
20200319_140425.jpg

So I sanded the inside of the crossmember cleaned with dawn then w/g remover then brushed on epoxy then rustoleum.
20200320_192325.jpg

I drilled out the spot welds on the rear crossmember. I found them by sanding away the paint and marking with a sharpie. Then I use 1/8 bit to drill a pilot but not all the way through. Then HF spot weld cutter them out.
20200318_171207.jpg

I contemplated just fixing the ends that were rotten on the crossmember but decided against it because I suspected heavy rust on the inside. Gm didn't paint the inside of the crossmember or seat brackets. It's just bare metal.
20200318_181458.jpg

And under the car.
20200318_181625.jpg

After hours on my back grinding/sanding. This sucked. Im not doing the rest of the car from my back.
20200320_181612.jpg

I taped off the spot weld holes and brushed on epoxy then rustoleum again.
20200320_192233.jpg

The sides were the crossmember mounts were rotten. So I cut them out and made patches from slightly thicker steel.
20200319_172208.jpg

While messing with this I realized I missed a rusty area on the pass wheelhouse. Well I thought it was ok so I didn't replace it.It wasn't so I did it today.
20200322_144545.jpg

Fixed
20200322_162622.jpg

I also got the floor pan fitted and seat belt mounts plug welded in.
20200318_165035.jpg

I went ahead and fixed the #7 pass mount.
20200318_153941.jpg

Its seemed like slow going this last week but I feel I got all the prep done to finish this floor/backseat area out. I need to get the frame blasted but not sure if there open right now. So in the meantime...
20200318_171144.jpg
child labor laws are suspended right now correct?
 
  • Like
Reactions: 5 users

RabbitHoleSS

G-Body Guru
Dec 8, 2019
712
2,105
93
Indianapolis
Went ahead with the crossmember today. Started by patching where the crossmember gets welded.
Before
20200319_165215.jpg

After
20200323_155159.jpg

Then I fit the crossmember but it was short on each side an 1/8 inch. I figured I could hammer it in place aftee it was plug welded to the back seat. I took measurements to get the body mounts in the right spot. It fit pretty good Im happy with it.
20200323_170920.jpg

I had to hammer in a few spot weld holes on the hump so it would be tight enough to weld.
Before
20191207_173440.jpg

After
20200323_183459.jpg

Underneath where I welded the crossmember to the body.
I ran out of gas. So I'll finish up tommorow.
20200323_170928.jpg

I got the patches for 1 side of the backseat made. For those keeping score. That's 7 of the body mounts on the cab I replaced. I dont know WTF I was thinking. Oh well I'm in to deep to quit now.
 

Attachments

  • 20200323_183459.jpg
    20200323_183459.jpg
    1,015 KB · Views: 139
  • Like
Reactions: 5 users

RabbitHoleSS

G-Body Guru
Dec 8, 2019
712
2,105
93
Indianapolis
I've been busy working so I haven't had much energy/time for the garage. I been going at the underbody. It was a little rusty to start.
20200327_144044.jpg

I clean n stripped it then put rust converter on (ospho). I brushed it on and let it dry. Then read a bit more about it. Adhesion is an issue when trying to put epoxy over it. The remedy is to reactivate the dry ospho by brushing it on again and waiting 5 mins. Then I used my pressure washer to clean it off.
20200331_132827.jpg

Then i moved to behind the backseat.
20200407_210250.jpg

Then to the rear end where the body mounts are located. There's so much undercoating on this thing. I wonder if they were covering something up.
20200423_121625.jpg

20200424_214435.jpg

20200424_214445.jpg

By this time Id had enough of cleaning this thing on my knees and back. So I started building the tip over jig today after work.
20200424_210627.jpg

20200424_210601.jpg

I had to drill 4 holes to run the bolts thru. They'll be covered by the bumper cover and ill weld them shut when im done.
20200424_210609.jpg

I gotta finish it tommorow. My jigsaw blade is toasted so I couldn't cut the radiuses. Ill throw some 4x4 legs on it, the radiuses, and the 2x4 thru the doors and it should be ready to roll after i weld the floor in. I ordered some upol raptor liner for the underbody, trunk and rear wheel houses.
 
  • Like
Reactions: 8 users

RabbitHoleSS

G-Body Guru
Dec 8, 2019
712
2,105
93
Indianapolis
I got the tip over jig finished. It feels really quite sturdy.
20200425_161549.jpg

Ive been making the pieces for the back seat for awhile. I felt like I had them how I wanted. So I painted the underside and prepped everything for welding.
The passenger side.
20200429_135549.jpg

The driver side
20200429_145352.jpg

I still have to fix 1 seat belt area for the driver side back seat. I got the floor pan prepped and fitted for welding. It fit really good almost dropped right in. I ran out of gas so Ill save that for this weekend.
Message_1587848737718.jpg
 
  • Like
Reactions: 8 users

Doug Chahoy

Comic Book Super Hero
Nov 21, 2016
2,565
2,663
113
Looking real good ! When you get that car done you’ll be a journeyman autobody tech.
 
  • Like
Reactions: 2 users

RabbitHoleSS

G-Body Guru
Dec 8, 2019
712
2,105
93
Indianapolis
Great progress and workmanship!
Thanks I appreciate it. Im trying not to be a total hack and take my time.
Looking real good ! When you get that car done you’ll be a journeyman autobody tech.
I dont know about that but I appreciate it. I have a new found respect for anyone who does this for a living. Im starting to understand why paint/bodywork is so expensive. Its also given me a reason to buy tools and teach my boy how to use his hands and mind.
 
  • Like
Reactions: 4 users
Status
Not open for further replies.

GBodyForum is a participant in the Amazon Services LLC Associates Program, an affiliate advertising program designed to provide a means for sites to earn advertising fees by advertising and linking to amazon.com. Amazon, the Amazon logo, AmazonSupply, and the AmazonSupply logo are trademarks of Amazon.com, Inc. or its affiliates.

Please support GBodyForum Sponsors

Classic Truck Consoles Dixie Restoration Depot UMI Performance

Contact [email protected] for info on becoming a sponsor