

I just placed order for the same. Any tips for doing the swap?I could have reused my stock arm since it was the same style gearbox, but decided to just get the new one just to make things easier.
BUILD THREAD The Camel - Sep23 Rear LCA
- Thread starter 81camel
- Start date
-
- Tags
- iraqi taxi malibu
You are using an out of date browser. It may not display this or other websites correctly.
You should upgrade or use an alternative browser.
You should upgrade or use an alternative browser.
It was just a basic R&R I didn't have any issuesI just placed order for the same. Any tips for doing the swap?
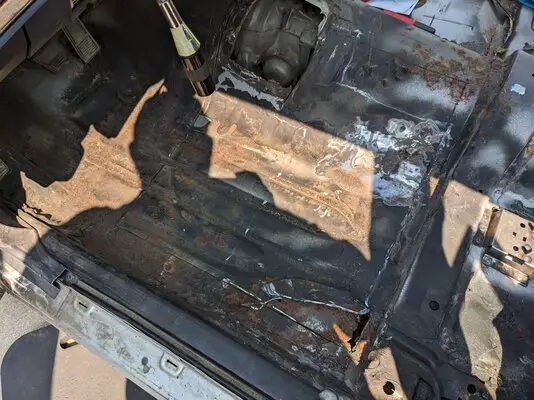
Started working on the seats this last weekend. I bought floor pan quarters for the drivers side and both inner and outer seat mounts as I wasn't sure what we would all need.
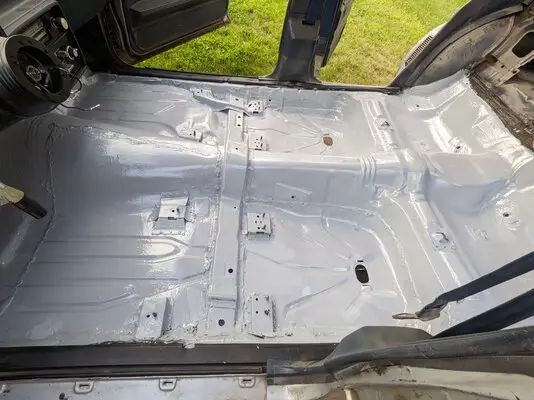
Only the front outer mount on the drivers side needed to be replaced and once we cut that out, we realized that the floor needed replacing there too.
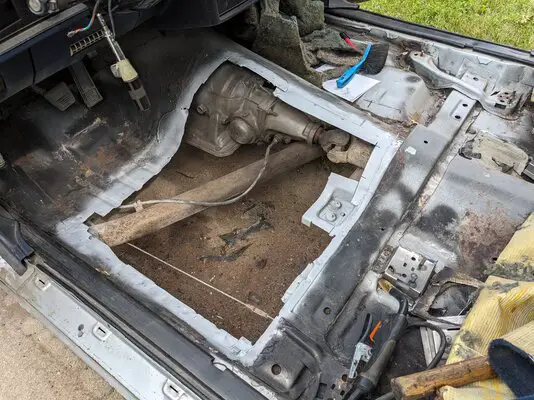
As this car was an Iraqi Taxi, it had a shifter cutout in the trans tunnel originally too. So since we needed to replace part of the floor, we decided to go a bit further to close off that manual shifter hole as I have no plans to go back to manual on this car.
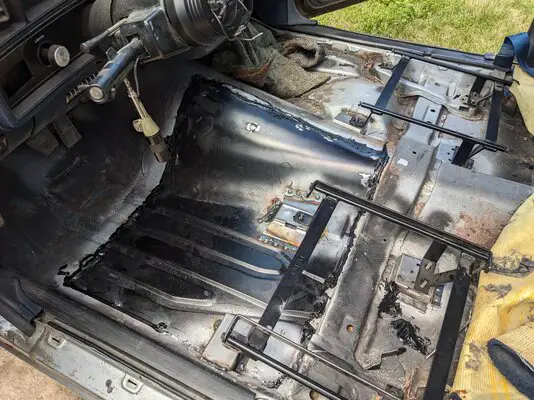
Here's some pics. I would say it turned out "okay". My welding wasn't very good. Was only my second time welding with a MIG.
We probably should have taken out the cross brace and replaced part of the floor underneath that, but our goal was really just to not fall through the floor. Not make the floor pan show car quality. Seam sealer will fill some gaps and we will probably do some fiberglass in some areas yet to seal things a bit better.
In the end we just need it sealed and prevent future rust.
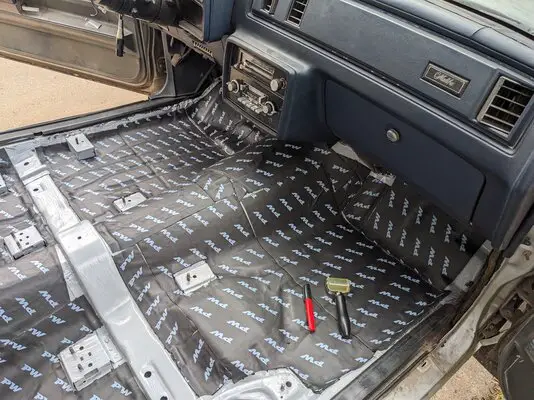
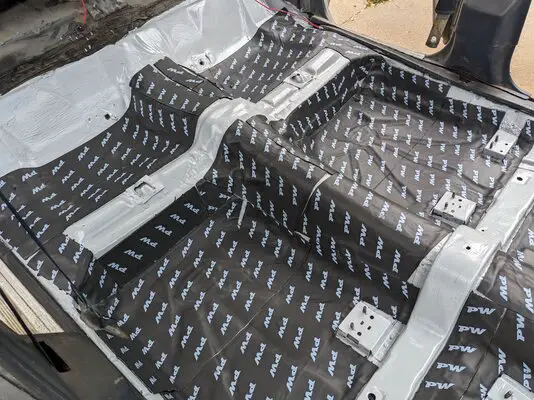
Next step before mounting the seats is that we need to seam seal underneath, then we'll spray the whole top side of the floor with rust converter then do a primer sealer.
At that point we'll call the top side of the floor pan of the car done and then I'll be adding sound deadening mats. Thinking of going with Noico or Siless.
Down the road I plan to clean up and undercoat the bottom of the whole car but thats a long ways out.
Regarding the seats. 565bbchevy, did you find with the cerullo seats that they sit a bit high compared to the stock seats? Did a test fit to make sure things lined up and found that they sat an inch or two higher than stock.
I'll leave it for now and get them installed, but I may end up cutting down the brackets they came with in order to lower them.
Only the front outer mount on the drivers side needed to be replaced and once we cut that out, we realized that the floor needed replacing there too.
As this car was an Iraqi Taxi, it had a shifter cutout in the trans tunnel originally too. So since we needed to replace part of the floor, we decided to go a bit further to close off that manual shifter hole as I have no plans to go back to manual on this car.
Here's some pics. I would say it turned out "okay". My welding wasn't very good. Was only my second time welding with a MIG.
We probably should have taken out the cross brace and replaced part of the floor underneath that, but our goal was really just to not fall through the floor. Not make the floor pan show car quality. Seam sealer will fill some gaps and we will probably do some fiberglass in some areas yet to seal things a bit better.
In the end we just need it sealed and prevent future rust.
Next step before mounting the seats is that we need to seam seal underneath, then we'll spray the whole top side of the floor with rust converter then do a primer sealer.
At that point we'll call the top side of the floor pan of the car done and then I'll be adding sound deadening mats. Thinking of going with Noico or Siless.
Down the road I plan to clean up and undercoat the bottom of the whole car but thats a long ways out.
Regarding the seats. 565bbchevy, did you find with the cerullo seats that they sit a bit high compared to the stock seats? Did a test fit to make sure things lined up and found that they sat an inch or two higher than stock.
I'll leave it for now and get them installed, but I may end up cutting down the brackets they came with in order to lower them.
Attachments
Cool project. I like what you've done to it so far and glad to see that you saved and resurrected an Iraqi taxi. However, I'm a little surprised that you didn't keep it as a stick shift.
I'll be following your progress. Keep up the good work.
I'll be following your progress.
Keep up the good work.Thanks for the comments! It was actually my dad that changed it from a stick shift when he drove the car 20-25 years ago. It had a v6 and manual transmission. He swapped in a 305 and did a turbo 350 at the same time.Cool project. I like what you've done to it so far and glad to see that you saved and resurrected an Iraqi taxi. However, I'm a little surprised that you didn't keep it as a stick shift.
I'll be following your progress.
I thought about going back to manual, like a T56 or something, but decided that I'll be putting in a 4L80E once I get to that point.
When I did both of my cars I already had power bases ready to install on them which lets it sit lower than the manual brackets.Regarding the seats. 565bbchevy, did you find with the Cerullo seats that they sit a bit high compared to the stock seats?
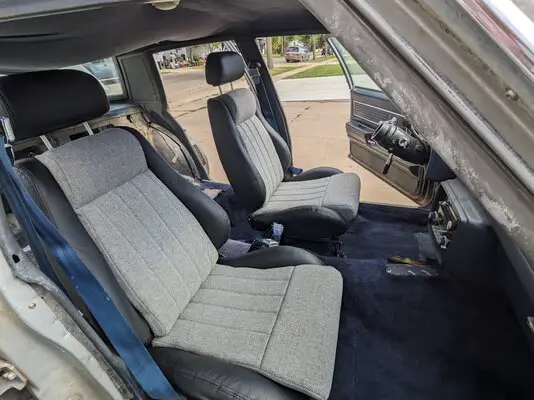
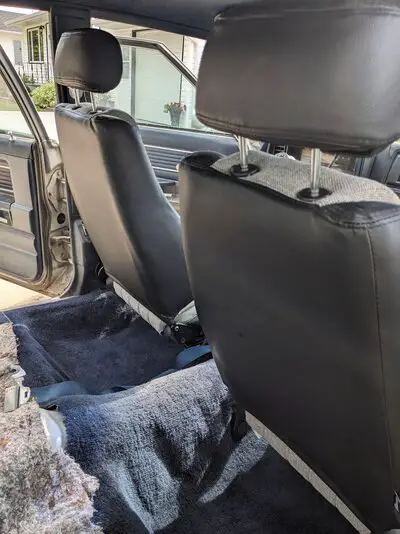
The seats are finally in!
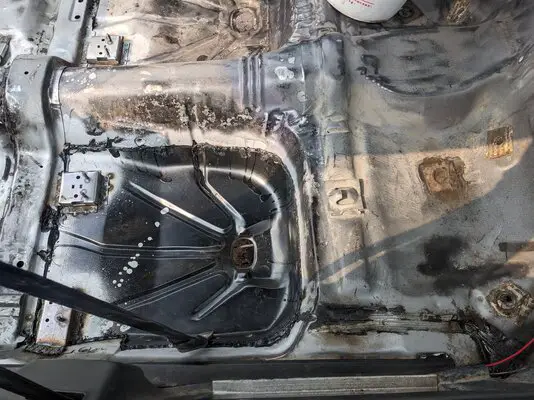
There was a bit of a set back when I decided to do sound deadener and during the process of cleaning up the floor, we found that the rear drivers side floor pan needed to be replaced as well. So we cut out and welded in a new section. Seam sealed then did an epoxy primer on the whole floor before installing sound deadener.
At last, I was able to install the new seats. They do sit a bit higher than the stock bench seat, but it actually doesn't feel too bad. I will drive it like this for a while before deciding whether we will modify the brackets to lower the seats or not.
Next up is need to pop in the rear seats, do some more cleaning up and get the choke fixed up so I can finally drive it a bit this year.
Attachments
So we found out that the choke thermostat was bad. Ordered a new one (JET 201354) on Amazon and it worked right away.
The only thing I didn't like about it was that it didn't come with the alignment notch on it so just made my own.
I need to do some tuning on the carb yet, but it's at least a lot more driveable now.
I also installed a UMI rear sway bar this last weekend. That was a pain to do and I need to go back and torque the bolts a bit more I think.
Hoping that this weekend, I'll get some time to install new steering box and I bought some brackets to mount a car seat so we can take the little one for a ride more easily.
Got the car seat UAS bracket in place and working this past weekend. It seems plenty secure, but I think in the future I will find a way to bolt or weld it to the floor pan instead of it being attached to the seat itself.
Steering box is in and working. WOW does that make a difference. Why would GM even sell a car without it.... Such a huge difference. Was struggling to get the pitman arm off the center link and ended up going to the store to buy a ball joint separator and that worked great.
Steering box is in and working. WOW does that make a difference. Why would GM even sell a car without it.... Such a huge difference. Was struggling to get the pitman arm off the center link and ended up going to the store to buy a ball joint separator and that worked great.
Similar threads
- Replies
- 11
- Views
- 789
- Replies
- 16
- Views
- 880
GBodyForum is a participant in the Amazon Services LLC Associates Program, an affiliate advertising program designed to provide a means for sites to earn advertising fees by advertising and linking to amazon.com. Amazon, the Amazon logo, AmazonSupply, and the AmazonSupply logo are trademarks of Amazon.com, Inc. or its affiliates.