What did you do to your G-Body today 2024

mclellan83

Comic Book Super Hero
Jun 27, 2017
4,425
9,994
113
Pgh, PA
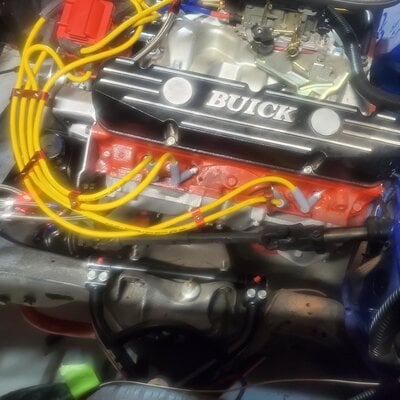
Had 2 rounds of working on the Monte over the weekend, first Friday night since it was raining we checked the plugs to see how they were burning which appears to be pretty good. Which was a very good thing cause the attempt to get some shorty plugs crossed over did not go as planned and were actually longer than what was in there. Replaced the burned plug wire and of course the wire wrap wouldn't come to the shop until the next day. Got more of the troubleshooting done with the Dakota so just waiting on them to reply today. Another really good mechanic buddy stopped over once I sent him a pic of the burned plug wire, he played with the ignition and said it seemed like a stuck tumbler so he sprayed some WD40 in there and bam like new. Ran good with the test drive so decided to take it the next day to Cars N Coffee (which always has food after) which turned into a pretty long day of driving around which it needed to relearn the fuel trims. But as I was getting close to home it started to idle weird again and then stalled when going to back into the garage. Took a good bit of cranking which started slow and then gave it a bit of gas to finally come around and let me back her into the garage.

Yesterday had planned to take it to a Fathers Day show out in Robinson but the Monte had other ideas, when I finally got it into the garage last night the front bag aired out and I thought it was weird but was really just testing that it would restart itself rather easily after I let it sit. So had planned to run to put gas in it and wash it, but couldn't get the bag up front to work properly so I do some investigating to find that it flipped the sensor around again for some reason. I'm wondering if the Dakotas are playing games with other systems, but will have to find out. I started to fix the bent rod and try to reattach it but thought better of it because it was gonna be really hot and another long day of driving so didn't want to take a chance of stranding myself.
20240615_092851.jpg
20240614_181041.jpg
20240615_114242.jpg
20240615_115634.jpg
20240615_135100.jpg
20240615_135911.jpg
20240616_111016.jpg
 
  • Like
Reactions: 6 users

CopperNick

Comic Book Super Hero
Supporting Member
Feb 20, 2018
3,455
3,162
113
Canada
I was able to do some welding today! I had a line issue on the welder while in the process but I figured it out. All I can say is it's not bad for a first timer learning from video's. There are some holes I have to go back and get to not to mention the holes I blew through the panel. I know I could have done this better. . . It's all apart of getting experience as few would say. Still one more piece that I will have to angle in on the under side. It is painted (temporary) to keep the patch from rusting. Tomorrow is supposed to be as windy as yesterday.

View attachment 240898
With body metal one of the keys is Not to Linger. Go as cold as possible on the heat and just tap the trigger enough to lay a fast tack. Then move several inches or more away and repeat. If you do blow through, don't try to immediately add more weld, the metal is too hot and won't support more filler or heat. Let it cool right down before revisiting that site. As for blow through, likely what you hit was either a small pocket of rust in what was supposed to be good metal or a thin spot in the metal itself; yeah it happens. Basic body metal is only around 19 ga in thickness. The only bad part about a blow through is that you can end up chasing it simply because as you fill in one gap, another pops open. They can become a Major PITA to deal with, to the point where it can become easier to cut away the entire blow out zone and come back with new clean metal. That is why body men sometimes seem to go overboard in how much they cut away for they start to repair/replace panel metal.


Nick
 
  • Like
Reactions: 3 users

CopperNick

Comic Book Super Hero
Supporting Member
Feb 20, 2018
3,455
3,162
113
Canada
Actually on Saturday, but I moved over to the other side of the cold air induction scoop for the radiator and used Dr. Dremel and a micro cutoff wheel to remove the pop rivets that held it to the scoop floor. It turned out to be in better shape and flatter than the driver's side so less tapping and slapping to flatten out the dings and dimples. i still have to dress one repair done on an edge that I must have done at some point, probably pre-Covid, that is still in as laid form. More work for the good Dr. and its assortment of accessories.

Once the second side and the floor are remediated to my satisfaction, they will both get some serious sanding to clean up the surface rust and overspray from some previous body shop and receive their coat of protective anti-rust black. After that the scoop gets re-assembled and loosely installed onto the rad cradle, that being the easiest place to stash it as it really is a nuisance to find a place for it otherwise. It won't get installed permanently as I still need to access the FEAD for the engine for other reasons so it and the rad will be coming back out at the point.


Nick
 
  • Like
Reactions: 2 users

old80cs

G-Body Guru
Jun 27, 2013
648
2,160
93
Massachusetts
Installed my center console and driver seat this morning. I almost have a complete interior in the car, first time since 1991. This interior came out of an '86 Calais, 10K mile recovered theft and has been stored in my basement last 30 years. I wired up the console and power driver seat and tried it out. Two steps forward, ten steps back, the power seat gave up the ghost and is grinding gears. No up, down or back and forth. For now the chair is in a good spot but I want to get it working again. Found these grey pieces in the back seat are, no idea where it's from.... yet.

IMG_5251.jpeg IMG_5456.jpeg IMG_5457.jpeg IMG_5458.jpeg IMG_5460.jpeg
 
Last edited:
  • Like
Reactions: 6 users

CopperNick

Comic Book Super Hero
Supporting Member
Feb 20, 2018
3,455
3,162
113
Canada
Try hitting the release lever and see if your chair backs move back and forth or just flop. Looks like the corpse of a bushing.


Nick
 
  • Like
Reactions: 1 users

CopperNick

Comic Book Super Hero
Supporting Member
Feb 20, 2018
3,455
3,162
113
Canada
Rain. No paint stripping on the air duct due to the possibility of flash rust due to the humidity. Did unlimber Dr. Dremel and clean up that seam I mentioned, then put a little time in with the body hammers to reshape the curve of the duct beside the repair to get it back to being round. I do seem to recall having to replace both of the collapsible rams that attach the front bumper to the frame horns so not surprised what I am still finding for damage to this duct. Very fortunate that the duro-urethane bumper cover did not get torn or ripped. Did have to replace the front license plate bracket mostly due to them being required for street legal around here.

Supposed to be more rain tonight and tomorrow. Bleah.


Nick
 
  • Like
Reactions: 1 users

Slowpoke

G-Body Guru
Dec 23, 2016
610
1,261
93
Not today but this weekend.. just slappped in an astro shaft and got the F out the garage.. it's just do damn hot to work on anything significant.
 

Attachments

  • 20240618_185941.jpg
    20240618_185941.jpg
    2.2 MB · Views: 8
  • Like
Reactions: 5 users

CopperNick

Comic Book Super Hero
Supporting Member
Feb 20, 2018
3,455
3,162
113
Canada
Today was as good a day as any so, I popped the tank drain on the compressor to make sure any water that had accumulated got blown out by the residual tank pressure, did the same for the water trap on the main distribution board and then barked the compressor up and let it fill.

Dug my DA out of its tote box and found that it had locked up over winter. Not a big issue, fed it a few drops of tool oil and used a pair of waterpump pliers to gently tease the rotor to move. Once it started to rotate, the oil took over and loosened up the blades on the rotor body so it would spin freely. Hung a 60 gr disk on the pad and had at 'er. Took about 8 pads total for both sides to get the old paint off the air duct floor. Turned what could have been several days work by hand into several hours and done.

Spent a few minutes at a time dealing with the various dents and dimples that the sanding revealed, periodically flipping the duct over to whack at them from the other side as needed. Discovered that I still had about a double shot glass worth of SEM Rust Mort still in the bottle and applied a coat of that to the metal, again on both sides. it will dry overnight and be ready for welder tomorrow. All that paint stripping disclosed a small rip in the metal down near one of the mounting tabs and it is going to get some MIG Love tomorrow. Once I get that fixed up then it will be time for paint.

Not going with the Krylon this time. This last batch proved to be too watery straight out of the can and to shoot it without getting runs meant using a shot distance that wasted material because too much blew past the panel instead of landing on it. This time it is going to be Dupli-Color as I was able to locate a flat black anti-rust product in their product line. Would still use the Krylon but more probably under the S-10 to recoat the frame rails and crossmembers. Drips and drops under it aren't that critical as no one is likely to be nosey enough to attempt crawling around under it. If so, then I guess I will have to pick up a pressure washer and dig 'em out of there.


Nick
 
  • Like
Reactions: 2 users

mclellan83

Comic Book Super Hero
Jun 27, 2017
4,425
9,994
113
Pgh, PA
Ended up getting the sensor back together last night but was reading it was maxed out when it is at its lowest, talked to my buddy who is much more familiar with it who said he is gonna stop over tonight to see if we can get it back into range. Then also did the next step of troubleshooting, i think having the ride sensor unplugged was messing with the dakota since it wasn't letting me go through the menus for some reason. But got what they needed and now will hopefully have me send in the BIM box after a few weeks of back and forth.
20240619_203138.jpg
20240619_202218.jpg
 
  • Like
Reactions: 2 users

Sweet_Johnny

Has A Face For Radio
Supporting Member
Oct 4, 2022
825
1,548
93
Wichita, Kansas
Ended up getting the sensor back together last night but was reading it was maxed out when it is at its lowest, talked to my buddy who is much more familiar with it who said he is gonna stop over tonight to see if we can get it back into range. Then also did the next step of troubleshooting, i think having the ride sensor unplugged was messing with the dakota since it wasn't letting me go through the menus for some reason. But got what they needed and now will hopefully have me send in the BIM box after a few weeks of back and forth.
View attachment 241051 View attachment 241052
Good Lord, I think I'll stick with analog after seeing what you've had to go through. I'm glad to see you persevere though.
 
  • Agree
  • Like
Reactions: 1 users

GBodyForum is a participant in the Amazon Services LLC Associates Program, an affiliate advertising program designed to provide a means for sites to earn advertising fees by advertising and linking to amazon.com. Amazon, the Amazon logo, AmazonSupply, and the AmazonSupply logo are trademarks of Amazon.com, Inc. or its affiliates.

Please support GBodyForum Sponsors

Classic Truck Consoles Dixie Restoration Depot UMI Performance

Contact [email protected] for info on becoming a sponsor