It's been sitting for more than a week with the pan off and I figure it drained down whatever was able to flow in that time. Having the shift shaft out let more oil drain from the valve body as well. Maybe even draining the coolant lines to the radiator and remote cooler in front of the radiator? I trust the dipstick as it is an OEM unit and it read right on full, warmed up at idle.Eight quarts?? When I spec'd the fill amount for my 700 the manual gave me a value of 4.78 quarts. for a stock depth pan which is what I personally went with, albeit now made of aluminum and fitted with a drain plug for easier servicing should the need arise. A 5 litre jug of Dexron IV did the job quite nicely. Was your converter empty by any chance? Or are you running a deep pan? Just me here wondering because the shifts I am experiencing with the 700 are smooth as glass; you don't really feel the 2-3 upshift but the speedo lets you know right quick that you are a hair or less from exceeding the posted speed limits.
Nick
What did you do to your G-Body today 2024
- Thread starter 64nailhead
- Start date
You are using an out of date browser. It may not display this or other websites correctly.
You should upgrade or use an alternative browser.
You should upgrade or use an alternative browser.
Looks great!Had the '80 down on the ground and got it warmed up to check the transmission fluid level. I put almost 8 quarts of transmission oil in the 700R4. Checked the engine oil as well as that was changed last week and hadn't run with the trans laid up for parts. 5 quarts was on the money on the dipstick. I pulled the car back onto the lift pads and need to adjust the shift cable again and check around for any leaks. Then onto getting it properly tuned and cleaning out the carburetor as it doesn't idle well. Here are a few shots outside tonight.
Before it gets mentioned, I know it sits a bit high but my reject from the 80's self loved the look back then and still do today. If it gets old I'll lower the rear a little to level it out, but the front is fine with me. Have no plans for carving corners!.
View attachment 244682View attachment 244683
Thank you, Jared, appreciate it!Looks great!
has anyone ever taken a look to see where the stick lands in relationship to the pan rail? I didn't know that was the true full mark untill the company I got my trans from said for warranty purposes laying a straightedge across the two makes for true full and mark the stick accordingly.It's been sitting for more than a week with the pan off and I figure it drained down whatever was able to flow in that time. Having the shift shaft out let more oil drain from the valve body as well. Maybe even draining the coolant lines to the radiator and remote cooler in front of the radiator? I trust the dipstick as it is an OEM unit and it read right on full, warmed up at idle.
it was no surprise that my aftermarket dipstick and tube read about 1/4"off. A quarter inch might not be that much to make a difference but it was still interesting to learn
And here is where my latest Tale of Project Regress ends for now............

What you now see here is a freshly installed lower sill assembly in my 85 SS Monte Carlo, it consists of a new inner rocker panel, which I had to fabricate out of flat body metal as they are not offered as a ready to install part, a new outer rocker panel, I was able to purchase maybe as much as a decade or longer ago; can't honestly recall, plus the front and back transitions from the rocker up into the pillars.


A couple of close ups of the finished reconstruction of the front or A pillar. For those who saw the opening pictures, this was a total replacement in and of itself as the original lower section of the pillar was beyond repair. The donor segment came from a 1979 Pontiac Grand AM. I knew about the car ahead of time but at that point it was still on the road and the owner was just someone that I knew well enough to say "yo" to but no closer. I was surprised to find it at the yard but a closer inspection yielded evidence that it had other issues so he had booted it down the road. His loss, my gain.
Again, for those contemplating a project of this kind, be very aware that anything you harvest from a donor car might look close to what you need but may also still tend to need massaging or tweaking to get it to fit absolutely as you want it to. The resident architecture of the vehicle will play a large part in how much work you will have to do to achieve that "perfect" fit.


Moving on to the other end of things, and again, this was a removal and replacement, only the section in question was the same section. Again, be aware that if you cut away a portion of a panel to gain access to what is behind it, when it comes time to rehang that piece of panel, it might just surprise you and not want to return to where it came from. In this case, apparently the upper section of the panel assembly had twisted away out of alignment; probably due to old age and body movement over time. For the install, I had to push and shove the returning section into as close to original position as original that I could find, anchor it using a couple of tacks, and then , tack by tack, "encourage' it to "remember" it's location and shift around to fit as it used to. Although it still looks like it needs to be dressed and cleaned up, that is the light and angle of the shot. It is pretty much where it should be and solidly burned into place.

Just a last look at the upper row of plug welds that I used to secure the outer rocker panel. Mostly, that way is about how the factory would have done it only they used some kind of long throat fusion welder instead of getting up close and personal with a hand held MIG. While they don't look pretty, they are smooth to the touch and sit flush with the metal around them so the plastic sill sleeve that sits on the joint will fit as it should and the sill plate will sit down correctly as well.
The last step for now will be to rehang the door, as is, I have no time right now to re-skin it as other projects are demanding their turns. The process for that will be identical to what I did with the driver's side so there may never be any individual shots of this side to record it as well. One thing for sure, if the Insurance Company ever attempts to quibble about the value of my Monte, well, there must as many as 500 or possibly more pictures that show work like this that has been done. Citing the old adage that "A picture is worth a thousand words" I would guess that my word count for all this is up around a half mil, +/-. 😵💫
CopperNick

What you now see here is a freshly installed lower sill assembly in my 85 SS Monte Carlo, it consists of a new inner rocker panel, which I had to fabricate out of flat body metal as they are not offered as a ready to install part, a new outer rocker panel, I was able to purchase maybe as much as a decade or longer ago; can't honestly recall, plus the front and back transitions from the rocker up into the pillars.


A couple of close ups of the finished reconstruction of the front or A pillar. For those who saw the opening pictures, this was a total replacement in and of itself as the original lower section of the pillar was beyond repair. The donor segment came from a 1979 Pontiac Grand AM. I knew about the car ahead of time but at that point it was still on the road and the owner was just someone that I knew well enough to say "yo" to but no closer. I was surprised to find it at the yard but a closer inspection yielded evidence that it had other issues so he had booted it down the road. His loss, my gain.
Again, for those contemplating a project of this kind, be very aware that anything you harvest from a donor car might look close to what you need but may also still tend to need massaging or tweaking to get it to fit absolutely as you want it to. The resident architecture of the vehicle will play a large part in how much work you will have to do to achieve that "perfect" fit.


Moving on to the other end of things, and again, this was a removal and replacement, only the section in question was the same section. Again, be aware that if you cut away a portion of a panel to gain access to what is behind it, when it comes time to rehang that piece of panel, it might just surprise you and not want to return to where it came from. In this case, apparently the upper section of the panel assembly had twisted away out of alignment; probably due to old age and body movement over time. For the install, I had to push and shove the returning section into as close to original position as original that I could find, anchor it using a couple of tacks, and then , tack by tack, "encourage' it to "remember" it's location and shift around to fit as it used to. Although it still looks like it needs to be dressed and cleaned up, that is the light and angle of the shot. It is pretty much where it should be and solidly burned into place.

Just a last look at the upper row of plug welds that I used to secure the outer rocker panel. Mostly, that way is about how the factory would have done it only they used some kind of long throat fusion welder instead of getting up close and personal with a hand held MIG. While they don't look pretty, they are smooth to the touch and sit flush with the metal around them so the plastic sill sleeve that sits on the joint will fit as it should and the sill plate will sit down correctly as well.
The last step for now will be to rehang the door, as is, I have no time right now to re-skin it as other projects are demanding their turns. The process for that will be identical to what I did with the driver's side so there may never be any individual shots of this side to record it as well. One thing for sure, if the Insurance Company ever attempts to quibble about the value of my Monte, well, there must as many as 500 or possibly more pictures that show work like this that has been done. Citing the old adage that "A picture is worth a thousand words" I would guess that my word count for all this is up around a half mil, +/-. 😵💫
CopperNick
Loaded it on a Uhaul trailer to take to the shop over the weekend to jam the 9 inch in.

I’m getting an odd sense of deja vu here….

I’m getting an odd sense of deja vu here….
I think that's what she said!Loaded it on a Uhaul trailer to take to the shop over the weekend to jam the 9 inch in.
I’m getting an odd sense of deja vu here….
Tried to get the ‘80 registered this morning. I got it out of the garage for the mandatory photo shoot for the insurance company of the sides, front and rear, engine compartment, interior and one of the rear end parked in its garage stall. Got them over to my agent and had them submitted with the application by 9am. I guess they took the afternoon off because I didn’t hear back all afternoon about being approved. Hopefully hear from them next week and I’ll register it on my next day off. In the mean time I’ll keep working on the punch list.
Changed out the fuel pump on the engine today and connected the line from the tank. Filled up my diesel pickup and got 6 gallons of 89 octane for the car. Started it up with full fuel bowls and it primed pretty quickly from the tank. Checked for leaks under the car and found nothing, trans is clean & dry and no drips from the fuel lines in the frame or bye the tank.
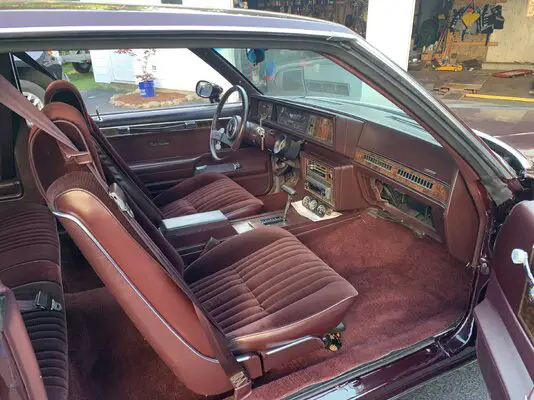
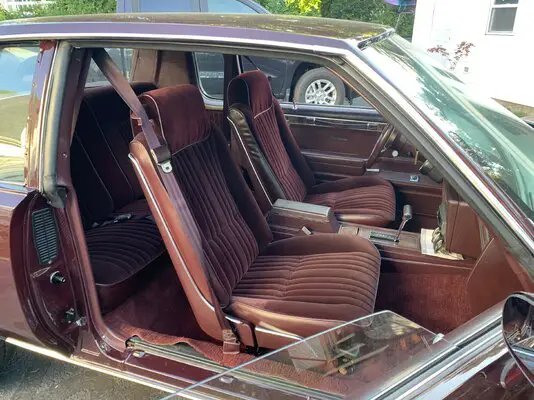
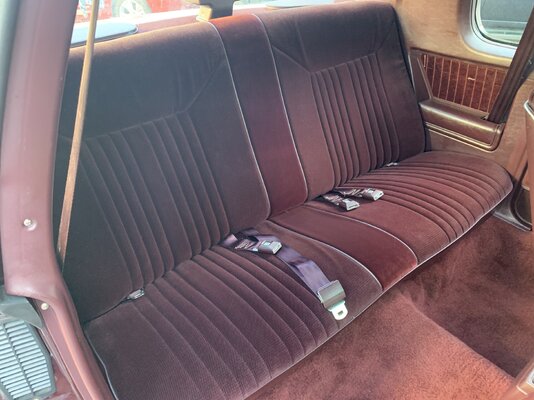
I installed all the NOS bits I collected over the past several years too, the grills and headlight surrounds and all the new body badges. Here are a few pictures of the '86 Salon seats I've had in storage for 30 years. Lastly, the three gauge pod is going to be removed and replaced shortly.


Last edited:
So close!Tried to get the ‘80 registered this morning. I got it out of the garage for the mandatory photo shoot for the insurance company of the sides, front and rear, engine compartment, interior and one of the rear end parked in its garage stall. Got them over to my agent and had them submitted with the application by 9am. I guess they took the afternoon off because I didn’t hear back all afternoon about being approved. Hopefully hear from them next week and I’ll register it on my next day off. In the mean time I’ll keep working on the punch list.
Changed out the fuel pump on the engine today and connected the line from the tank. Filled up my diesel pickup and got 6 gallons of 89 octane for the car. Started it up with full fuel bowls and it primed pretty quickly from the tank. Checked for leaks under the car and found nothing, trans is clean & dry and no drips from the fuel lines in the frame or bye the tank.
I installed all the NOS bits I collected over the past several years too, the grills and headlight surrounds and all the new body badges. Here are a few pictures of the '86 Salon seats I've had in storage for 30 years. Lastly, the three gauge pod is going to be removed and replaced shortly.
View attachment 244839View attachment 244840View attachment 244841
And yet so far.............................Being as this is Labor Day weekend, we get to labor and they get to blow off half of Friday by taking off at noon. Probably they'll show up on Tuesday, mostly still hung over, work??? for the morning and then go for a three martini lunch.
Nick
Nick
Similar threads
- Replies
- 246
- Views
- 11K
- Replies
- 356
- Views
- 18K
- Replies
- 101
- Views
- 4K
GBodyForum is a participant in the Amazon Services LLC Associates Program, an affiliate advertising program designed to provide a means for sites to earn advertising fees by advertising and linking to amazon.com. Amazon, the Amazon logo, AmazonSupply, and the AmazonSupply logo are trademarks of Amazon.com, Inc. or its affiliates.

