What did you do to your non-G Body project today [2024 edition]

CopperNick

Comic Book Super Hero
Supporting Member
Feb 20, 2018
3,469
3,184
113
Canada
DSCN3970.JPG


Just as a recap, this where I got to using the wooden board version of my drilling jig and the now correctly drilled brace that resulted.


DSCN3971.JPG


Like I mentioned a page or two back, all the comments about C-clamps being fitted with sections of angle iron to better deal with tube and bar stock triggered a synapsis that led me to go digging in the top trays of my basement master cab and box. Here you can see the small piece of angle that, many, many, many many moons ago I took a file to in order to shave down the edge where the flats met and create a flat surface that a clamp could grab and not slip off. That worked but still left me with the need to create a jig that could be clamped onto the drill press deck.


DSCN3972.JPG


I did happen to have this, which is a legacy tool that probably came off my GrandDad's bench when he died. Not sure otherwise where Dad might have acquired it. Unfortunatley and unhappily the matching horseshoe clamp that ought to have accompanied it has been MIA for as much as a halfa-century so it became time once more to improvise.


DSCN3973.JPG


What I actually had had in mind was one of the old Proto flat jaw plate pullers for yanking gears and such like. What I came up with was a two jaw puller out of the Napa Catalogue that actually required no modifications to assemble to the V-Block at all.


DSCN3974.JPG


Trial run of my Rube Goldberg device. If you look closely in between the jaws of the puller you can see that little piece of angle iron doing its thing. The tip on the puller is flat as it is intended for pulling v-belt pulleys off shafts and axles so no centering hole necessarily present. The brace in the Block is a candidate for dissection and re-use; it was brazed together from separate pieces sometime in the dusty long ago and is otherwise too short for any use I might have for it at present.


DSCN3978.JPG


And now, Meet the Mark Two version of my drilling jig! My buddy collects and hoards steel in all shapes and sizes for the various projects he becomes involved in so I gave him a call to see if he had any leftovers that might match my wooden Mark One. What he had and dropped off on my doorstep was a piece of 3/16ths x 2 inch flat bar, around 20 inches or so that was a perfect starting point for creating a stronger drilling jig that would not wear as quickly as the wooden one was going to do. In front of it is the candidate for the fourth brace. The bolts in the jig allow me to drill one ear and then clamp the entire brace into position, true it for centre and then drill the second hole. I can also drill both holes if I use the C-clamp and that little piece of angle to freeze the brace in position once it is trued up.


DSCN3979.JPG


And finally, a shot of the why for all this work. The front legs are from my 1947 Indian Chief. The fender is actually an essential services. military item that I scored from a vendor on the East Coast a number of years ago. This is the fender that I lengthened back to somewhere close to original using that salvaged section of sponson from my S-10 body repairs. While all four braces appear to be installed, the fourth one, which in this picture is the brace to the right of the fork leg in the forground, is only spotted into place, That particular brace is not going to be used, it is more of a template for what I will have to make.


All of which concludes my adventures in Vintage La-La land for now. I go back in for a two week rotation starting tomorrow at Zero Dark Hundred and although the shifts aren't that long per diem, by the end of the day I am done, to the point that if I sit down and get any kind of comfortable I will go to sleep and wake up at bedtime! I might do some fiddling, but I have to reset the press to do any bending and that means I have to revisit the mechanism that I was going to fabricate to make raising and lowering the press cradle and see what I can do about completing it. ODTAA...............


Nick
 
  • Winner
Reactions: 1 users

Bonnewagon

Lost in the Labyrinth
Supporting Member
Sep 18, 2009
10,618
14,422
113
Queens, NY
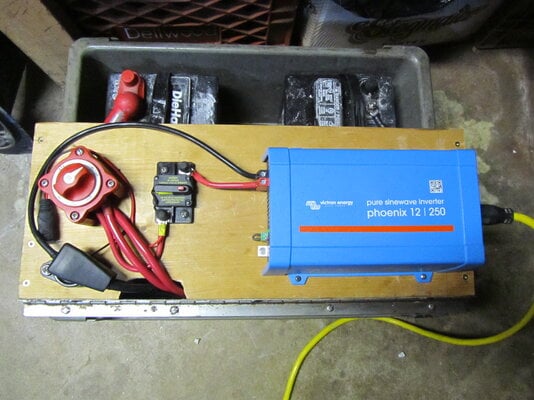
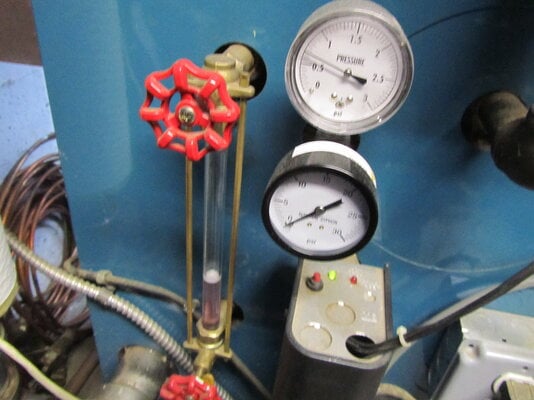
One of my endeavors was to rig up a battery back-up system for my boiler in case of a blackout. A while back I had power supply problems with the whole house blinking. A new meter box, supply line from the box to the light pole, and the box to my breaker panel, fixed that nicely. The meter box was 1950's vintage and way over due. That alerted me about power maybe going out in winter and staying warm. I researched and decided to take two of my 12 volt marine deep cycle batteries, hook them to an inverter, and power my gas boiler. I used a Kill-a-Watt meter to find that the boiler used about 20 watts to run. Steam is it's own motivator so no fans or pumps involved. Just a gas valve, thermostat, and control unit. I had scrounged an old Post Office flats tray made of real heavy plastic for the battery holder. An acid spill will not hurt it . Then I built a folding wood board on top to mount the inverter and control switches. I used a very good brand of pure sine wave inverter made by VICTRON. The smallest pure sine they made was 250 watts, way more than I needed. I made up some battery cables, used a marine grade multi-battery switch, and marine grade 25 amp manual reset breaker that can also be shut off manually. I even wired in a plug-in charging circuit so I can use my NOCO boat battery smart charger to keep the batteries topped off. For a final touch I added a couple of 12 volt LED boat lights to light up the area. No need to hold a flashlight in my mouth working around the boiler during a blackout. Future plans include looking for a nice solar panel for recharging the batteries during the day. The first test was a smashing success. I keep the house at 65° so I lowered it to 60° to see if it would work. And it did. I can switch between batteries, or use them both at once. I used the older, weaker battery first, to see if it would last. It ran a full boiler cycle and the fan in the inverter never even came on once. I also have the USB connector so I can plug a laptop in to the inverter and monitor/adjust the performance. I can test the battery discharge rate and boiler power usage in real time. So far so good. See pics. White stuff is baking soda from battery cleaning. Notice my boiler steam gauge is just above .5 pounds. This shot is at full pressure, after running for about 20 minutes. I run on ounces, not pounds. It is a quiet, economic steam system like you don't see anymore. Them old timers knew what worked. ------------------------------------------------------------------------------------------------------------------------------------------------------ IMG_0753.JPG IMG_0755.JPG
 
  • Winner
Reactions: 1 users
Oct 25, 2019
5,013
7,858
113
Colorado Springs, CO
One of my endeavors was to rig up a battery back-up system for my boiler in case of a blackout. A while back I had power supply problems with the whole house blinking. A new meter box, supply line from the box to the light pole, and the box to my breaker panel, fixed that nicely. The meter box was 1950's vintage and way over due. That alerted me about power maybe going out in winter and staying warm. I researched and decided to take two of my 12 volt marine deep cycle batteries, hook them to an inverter, and power my gas boiler. I used a Kill-a-Watt meter to find that the boiler used about 20 watts to run. Steam is it's own motivator so no fans or pumps involved. Just a gas valve, thermostat, and control unit. I had scrounged an old Post Office flats tray made of real heavy plastic for the battery holder. An acid spill will not hurt it . Then I built a folding wood board on top to mount the inverter and control switches. I used a very good brand of pure sine wave inverter made by VICTRON. The smallest pure sine they made was 250 watts, way more than I needed. I made up some battery cables, used a marine grade multi-battery switch, and marine grade 25 amp manual reset breaker that can also be shut off manually. I even wired in a plug-in charging circuit so I can use my NOCO boat battery smart charger to keep the batteries topped off. For a final touch I added a couple of 12 volt LED boat lights to light up the area. No need to hold a flashlight in my mouth working around the boiler during a blackout. Future plans include looking for a nice solar panel for recharging the batteries during the day. The first test was a smashing success. I keep the house at 65° so I lowered it to 60° to see if it would work. And it did. I can switch between batteries, or use them both at once. I used the older, weaker battery first, to see if it would last. It ran a full boiler cycle and the fan in the inverter never even came on once. I also have the USB connector so I can plug a laptop in to the inverter and monitor/adjust the performance. I can test the battery discharge rate and boiler power usage in real time. So far so good. See pics. White stuff is baking soda from battery cleaning. Notice my boiler steam gauge is just above .5 pounds. This shot is at full pressure, after running for about 20 minutes. I run on ounces, not pounds. It is a quiet, economic steam system like you don't see anymore. Them old timers knew what worked. ------------------------------------------------------------------------------------------------------------------------------------------------------ View attachment 233959 View attachment 233960

Only thing I'd add to that is the ability to keep the fridge cold for a day or so.
 
  • Like
Reactions: 1 user

Bonnewagon

Lost in the Labyrinth
Supporting Member
Sep 18, 2009
10,618
14,422
113
Queens, NY
I learned during super storm Sandy that if you keep the door closed, stuff stays cold for quite a while. Of course, with women and kids, keeping it closed is the problem. In winter I would just place perishables in a secure cold area.
 
  • Agree
Reactions: 1 user

Ugly1

Royal Smart Person
Oct 26, 2021
1,725
1,516
113
Lost in the woods of NH
One of my endeavors was to rig up a battery back-up system for my boiler in case of a blackout. A while back I had power supply problems with the whole house blinking. A new meter box, supply line from the box to the light pole, and the box to my breaker panel, fixed that nicely. The meter box was 1950's vintage and way over due. That alerted me about power maybe going out in winter and staying warm. I researched and decided to take two of my 12 volt marine deep cycle batteries, hook them to an inverter, and power my gas boiler. I used a Kill-a-Watt meter to find that the boiler used about 20 watts to run. Steam is it's own motivator so no fans or pumps involved. Just a gas valve, thermostat, and control unit. I had scrounged an old Post Office flats tray made of real heavy plastic for the battery holder. An acid spill will not hurt it . Then I built a folding wood board on top to mount the inverter and control switches. I used a very good brand of pure sine wave inverter made by VICTRON. The smallest pure sine they made was 250 watts, way more than I needed. I made up some battery cables, used a marine grade multi-battery switch, and marine grade 25 amp manual reset breaker that can also be shut off manually. I even wired in a plug-in charging circuit so I can use my NOCO boat battery smart charger to keep the batteries topped off. For a final touch I added a couple of 12 volt LED boat lights to light up the area. No need to hold a flashlight in my mouth working around the boiler during a blackout. Future plans include looking for a nice solar panel for recharging the batteries during the day. The first test was a smashing success. I keep the house at 65° so I lowered it to 60° to see if it would work. And it did. I can switch between batteries, or use them both at once. I used the older, weaker battery first, to see if it would last. It ran a full boiler cycle and the fan in the inverter never even came on once. I also have the USB connector so I can plug a laptop in to the inverter and monitor/adjust the performance. I can test the battery discharge rate and boiler power usage in real time. So far so good. See pics. White stuff is baking soda from battery cleaning. Notice my boiler steam gauge is just above .5 pounds. This shot is at full pressure, after running for about 20 minutes. I run on ounces, not pounds. It is a quiet, economic steam system like you don't see anymore. Them old timers knew what worked. ------------------------------------------------------------------------------------------------------------------------------------------------------ View attachment 233959 View attachment 233960
Harbor freight has some pretty economical solar panels you could take a look at.
 
  • Like
Reactions: 1 user

Bonnewagon

Lost in the Labyrinth
Supporting Member
Sep 18, 2009
10,618
14,422
113
Queens, NY
Yes, I saw them while looking for an inverter. A YouTube video has a guy testing them and they are actually not bad. I just need to figure out what charging rate I can use before that requires a regulator. I have a good NOCO car dash charger but it is only 2.5 watts.
 
  • Like
Reactions: 1 user
Oct 25, 2019
5,013
7,858
113
Colorado Springs, CO
Yesterday I cracked into the front brakes on my dually. The steering wheel would shake when the brakes got hot, but no jumpy pedal. New one on me but OK. Fvckin GM in their infinite wisdom decided to take a simple job to the next level.

PXL_20240121_003032027.jpg


So after beating the ever living snausages out of these things I got them out at the hangar and brought the sub assemblies home to further break them down.


PXL_20240121_022632181.jpg


Not too shabby for a 97. After cleaning and painting the hub faces and wire wheeling the studs I got this.

PXL_20240121_225632609.MP.jpg


Now that's more like it. Next up was the hub extender dealios.

PXL_20240121_041029569.MP.jpg
PXL_20240122_030152317.MP.jpg


They cleaned up just fine too. I still have to knock those studs back in too, but while cleaning them up I noticed this.

PXL_20240122_030348388.MP.jpg


I had 9 of the 9.8 and 7 of the 10.9. 3 in 1 wheel, 4 in the other. The 10.9 cleaned up better, so I'm led to believe that the 9.8 was factory. I won't be able to reinstall until Wednesday as the truck lives 20 minutes away.
 
  • Like
Reactions: 1 users

Local Hero

G-Body Guru
Nov 24, 2016
729
1,917
93
Northcoast, Cleveland, Ohio
Well, I've not posted much recently. Other than needing to replace the starter in my wagon last week, outside , in -3F temps, it has been toughing through another Northcoast winter.

I have been working on this project that I took delivery of over Thanksgiving weekend. It's a 1936 Ford ex-5 window coupe that my Dad bought as a completed stock-bodied street rod back in the late 70s. The underpinnings were always updated via a mid-70s truck Chevy 350, 350 trans and GM 10 bolt rear. More recently is has been updated with a crate 350, early 70s Nova front subframe grafted to the rest of the original frame, the same 350 trans and a Ford 9" rear with something like 2.41 highway gears. It has a tilt steering column, power steering, disc brakes, and remote-control power windows to allow access in and out.

Dad had been customizing this thing since the mid-80s. First major surgery was cutting off the roof and making it a roadster. The roof is now fiberglass and can be removed and clamped back on pretty quickly. Next was the adding of 49 Cadillac tailfins and lights. Front and rear bumpers are modified 50s Pontiac. Headlights are 50 Ford, Harley Davidson front turn signals and a 40 Willy's grill.

Over the years it has been a multiple of different colors because Dad would work on it all winter, then spray it a solid color, put it all back together, and then drive it all summer and repeat the process the following winter. He never officially finished it. But in this configuration, from our Northeast, Ohio location, this car has been as far east as Boston, as far south as the Florida Keys, as far west as California several times and even northwest to Spokane, Washington, always driven and never on a trailer until my brother delivered it to me in pieces and not running this past November.

About 10 years ago, he finally finished all the major customizing that he wanted to do, but was also showing signs of dementia setting in. He progressively got worse to where he wouldn't leave the couch so the car just sat in pieces. He passed away a little over a year ago and I now have the car. My long-term goal is to eventually finish it the way he envisioned it. Currently my short-term goal is to get it back on the road this Spring/Summer and get it sorted back out. Eventually I'll dismantle it all again and paint it the color Dad always wanted which is something along the lines of the "antifreeze green" that you see on the latest generation of Camaros, then get the interior done.

It's been a challenge because 90% of this car has been drastically changed. Most of that, only Dad knew how it went back together. Making matter worse, some parts have gotten misplaced over the years. So I've been trying to sort things out, and figuring out how things go back together. I've managed to get it running after going through the fuel system and freshening that up. I was able to drive it around the block with no lights, hood, bumpers, or even a seat. I've been updating some of the wiring as I go. Currently I'm going through the brake system and putting the body back together while I pay off some Christmas bills before I purchase some larger ticket items such as a custom bench seat to replace the outdated buckets leftover over from the Street Rod configuration.

I have a Lokar classic style shifter on order to replace the mid-60s Mustang shifter that has always been in there. The bench seat will need to be custom made to fit the floor that was severely modified to allow space for the tunneled driveshaft. It has a crude primitive style air ride system on the rear which I will update with fresh components. All of the really hard and time-consuming work has been done. It's just up to me to complete it and finish off the hundreds of details that were never addressed.

Here are some pics as I received it and as I've been putting it back together.
IMG_20231127_185952589.jpg
IMG_20231127_185944288.jpg
IMG_20231127_190002737 (1).jpg
IMG_20231127_190013143.jpg
IMG_20240111_211811858.jpg
IMG_20240111_211830754.jpg
IMG_20240111_211857243.jpg
IMG_20240111_211925018.jpg
 
  • Like
  • Love
Reactions: 8 users

GBodyForum is a participant in the Amazon Services LLC Associates Program, an affiliate advertising program designed to provide a means for sites to earn advertising fees by advertising and linking to amazon.com. Amazon, the Amazon logo, AmazonSupply, and the AmazonSupply logo are trademarks of Amazon.com, Inc. or its affiliates.

Please support GBodyForum Sponsors

Classic Truck Consoles Dixie Restoration Depot UMI Performance

Contact [email protected] for info on becoming a sponsor