Texas82GP's Roadmaster

pontiacgp

blank
Mar 31, 2006
29,270
20,398
113
Kitchener, Ontario
So after watching some videos I'm stating to think I'd be a fool not to replace the three seals in the timing cover. I'm aware there is a special tool needed to install the seal for the water pump drive. It is readily availabe and inexpensive. What do you guys think? I'd hate to put all this together just to have it spring an oil leak at one of these seals sometime later down the road.

replace them, there is no need to try to prove what we already know..... :giggle:
 
  • Haha
Reactions: 2 users

slow 442

Greasemonkey
Jan 16, 2014
137
161
43
11377
Replace the water pump drive seal anytime you remove the water pump...its cheap and keeps oil from getting on the distributor.on the passenger side near the coolant tank you should have a plastic t and a restrictor in the heater hoses, I made a t from household plumbing supplies and the restrictor from the factory is crimped on to the hoses but can be changed by cutting off the aluminum ends and using hose clamps to secure the restrictor.the replacement restrictor comes crimped to the heater hoses if you purchase the gm heater hoses or can be had on its own and spliced in to the hoses. I think it's listed as a heater control valve in the parts stores.
 
  • Like
Reactions: 2 users

DRIVEN

Geezer
Apr 25, 2009
8,079
14,556
113
*CENSORED*
Heads up; the new Optispark seal may be a PTFE and those are typically installed dry or they leak (guess how I know) . Look for a note on the packaging.
 
  • Like
  • Informative
Reactions: 3 users

Texas82GP

Just-a-worm
Apr 3, 2015
7,989
18,702
113
Spring, Texas
Replace the water pump drive seal anytime you remove the water pump...its cheap and keeps oil from getting on the distributor.on the passenger side near the coolant tank you should have a plastic t and a restrictor in the heater hoses, I made a t from household plumbing supplies and the restrictor from the factory is crimped on to the hoses but can be changed by cutting off the aluminum ends and using hose clamps to secure the restrictor.the replacement restrictor comes crimped to the heater hoses if you purchase the gm heater hoses or can be had on its own and spliced in to the hoses. I think it's listed as a heater control valve in the parts stores.
Thanks again for the help! I bought the AC Delco heater hose assembly which includes the "T" and the restrictor. I'm going to replace the three seals in the timing cover.
Heads up; the new Optispark seal may be a PTFE and those are typically installed dry or they leak (guess how I know) . Look for a note on the packaging.
Will do. You probably just saved me. I would normally put oil on the seal before putting the optispark back. Thanks for the help!
 
  • Like
Reactions: 2 users

Texas82GP

Just-a-worm
Apr 3, 2015
7,989
18,702
113
Spring, Texas
Work continues on the LT1 "refresh". The scope has grown to the point I am no longer calling it a tune-up. Last Saturday I spent most of the day cleaning the front of the engine. What a mess! I also pulled the balancer hub, the optispark and the throttle body. I know, I'm slow. Hopefully the results look thorough though.

When I pulled the throttle body I discovered some decrepit emissions hoses and vacuum lines, which I should have expected. I spent some time Saturday looking for and purchasing replacements for all of those and that ate up some of my time. I still haven't found one of them. Its a rubber 90° boot. It is a strange duck. It reduces from 3/8" to 1/4". It appears to be unobtanium. I don't have that figured out yet. Enough words. Here are some pics....

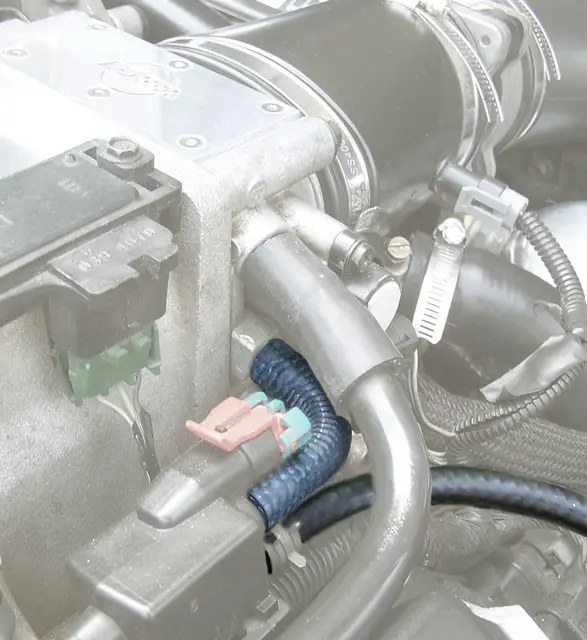
This is a pic of the PCV hose going into the front of the intake. It crumbled when I tried to remove it. I'm pretty sure it was the source of most of the crud on the upper front of the engine. I meant to take a picture before I scraped/vacuumed the area but forgot. I'll bet there was 3/8" to 1/2" thick of accumulation around it on the front of the intake. Still this picture represents a decent starting point for my Saturday. I did struggle to get the throttle body off some. It was stuck good and I was being pretty soft with it....

01-20-20_01.jpg


Finished product after a lot of cleaning and pulling the optispark and the balancer hub...

01-20-20_10.jpg


Certainly not perfect but much, much better. I'm satisfied with it for a driver. I can put the new plug wires on for the passenger bank without getting them filthy dirty now. Here's a look at what I used to pull the balancer hub. The bolt holes are 7/16 coarse but my balancer puller won't take bolts that big. I through bolted with Grade 8 3/8" bolts. I used about a 4" 1/4"-drive extension for the puller to push against since the hole in the balancer hub is the same size as the bolt hole in the crank. I didn't want to thread a longer bolt in there and push against the threads in the crank. Not my idea, just something I came across online....

01-20-20_08.jpg


I didn't get much done Sunday. I had chores to do (laundry, etc.) that morning. I wasted a lot of time running around to the four local auto parts store chains trying to find a solution on the rubber evap 90 and didn't come up with anything satisfactory. Also, I had ordered a new balancer hub earlier that week as I was concerned my hub would have a groove in it from the front seal. I thought it would be nicer to have a new hub rather than to put a seal saver on mine. The new hub came in Saturday while I was at the storage. Sunday, I figured out it wasn't going to work. The hub for my car is B-body specific and is 96 year model (OBD II) specific. A new one appears to be unobtanium. Realizing this lead me to start the restoration of my hub late Sunday afternoon/early evening. First I cleaned up the nub that goes in the engine with carb spray and a brass wire brush. Then I wire brushed the rest of the hub with a regular steel brush to get any loose paint or rust. That got me to here.......

01-20-20_17.jpg


I couldn't feel the line that you see on the sealing surface with my fingernail but I was still concerned about it. Next, I went and bought a gallon of Evaporust. When I got back, I put the hub in a tupperware container full of it and called it a day. When I got home Monday after work, I decided to let the hub soak some more and to work on the optispark refresh. I started by putting the cap back on it and giving it a good cleanup. It was pretty dirty...

01-22-20_02.jpg


01-22-20_03.jpg


I cleaned it up with carb spray, a small nylon bristle brush (a little bigger than a toothbrush) and a microfiber cloth. Then I pulled the cap, the rotor and the "shield". Here is a look inside an Optispark for those who haven't seen one before.....

01-22-20_04.jpg


Here's the back....

01-22-20_05.jpg


Then I went back together with the new shield, rotor, cap and seals I got from MSD...

01-22-20_06.jpg


01-22-20_07.jpg


I used the purple (low strength) Locktite on all the screws. MSD provides Phillips head screws for the rotor and the cap but I elected to use the original hardware, especially now that I have the tools for it. The one Phillips screw you see in the picture above is an additional screw that MSD added to their cap. they provide an aluminum block that the screw threads into and this provides additional clamping of the cap in that area. The stock cap doesn't have a fastener there at all. Here's a look at that aluminum block from the back....

01-22-20_09.jpg


When I initially tested the optispark to see if it would hold vacuum, it failed miserably. I was pretty disappointed since I was pretty proud of what I had done. Then I realized that the lead that plugs into the optical sensor seals that opening in the cap (weatherpak connector). Once I put my thumb over that opening, it held vacuum fine.

Tuesday, I had a Dr.'s appointment at 11:15 so I hung around the house. That morning I pulled the balancer hub out of the Evaporust and gave it a rinse in the sink. I was pretty happy with the results. I was still fretting about that line on the machined surface...…

01-22-20_10.jpg


I decided to try a red Scotchbrite pad on it and it polished it right off with ease! Enthused, I decided to tape the hub up and give it a coat of paint. I used VHT Engine Enamel. I was able to follow the instructions and do the two light coats and then one medium wet coat with both the primer and the paint. Then I went to my Dr. appointment and then on to work. When I got home, I un-taped it. The paint job turned out pretty good. A little shinier than I wanted but it will be fine.....

01-22-20_11.jpg


01-22-20_12.jpg


With the optispark and the hub done, I moved on to disassembling and cleaning up the throttle body. I don't think it's ever been cleaned...

01-22-20_14.jpg


Notice the wavy gravy gasket under the top cover in the picture above. More before pics...

01-22-20_13.jpg


01-22-20_16.jpg


Believe it or not, I spent 4-5 hours and two cans of carb spray cleaning that thing up. Don't worry, I pulled the TPS and the IAC first. I don't have pictures of the clean parts. By the time I finished up last night and cleaned up after myself (I've been doing these small projects at home) I was tired. At this point I'm waiting on new gaskets to put it back together.

That's it for now friends. I may have another update this week if I get the gaskets and get the throttle body back together. Saturday I plan to replace the three seals in the timing cover. Then, I'm going to replace the valve cover gaskets. The next project after that I think will be the plugs and wires. Then I'll start putting the front of the engine back together. Until then, thanks for following along and take care!

Best,

Jared
 
  • Like
Reactions: 11 users

superbon54

G-Body Guru
Apr 15, 2014
755
2,442
93
Wisco
Great job but damn it, Seeing your work is going to make me paint my crusty parts now!

With all the horror stories I’ve heard, I get nervous just handling my opti. I bought the E4 socket but haven’t mustered the balls to open it up yet.

My hub has that wear line too, and I was just going to leave it since it wasn’t leaking but maybe I’ll hit it with a scotch brite pad before reinstall. I bought new VC gaskets too but those aren’t leaking so I’ll probably leave well enough alone.

My next project after the motor is reassembled is dropping the tank and fixing the sending unit. Ran the pig out of gas twice because it’s actually empty when the gauge shows 1/8 tank.

Keep the updates coming because it’s motivating me to get all my similar work done too. I’ll be taking the whole fam in the Imp on the power tour this year and would never hear the end if we had a breakdown!
 
  • Like
Reactions: 1 users

DRIVEN

Geezer
Apr 25, 2009
8,079
14,556
113
*CENSORED*
If you're talking about the same PCV hose I'm thinking of, Dorman used to have a universal variety pack that might help. Maybe use a spark plug boot in a pinch.
 
  • Like
Reactions: 3 users

Turbo Zach

Comic Book Super Hero
Sep 8, 2015
2,534
5,874
113
50130
That is a pretty cool car, but you seem to find any reason not to work on the red one. I would love to find a car like that for a daily driver. Keep up the good work. That line where the seal road is no big deal. Even if it was a little worse it most likely would have not leaked. If they are scored pretty bad, you can fix it with a speedy sleave.
 
  • Like
Reactions: 1 users

69hurstolds

Geezer
Supporting Member
Jan 2, 2006
8,228
17,689
113
For that "fitting" with the evap hose.... it's GM p/n 10105324. Nipple isn't available separate from GM. Have to buy the whole kit/tube. My old Camaro had that very elbow go bad UNDER WARRANTY for cripes sake. When the part came in, I just popped the nipple off the new one and swapped the old one on the dealership tube. 5 minutes and it was done.

Unobtanium? YES! Has been for almost 20 years. Not available ANYWHERE......not that I can find anyway.

DRIVEN is correct. There was an old "trick" that the Impala SS crowd guys used that worked well and that's taking a good quality old 90 degree spark plug boot and slipped it in place. Depending on the wire size. Should work ok with 7mm wires. If not, a little dab of sealer on the little end should do it fine. I've personally never tried it though, although reports say it works.

But y'all know me. If there's a way to find a part, I can usually track it down. Granted, it's for "corvette" so it's automatically pricey at $19.95, but it's the rubber bits of the metal tube unit that is no longer available. It comes with the dual ID hose nipple you seek. Well, you be the judge.

https://corvetteparts.com/item/fuel...hrottle-body-vacuum-hose-lt1-engine-1992-1995

It says the rubber parts are part of p/n 10105324.

I think the elbow you want is the top hose in the picture. Which is included in the kit.


yfZBW86OFRZvg8Yp7L8HfA_3.jpg
 
  • Like
  • Winner
Reactions: 4 users

GBodyForum is a participant in the Amazon Services LLC Associates Program, an affiliate advertising program designed to provide a means for sites to earn advertising fees by advertising and linking to amazon.com. Amazon, the Amazon logo, AmazonSupply, and the AmazonSupply logo are trademarks of Amazon.com, Inc. or its affiliates.

Please support GBodyForum Sponsors

Classic Truck Consoles Dixie Restoration Depot UMI Performance

Contact [email protected] for info on becoming a sponsor