

Great photos Jared! You'll have to get your GP finished, so that we can see some pics of the whole family fleet.
Dad's 62 Ford Galaxie
- Thread starter Texas82GP
- Start date
You are using an out of date browser. It may not display this or other websites correctly.
You should upgrade or use an alternative browser.
You should upgrade or use an alternative browser.


Wow!! They've certainly come a long way. It really makes us appreciate seeing them from start to finish. I enjoy seeing pics of the cars progressing over time. Like Jeff said, it would be nice seeing your GP pictured in family cruises as well, Jared.Last Saturday, Sean, Dad and I all went to out to breakfast like we have almost every Saturday morning for the past 15+ years. Dad came over to the house to pick us up but Sean wanted to get his car out too so I rode with Dad and Sean followed. He got some good pictures....
View attachment 214425
View attachment 214426
View attachment 214427
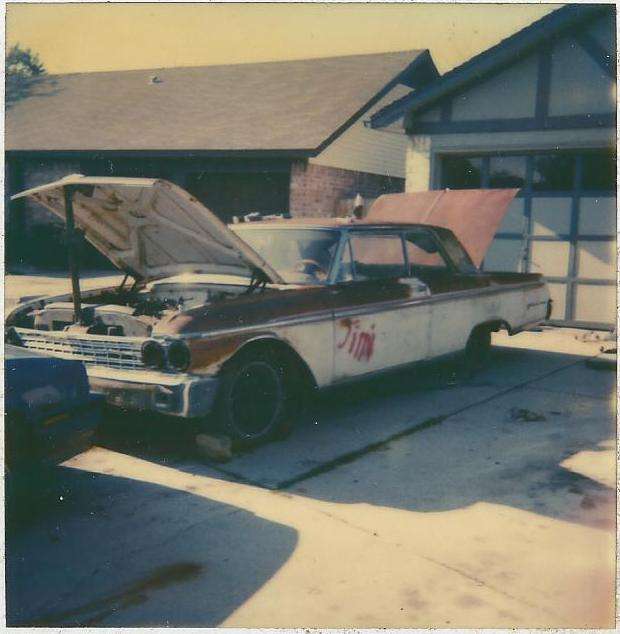
Still hard to believe that those cars started out like this in 1989 and 2006, respectively....
View attachment 214428
Last edited:
Great photos Jared! You'll have to get your GP finished, so that we can see some pics of the whole family fleet.
Someday friends. We're hoping to start building the new house and the shop later this year. Maybe we move in early next year so maybe the GP goes back together in 2024. I wouldn't think later than 2025. It costs me every month, but at least I own it and have just about everything to make a complete car.Wow!! They've certainly come a long way. It really makes us appreciate seeing them from start to finish. I enjoy seeing pics of the cars progressing over time. Like Jeff said, it would be nice seeing your GP pictured in family cruises as well, Jared.
Dad made another nice little improvement to the Galaxie this past week. He installed the cardboard trim panels that go in the trunk, inboard of the quarter panels, to finish it out.....


He also glued down the mat around the edges. It all got the customary attention to detail. I had previously seen Dad on Sunday (1/16) and he was working on obtaining all matching hardware to install those sideboards. So if you were to peel up the mat to look, it's all matching new hardware. As nice as the car is, it's hard to believe there is still little stuff like this to do. I guess they are never finished but it just got a little closer.
He also glued down the mat around the edges. It all got the customary attention to detail. I had previously seen Dad on Sunday (1/16) and he was working on obtaining all matching hardware to install those sideboards. So if you were to peel up the mat to look, it's all matching new hardware. As nice as the car is, it's hard to believe there is still little stuff like this to do. I guess they are never finished but it just got a little closer.
Dad keeps making improvements. The clock in the dash gave up about a year ago. He sent it off for repair. He got it back, it ran on the bench but never ran in the car. He recently pulled it again and sent it back. They took care of it under warranty. They said it was a defective movement. It's running again....

When the car came back from paint, about two and a half years ago, Dad immediately started putting trim on it. In the case of the 390 flags on the fenders, his exuberance turned out to be a bad thing. The barrel nuts in the fenders were full of body shop debris (dust, primer, filler) and they wouldn't push all the way in. Then they wouldn't come off. They have been like that, not pushed all the way in all this time. Dad has fixed it. He stared on the passenger side and initially his approach was to pull the inner fender. He got it completely loose but it wouldn't come out from the wheel well without pulling the fender. In the end, he ended up gently prying the emblem off, prying against a paint stir stick laying against the fender. He then cleaned out the barrel nuts and also filed the pegs on the emblems.

Now they are on right....

Those are real deal, new old stock flags. Dad has decided to put the wheel lip trim, rocker panel trim and the washboards on the car. The washboards are the lower trim pieces behind the rear wheel openings. Dad already had New Old Stock rear wheel opening trim. He put those pieces on last week....


They fit very well, which is a relief considering we did patch panels both in front of and behind the wheel openings on both sides. For perspective, here is a another 62 Galaxie that has the front and rear wheelwell trim along with the rocker trim and the washboards...

Dad has sent the front wheel well trim off to a fellow up in Wisconsin that restores automotive trim. The same guy restored the Galaxie 500 XL script trim pieces that are on each quarter panel. When those pieces come back Dad is going to send him the rocker trim and washboards to do. Dad has cleaned up and painted the clips to put the rocker trim on the car. Miraculously, Dad came up with this picture, which is installation instructions to put the rocker trim on a 60 or a 61 Galaxie. We're pretty sure it is the same for the 62......

I'm going to transfer these dimensions into an AutoCAD drawing and print a couple of full size templates for us to look at. We sourced a reproduction left side rocker to use as a Gunia Pig so we don't have to learn on the car. We also sourced some reproduction clips so we'd have some extras to work with. I guess that's it for this update. I'll update when there is something new. My guess is that will be when dad gets the front wheel well trim back and has it on the car. Until then, thanks for the interest friends.
When the car came back from paint, about two and a half years ago, Dad immediately started putting trim on it. In the case of the 390 flags on the fenders, his exuberance turned out to be a bad thing. The barrel nuts in the fenders were full of body shop debris (dust, primer, filler) and they wouldn't push all the way in. Then they wouldn't come off. They have been like that, not pushed all the way in all this time. Dad has fixed it. He stared on the passenger side and initially his approach was to pull the inner fender. He got it completely loose but it wouldn't come out from the wheel well without pulling the fender. In the end, he ended up gently prying the emblem off, prying against a paint stir stick laying against the fender. He then cleaned out the barrel nuts and also filed the pegs on the emblems.
Now they are on right....
Those are real deal, new old stock flags. Dad has decided to put the wheel lip trim, rocker panel trim and the washboards on the car. The washboards are the lower trim pieces behind the rear wheel openings. Dad already had New Old Stock rear wheel opening trim. He put those pieces on last week....
They fit very well, which is a relief considering we did patch panels both in front of and behind the wheel openings on both sides. For perspective, here is a another 62 Galaxie that has the front and rear wheelwell trim along with the rocker trim and the washboards...
Dad has sent the front wheel well trim off to a fellow up in Wisconsin that restores automotive trim. The same guy restored the Galaxie 500 XL script trim pieces that are on each quarter panel. When those pieces come back Dad is going to send him the rocker trim and washboards to do. Dad has cleaned up and painted the clips to put the rocker trim on the car. Miraculously, Dad came up with this picture, which is installation instructions to put the rocker trim on a 60 or a 61 Galaxie. We're pretty sure it is the same for the 62......
I'm going to transfer these dimensions into an AutoCAD drawing and print a couple of full size templates for us to look at. We sourced a reproduction left side rocker to use as a Gunia Pig so we don't have to learn on the car. We also sourced some reproduction clips so we'd have some extras to work with. I guess that's it for this update. I'll update when there is something new. My guess is that will be when dad gets the front wheel well trim back and has it on the car. Until then, thanks for the interest friends.
You don't really realize how much bright work they put on those old cars until you have to install it yourself.
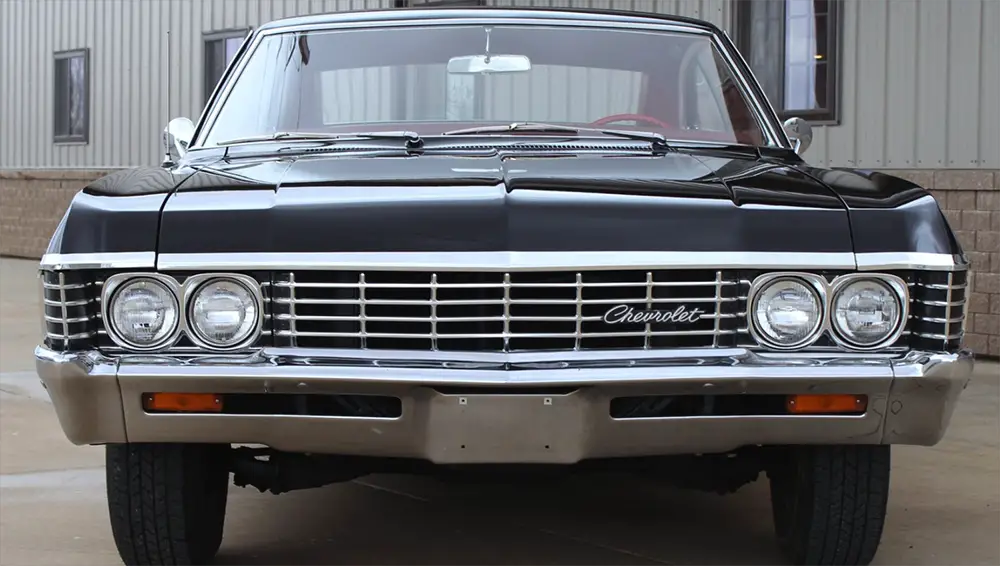
and a lot of it is not chromed. it's brushed aluminum, or anodized, or partially painted. try putting it on with damaging it! here's the front end of a '67 Impala just like mine. I count 9 pieces of brightwork on the front clip alone in this picture!You don't really realize how much bright work they put on those old cars until you have to install it yourself.
Early in March, shortly after my last update, Dad decided to start working on putting the roof gutter trim on the car. Years ago, he had me pull the trim off of two different 4-door parts cars to keep. He had pulled the trim off of his car back in the late 80's, and it didn't go so well. I managed to get both sets off with only minimal distortion. He's kept them all this time.
After the car got painted, I really didn't want to put the roof gutter trim on. For one, it's my opinion that stock, these cars were a bit heavy on trim. Especially the XL models. But the bigger reason was that I was afraid that installing that trim on a painted car would be an ugly process to undertake. I felt like there was too much material on and in the roof gutters to install the trim and I didn't want to be responsible for the disastrous results of trying to do it.
In the end, obviously, Dad's notion of how much trim should be on the car is way more relevant than mine. He was of the strong opinion that the trim was supposed to be on the car so he set about installing it. The trim is a four-piece set. There are two long side sections that run from the rear end of the gutter at the bottom of the sail pane and stop above the vent windows. Then there are two curved front pieces that meet over the center of the windshield with one overlapping the other. Each curved piece overlaps the side pieces so the side pieces go on first. The side pieces went on the car easily, almost a month ago.....


Unfortunately, installing the front pieces was an ugly battle. My fear that there was too much material on and in the gutters ended up being validated. The front pieces would not go on. Dad watched some YouTube videos and tried some different techniques but didn't have any luck. He ended up damaging some of the trim slightly but was able to straighten it. He was smart however and was working with the second-best pieces while trying to get them on there. Before it was all said and done, he ended up sanding the front roof gutter down to bare metal and also did some sanding and digging in the gutter in the front above the windshield to get the trim to go on. He described it as a painful process.
The roof gutters ended up with a few paint jobs on them before the car went out to paint. Dad had painted those gutters after the car went in the yellow epoxy primer back in the 90's.....

At some point, he had a glass guy remove and install the windshield. I can't remember if the car got a new windshield or if the windshield was leaking. The car had gotten a new windshield weatherstrip when it got put back together as you see it in the picture above. I don't remember why the windshield was removed and reinstalled or replaced. Regardless, in the process, the glass guy beat up the paint on the gutter over the windshield. Sean and Dad fixed the chips with filler or spot putty and re-painted the gutter. When the car went to paint, that second (at least) paint job on the gutter got covered over with high-build primer, sanded and then painted again. The trim just won't go over that mil thickness of material.
In the picture above, you can barely see Dad's first attempt at caulking the roof gutter on the car. It's the off-white color coming out of the gutter on the sail panel, up against the yellow epoxy. On these cars, there is a roof seam in the gutter. It is caulked at the factory with something similar to some of the seam sealers out there. When we stripped the car down, we dug and cleaned all the old, hard, cracked, petrified caulking out. After the car was epoxy primed, Dad bought a product from Eastwood, probably back in the 90's to seal up the seam. He started at about the middle of the windshield and went around the passenger side. He didn't like the results. The stuff was not good to work with. It ended up lumpy and bumpy. He tried to sand it, but it wasn't very sandable. He tried to cut it back with a utility knife but that didn't turn out well either.
Frustrated, he ignored it for a long time. In the 2015-2016 timeframe we did a lot of sheet metal repair on the car. We replaced both rockers and did patches on both quarters, in front of and behind the rear wheels. After all that was done, Sean and Dad did a lot filler work, priming and blocking. In conjunction with that work, they revisited the gutter seam problem.
They probably needed to dig out all the stuff that Dad put in back in the 90's out and start over, but they didn't. Instead, the caulked the Driver's side and got much better results. Then they fixed the passenger side to make it look good. It did look good but was more material than stock. When the car went to paint, this got built up more with high build, sanding, more primer and then paint. It's no wonder the gutter trim wouldn't go on.
Sean and I have been fairly aghast that Dad sanded on this painted car. There is no way either one of us had the courage to take this on. He pulled it off though. Once he got the trim pieces to fit right, he masked up the whole car, shot the bare metal with lacquer based primer-surfacer.....

Followed by Jet Black Centauri Enamel.....

Followed by the trim....

He pulled it off. Congratulations Dad! I'll get some more pics the next time he has the car out. Until then, thanks for getting through one of the more lengthy updates.
After the car got painted, I really didn't want to put the roof gutter trim on. For one, it's my opinion that stock, these cars were a bit heavy on trim. Especially the XL models. But the bigger reason was that I was afraid that installing that trim on a painted car would be an ugly process to undertake. I felt like there was too much material on and in the roof gutters to install the trim and I didn't want to be responsible for the disastrous results of trying to do it.
In the end, obviously, Dad's notion of how much trim should be on the car is way more relevant than mine. He was of the strong opinion that the trim was supposed to be on the car so he set about installing it. The trim is a four-piece set. There are two long side sections that run from the rear end of the gutter at the bottom of the sail pane and stop above the vent windows. Then there are two curved front pieces that meet over the center of the windshield with one overlapping the other. Each curved piece overlaps the side pieces so the side pieces go on first. The side pieces went on the car easily, almost a month ago.....
Unfortunately, installing the front pieces was an ugly battle. My fear that there was too much material on and in the gutters ended up being validated. The front pieces would not go on. Dad watched some YouTube videos and tried some different techniques but didn't have any luck. He ended up damaging some of the trim slightly but was able to straighten it. He was smart however and was working with the second-best pieces while trying to get them on there. Before it was all said and done, he ended up sanding the front roof gutter down to bare metal and also did some sanding and digging in the gutter in the front above the windshield to get the trim to go on. He described it as a painful process.
The roof gutters ended up with a few paint jobs on them before the car went out to paint. Dad had painted those gutters after the car went in the yellow epoxy primer back in the 90's.....
At some point, he had a glass guy remove and install the windshield. I can't remember if the car got a new windshield or if the windshield was leaking. The car had gotten a new windshield weatherstrip when it got put back together as you see it in the picture above. I don't remember why the windshield was removed and reinstalled or replaced. Regardless, in the process, the glass guy beat up the paint on the gutter over the windshield. Sean and Dad fixed the chips with filler or spot putty and re-painted the gutter. When the car went to paint, that second (at least) paint job on the gutter got covered over with high-build primer, sanded and then painted again. The trim just won't go over that mil thickness of material.
In the picture above, you can barely see Dad's first attempt at caulking the roof gutter on the car. It's the off-white color coming out of the gutter on the sail panel, up against the yellow epoxy. On these cars, there is a roof seam in the gutter. It is caulked at the factory with something similar to some of the seam sealers out there. When we stripped the car down, we dug and cleaned all the old, hard, cracked, petrified caulking out. After the car was epoxy primed, Dad bought a product from Eastwood, probably back in the 90's to seal up the seam. He started at about the middle of the windshield and went around the passenger side. He didn't like the results. The stuff was not good to work with. It ended up lumpy and bumpy. He tried to sand it, but it wasn't very sandable. He tried to cut it back with a utility knife but that didn't turn out well either.
Frustrated, he ignored it for a long time. In the 2015-2016 timeframe we did a lot of sheet metal repair on the car. We replaced both rockers and did patches on both quarters, in front of and behind the rear wheels. After all that was done, Sean and Dad did a lot filler work, priming and blocking. In conjunction with that work, they revisited the gutter seam problem.
They probably needed to dig out all the stuff that Dad put in back in the 90's out and start over, but they didn't. Instead, the caulked the Driver's side and got much better results. Then they fixed the passenger side to make it look good. It did look good but was more material than stock. When the car went to paint, this got built up more with high build, sanding, more primer and then paint. It's no wonder the gutter trim wouldn't go on.
Sean and I have been fairly aghast that Dad sanded on this painted car. There is no way either one of us had the courage to take this on. He pulled it off though. Once he got the trim pieces to fit right, he masked up the whole car, shot the bare metal with lacquer based primer-surfacer.....
Followed by Jet Black Centauri Enamel.....
Followed by the trim....
He pulled it off. Congratulations Dad! I'll get some more pics the next time he has the car out. Until then, thanks for getting through one of the more lengthy updates.

Jared,
Dad did what he had to do. I was kind of cringing reading through the process. But sometimes you have to grab the bull by the horns and go for it. It was necessary and he wasn't quite satisfied being unable to reinstall the gutter trim. I think something like that would gnaw at me as well.
I'm glad to hear that it was a successful endeavor.
Similar threads
- Replies
- 10
- Views
- 1K
GBodyForum is a participant in the Amazon Services LLC Associates Program, an affiliate advertising program designed to provide a means for sites to earn advertising fees by advertising and linking to amazon.com. Amazon, the Amazon logo, AmazonSupply, and the AmazonSupply logo are trademarks of Amazon.com, Inc. or its affiliates.
