

500 Caddy/Monte Clip into El Camino
- Thread starter Mike P
- Start date
You are using an out of date browser. It may not display this or other websites correctly.
You should upgrade or use an alternative browser.
You should upgrade or use an alternative browser.
- Status
- Not open for further replies.
Re: 500 Caddy into El Camino
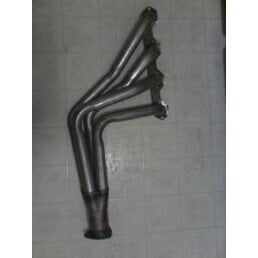
The headers are made by cadco for a G-body/caddy swap. They are very tight, but well worth the extra expense and work. Here are a couple pix of my driver side, it's real tight! Sorry, I don't have a pic of it bolted to the motor.
The headers are made by cadco for a G-body/caddy swap. They are very tight, but well worth the extra expense and work. Here are a couple pix of my driver side, it's real tight! Sorry, I don't have a pic of it bolted to the motor.
Attachments
Re: 500 Caddy into El Camino
how much did the steering wheel location change when you moved the shaft over?
how much did the steering wheel location change when you moved the shaft over?
Re: 500 Caddy into El Camino
"....how much did the steering wheel location change when you moved the shaft over?...."
Honestly it did c*ck the steering wheel just a bit,but unless you're specifically looking for it you never notice it, nor does it feel funnywhen you sit behind it.
Rock those rear passenger side header bolts look like a lot of fun to get to.
Re: 500 Caddy into El Camino
I got a steering shaft, and it fits great. I didn't have to modify it at all, it slipped over the end of the column and the bolt went right in. I have about a fingers width between the header and the shaft at the tightest point. Oh, and before someone catches it, I will be replacing the bolt with a grade 8, I didn't have one long enough so I put in what I could find.


I'll stop hijacking your thread now just thought you might want to see how the shaft fits.
I got a steering shaft, and it fits great. I didn't have to modify it at all, it slipped over the end of the column and the bolt went right in. I have about a fingers width between the header and the shaft at the tightest point. Oh, and before someone catches it, I will be replacing the bolt with a grade 8, I didn't have one long enough so I put in what I could find.
I'll stop hijacking your thread now
just thought you might want to see how the shaft fits.Re: 500 Caddy into El Camino
Both times I did the swap, in an 88 Cutlass and in the 87 442 I never had to move the steering or use another steering shaft. It was close though. In both cases I had the passenger side valve cover snug up against where the AC would have been had I not cut & fiberglassed the side of the box in for clearence. (3/8 to 1/2") Meaning when I set the engine in for motor mounting etc it was snug but not tight but later before setting the engine in for good I would set the side of the box in so that I could take the valve cover on and off without jacking up one side of the engine. (Otherwise the bottom of the valve cover would not clear the box for removal.) Both cars were also console shifts cars if that mattered any as far as for the linkage.
This swap seems to be somewhat marginal in that for some people it drops in with very little problems and others whether it be because they are prefectionists and want things just so or that there were production variances or differences in the wear of bushings etc it takes more work. Oh I also did headers on mine and if I used header bolts with the smaller tops it gave me more room and made it quicker and easier to tighten the bolts down.
Re: 500 Caddy into El Camino
Rock I like the looks of the steering shaft and if I happen to come across one will probably pick it up.
Vern I think you have a point on the production variances between the different G bodies that get 500s swapped in. My experience so far with this swap is that there is ONE sweet spot for the engine to go in and even when it’s there almost everything is very tight. Get the engine off even a little bit to get more clearance in one area and there is interference in another.
As far as moving the column over……I could have lived with the amount of manifold to shaft clearance I had as I had already gone to a floor shift. The problem was after I put the floor shift in I decided that I still wanted the shift indicator and backup lights to still work. As I already had the column out to do the I figured why give it a shot and I’m happy with the results.
Re: 500 Caddy into El Camino
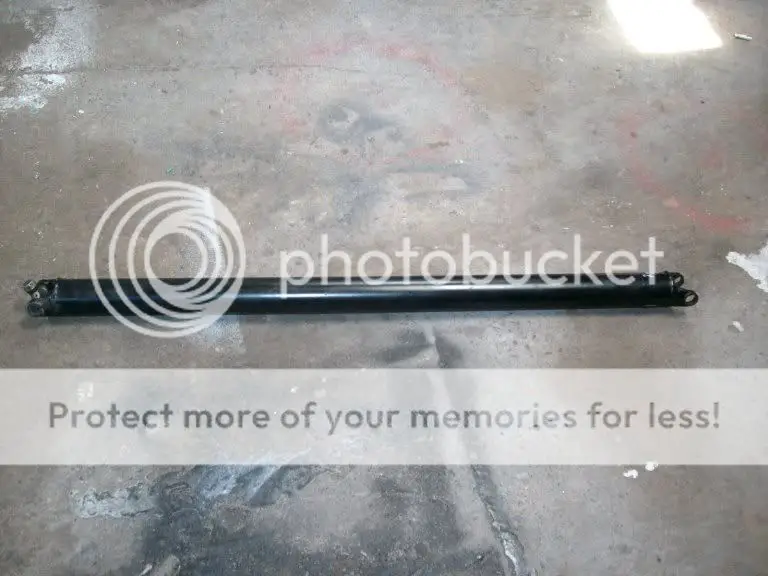
Well I’ve been making some progress on the project. The drive shaft/U joints are sorted out and in. I was able to find a drive shaft (54” U joint center to center) and the proper conversion joints to mate it to the TH 400 yoke and 9” rear. The information I got from the NEAPCO site on U joint dimensions sure helped.
http://www.neapco.com/n_products-catalogs.php?pdffile=2
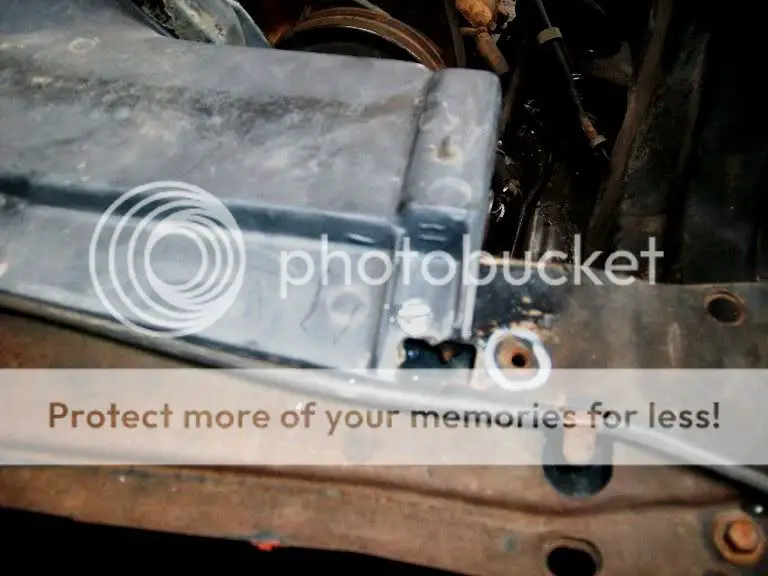
I have been working on getting the plumbing done on the fuel system. I’ve run a new 3/8” fuel line down the driver’s side frame rail, and modified the routing of the original fuel line on the passenger side to use as my fuel return line. I moved the lines to the top of the frame rail so they could be easily moved out of the way when I do the final welding and add gussets when I pull the engine. The original tank vent line to the charcoal canister will be left in place and used.
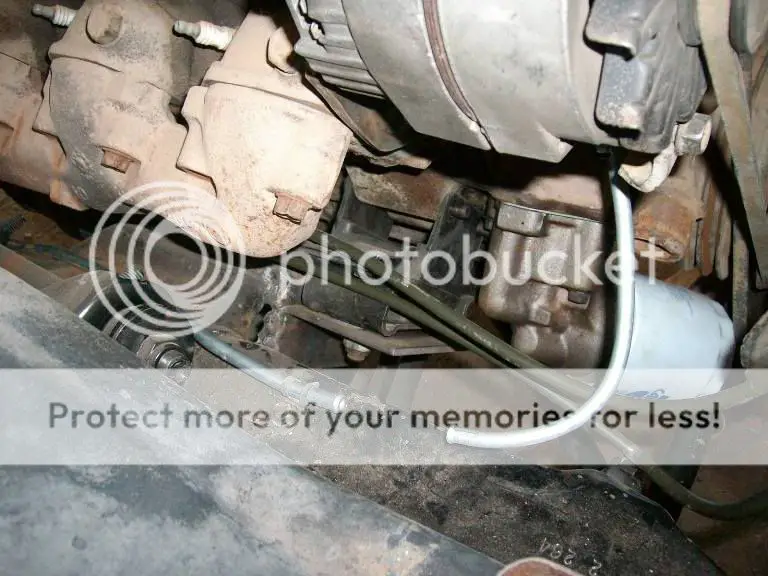

There was a pretty legnthy discussion on my fuel return system earlier in the thread, and here it is in the car. I elected to move the bypass/ pressure regulator to the carburetor itself rather than just using the return fitting on the mechanical fuel pump or a fuel filter with a built in return line.

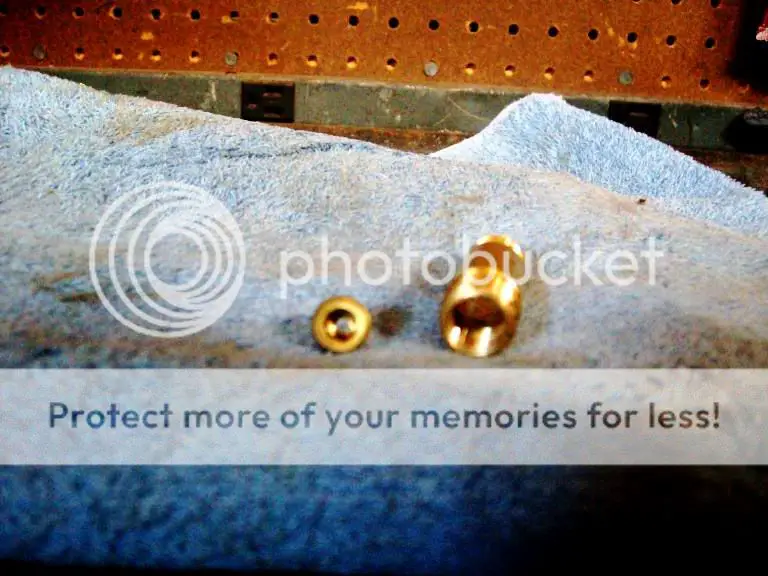
There is a fixed size orifice that threads into the pipe leaving the carburetor the sets the amount of fuel bypassed and regulates the pressure at the needle and seat. The pressure and amount of fuel bypassed can be changed by replacing the plug with one with a bigger or smaller hole.
While it’s a bit more cumbersome looking than some of the alternatives it does insure that there is no place for the fuel to lay stagnant and pick up heat anywhere on the way to the carburetor and should eliminate any possibility of vapor lock.
A while back I ordered a new fuel tank and sending unit for this project. I couldn’t find a sending unit with a return line so I figured I’d just have to add one. I ordered from Rock Auto and was just glad I could find them new in the first place. Anyway, last week I found a hairline stress crack in the fuel tank on the wife’s El Camino (great huh?).
Since the time I bought the tank and sender, I found out about a place called Genesis Auto Parts that specialize in tanks, sending units etc. They showed that had a sending unit with 3 lines. The price was $23 which is as cheap as I think I have ever bought a sending unit. The rest of the sending units Genesis sells for the El Caminos go for around $55 which is still considerably cheaper than the $140 Rock Auto gets for them.
They don’t list the sending units by tank size but by engine application. As I found out it is NOT for the 22 Gal tank. I do not have an 18 gallon tank or sending unit to compare it to but I suspect it’s for the smaller tank. It IS the same as a sending unit for a 78 Monte Carlo (which I do have from the parts car). The good news is that with a bit of modification it should still work in the 22 Gal tank.

From left to right are; a new 22 Gal sending unit that Rock Auto sells, an original sending unit from a 78 Monte Carlo, and the 3 line unit from Genesis.
It may be a little hard to tell from the picture but the pickup tube for the 22 Gal tank is about an inch longer that the one from Genesis (which as I said was the same as the center Monte Carlo one when I received it). To make up the difference I just straightened the 90 degree bend where the sock attaches. Pointing straight down the fuel sock (strainer) no longer fits but I’m not planning on using it anyway. I also straightened one of the bends on the arm that holds the float to lengthen it just a bit so the gauge will still read correctly with the bigger tank.
As far as not using the sock I was not planning on using it anyway as there is a possibility that I may at some point convert it to E85 and the sock is one of the items they recommend deleting.
So the new sending unit from Rock will be going into the wife’s El Camino when the new tank arrives and the modified 3 line unit from Genesis will end up in this project.
Well I’ve been making some progress on the project. The drive shaft/U joints are sorted out and in. I was able to find a drive shaft (54” U joint center to center) and the proper conversion joints to mate it to the TH 400 yoke and 9” rear. The information I got from the NEAPCO site on U joint dimensions sure helped.
http://www.neapco.com/n_products-catalogs.php?pdffile=2
I have been working on getting the plumbing done on the fuel system. I’ve run a new 3/8” fuel line down the driver’s side frame rail, and modified the routing of the original fuel line on the passenger side to use as my fuel return line. I moved the lines to the top of the frame rail so they could be easily moved out of the way when I do the final welding and add gussets when I pull the engine. The original tank vent line to the charcoal canister will be left in place and used.
There was a pretty legnthy discussion on my fuel return system earlier in the thread, and here it is in the car. I elected to move the bypass/ pressure regulator to the carburetor itself rather than just using the return fitting on the mechanical fuel pump or a fuel filter with a built in return line.
There is a fixed size orifice that threads into the pipe leaving the carburetor the sets the amount of fuel bypassed and regulates the pressure at the needle and seat. The pressure and amount of fuel bypassed can be changed by replacing the plug with one with a bigger or smaller hole.
While it’s a bit more cumbersome looking than some of the alternatives it does insure that there is no place for the fuel to lay stagnant and pick up heat anywhere on the way to the carburetor and should eliminate any possibility of vapor lock.
A while back I ordered a new fuel tank and sending unit for this project. I couldn’t find a sending unit with a return line so I figured I’d just have to add one. I ordered from Rock Auto and was just glad I could find them new in the first place. Anyway, last week I found a hairline stress crack in the fuel tank on the wife’s El Camino (great huh?).
Since the time I bought the tank and sender, I found out about a place called Genesis Auto Parts that specialize in tanks, sending units etc. They showed that had a sending unit with 3 lines. The price was $23 which is as cheap as I think I have ever bought a sending unit. The rest of the sending units Genesis sells for the El Caminos go for around $55 which is still considerably cheaper than the $140 Rock Auto gets for them.
They don’t list the sending units by tank size but by engine application. As I found out it is NOT for the 22 Gal tank. I do not have an 18 gallon tank or sending unit to compare it to but I suspect it’s for the smaller tank. It IS the same as a sending unit for a 78 Monte Carlo (which I do have from the parts car). The good news is that with a bit of modification it should still work in the 22 Gal tank.
From left to right are; a new 22 Gal sending unit that Rock Auto sells, an original sending unit from a 78 Monte Carlo, and the 3 line unit from Genesis.
It may be a little hard to tell from the picture but the pickup tube for the 22 Gal tank is about an inch longer that the one from Genesis (which as I said was the same as the center Monte Carlo one when I received it). To make up the difference I just straightened the 90 degree bend where the sock attaches. Pointing straight down the fuel sock (strainer) no longer fits but I’m not planning on using it anyway. I also straightened one of the bends on the arm that holds the float to lengthen it just a bit so the gauge will still read correctly with the bigger tank.
As far as not using the sock I was not planning on using it anyway as there is a possibility that I may at some point convert it to E85 and the sock is one of the items they recommend deleting.
So the new sending unit from Rock will be going into the wife’s El Camino when the new tank arrives and the modified 3 line unit from Genesis will end up in this project.
Re: 500 Caddy into El Camino
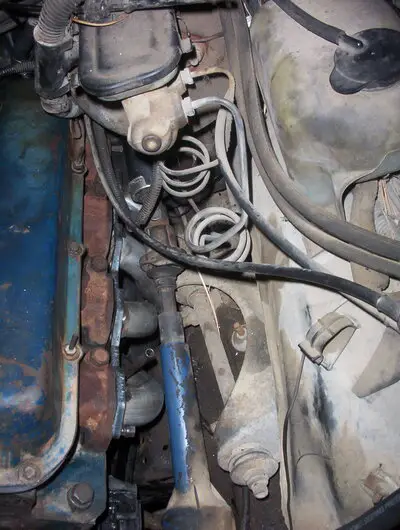
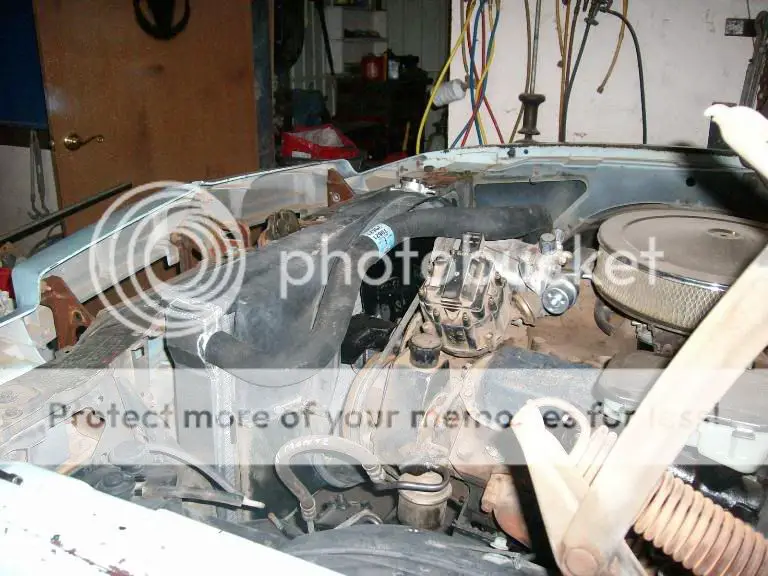
I’m using an aluminum radiator, 2 row with 1” tubes, the nipple for the heater return hose and internal trans cooler. I also dug up a mechanical 7 Blade fan and am using the HD (thick) fan clutch.
The radiator sits in the original location but the Caddy motor was moved over a bit more than an inch from the original engine center line in order to get the best clearance. This results in the fan shroud not being centered on the fan and interference with the fan blades.
The easy way to mount a fan and alleviate fan shroud clearance issues would have been to use electric fan(s) mounted to the radiator but I elected not to do this for a couple of reasons. My experience is while the electric fans do well in many cases, they still don’t move as much air as a 7 blade fan with a lot of pitch and a HD fan clutch. I also don’t care for the constant draw they put on the electrical system (think driving at night with the headlights and AC on and then add the fans going).
Relocating the shroud to center it is not that big of a deal. I removed the radiator so I didn’t damage it and then played with the shroud until it was centered on the fan and re-drilled the mounting holes and used self tapping screws to secure it. You can see how far it was shifted in relation to the original mounting hole.
The original fan shroud is made in 2 pieces, I’ve seen some stapled together and some held together with self tapping screws. If they are stapled I normally remove the staples and put screws in to make things like changing water pumps and fan clutches easier.
e next thing is to set the radiator in. There is plenty of clearance to run a 7 blade fan and the thick heavy duty fan clutch I normally prefer to use. Then it was just trimming the shroud a bit to make it fit the radiator that is still in the original location.

The shroud no longer completely covers the core and I am looking for one that will fit a bit better, but if I don’t have any luck this will still probably work.

The next thing on the agenda were hoses. A 73 El Dorado Upper hose fits nicely. I tried an 83 El Camino (305) lower hose, but the bends are not quite right. I ended up using a Car Quest 20687 trimmed at both ends that turns out to work very nicely (sorry I don't have an application that it fits, it was one of the ones I keep around for situations like this).
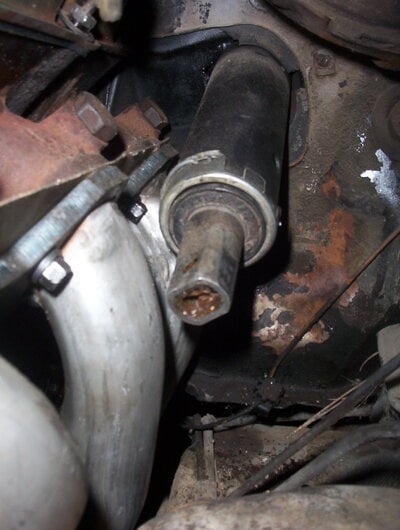
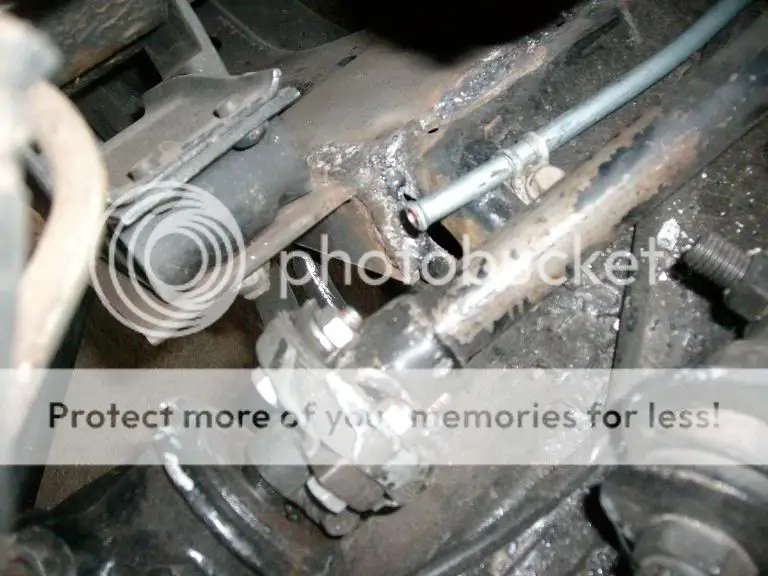
The other hose I was concerned about was the Power Steering pressure hose. There were a couple of issues to deal with on this. The Power Steering pump on the Cadillac engine uses a slip on pulley held with a nut and woodruff key. The Power steering pump form a donor Monte Carlo uses a press on pulley, the pulley on the Cadillac sets out just a bit farther but that could be overcome by simply not pressing the pulley on the Chevy pump quite as far. In my case the Cadillac pump seems to be in better condition than the Chevy pump so I elected to use that.
Using the Cadillac pump created it’s own issue. The Cadillac pump was set up for a pressure hose with a compression fitting and the Steering gear uses a hose with O ring fittings. The solution for that was simply interchanging the fitting in the back of the pump that the line screws into for the fitting from the Chevy pump.
The pressure hose that seems to fit well is for an 83 Monte Carlo with a 305. The return line is simply a length of 3/8” fuel line that goes on the barbed fittings at the pump and gear.

I’m using an aluminum radiator, 2 row with 1” tubes, the nipple for the heater return hose and internal trans cooler. I also dug up a mechanical 7 Blade fan and am using the HD (thick) fan clutch.
The radiator sits in the original location but the Caddy motor was moved over a bit more than an inch from the original engine center line in order to get the best clearance. This results in the fan shroud not being centered on the fan and interference with the fan blades.
The easy way to mount a fan and alleviate fan shroud clearance issues would have been to use electric fan(s) mounted to the radiator but I elected not to do this for a couple of reasons. My experience is while the electric fans do well in many cases, they still don’t move as much air as a 7 blade fan with a lot of pitch and a HD fan clutch. I also don’t care for the constant draw they put on the electrical system (think driving at night with the headlights and AC on and then add the fans going).
Relocating the shroud to center it is not that big of a deal. I removed the radiator so I didn’t damage it and then played with the shroud until it was centered on the fan and re-drilled the mounting holes and used self tapping screws to secure it. You can see how far it was shifted in relation to the original mounting hole.
The original fan shroud is made in 2 pieces, I’ve seen some stapled together and some held together with self tapping screws. If they are stapled I normally remove the staples and put screws in to make things like changing water pumps and fan clutches easier.
e next thing is to set the radiator in. There is plenty of clearance to run a 7 blade fan and the thick heavy duty fan clutch I normally prefer to use. Then it was just trimming the shroud a bit to make it fit the radiator that is still in the original location.
The shroud no longer completely covers the core and I am looking for one that will fit a bit better, but if I don’t have any luck this will still probably work.
The next thing on the agenda were hoses. A 73 El Dorado Upper hose fits nicely. I tried an 83 El Camino (305) lower hose, but the bends are not quite right. I ended up using a Car Quest 20687 trimmed at both ends that turns out to work very nicely (sorry I don't have an application that it fits, it was one of the ones I keep around for situations like this).
The other hose I was concerned about was the Power Steering pressure hose. There were a couple of issues to deal with on this. The Power Steering pump on the Cadillac engine uses a slip on pulley held with a nut and woodruff key. The Power steering pump form a donor Monte Carlo uses a press on pulley, the pulley on the Cadillac sets out just a bit farther but that could be overcome by simply not pressing the pulley on the Chevy pump quite as far. In my case the Cadillac pump seems to be in better condition than the Chevy pump so I elected to use that.
Using the Cadillac pump created it’s own issue. The Cadillac pump was set up for a pressure hose with a compression fitting and the Steering gear uses a hose with O ring fittings. The solution for that was simply interchanging the fitting in the back of the pump that the line screws into for the fitting from the Chevy pump.
The pressure hose that seems to fit well is for an 83 Monte Carlo with a 305. The return line is simply a length of 3/8” fuel line that goes on the barbed fittings at the pump and gear.
- Status
- Not open for further replies.
Similar threads
- Replies
- 2
- Views
- 142
- Replies
- 3
- Views
- 433
- Replies
- 0
- Views
- 89
- Replies
- 16
- Views
- 266
GBodyForum is a participant in the Amazon Services LLC Associates Program, an affiliate advertising program designed to provide a means for sites to earn advertising fees by advertising and linking to amazon.com. Amazon, the Amazon logo, AmazonSupply, and the AmazonSupply logo are trademarks of Amazon.com, Inc. or its affiliates.