BUILD THREAD '78 Cutlass Supreme Lichen Edition

Put SEM rust shield on the driver side floor yesterday during unseasonably warm weather - smells like nail polish. Seems like it would stick well with even less rigorous surface prep. Need to stir to re-suspend paint solids.

Headliner repaired with fiberglass and polyester resin and ready for blue headliner fabric obtained from "Your Auto Trim" of Columbus MS. The fabric matches the backside (not faded) of the interior plastic and will be easy to match with matte finish rattle can.

Got a carb rebuild kit from a Canadian who's business is "The Carburetor Doctor"; the kit shipped out of Oklahoma (affiliate). I paid $10 more than kit was worth (i.e. $35) since they were responsive on email and helped me find the right kit for my R2-M2MC 2-barrel.

Bought new proportioning valve and front lines from "Inline Tube" ebay seller.

Question: do brake boosters have a rubber diaphragm? Does it tend to dry rot? I'd really like to not spend $140 on a new brake booster, just because it looks rusty, if it is still good. Daughter will be driving car, so if the booster is a vulnerability, I'd just replace it with the master cylinder. If it is an unlikely failure point, I'll keep it.

Question: take a look at that pin in the upper door hinge, driver side. Should I replace that hinge, or the pin? I know it is challenging to maintain the body gap lines when you change hinges.... I'm worried.

Question: can someone recommend a steering wheel wrap or cover that works well for these older, thinner wheels? Not pink fuzz thanks.


20231109_134731.jpg
20231110_112314.jpg
20231110_112215.jpg
20231110_112141.jpg
20231109_134727.jpg
received_1065977764400954.jpeg
 
Last edited:
Floor looks very nice. On the booster, yes they do go out. When they do you basically end up with manual brakes, very hard pedal and usually a vacuum leak. One thing when chasing vacuum leaks or hard pedal always check the booster.
 
Put SEM rust shield on the driver side floor yesterday during unseasonably warm weather - smells like nail polish. Seems like it would stick well with even less rigorous surface prep. Need to stir to re-suspend paint solids.

Headliner repaired with fiberglass and polyester resin and ready for blue headliner fabric obtained from "Your Auto Trim" of Columbus MS. The fabric matches the backside (not faded) of the interior plastic and will be easy to match with matte finish rattle can.

Got a carb rebuild kit from a Canadian who's business is "The Carburetor Doctor"; the kit shipped out of Oklahoma (affiliate). I paid $10 more than kit was worth (i.e. $35) since they were responsive on email and helped me find the right kit for my R2-M2MC 2-barrel.

Bought new proportioning valve and front lines from "Inline Tube" ebay seller.

Question: do brake boosters have a rubber diaphragm? Does it tend to dry rot? I'd really like to not spend $140 on a new brake booster, just because it looks rusty, if it is still good. Daughter will be driving car, so if the booster is a vulnerability, I'd just replace it with the master cylinder. If it is an unlikely failure point, I'll keep it.

Question: take a look at that pin in the upper door hinge, driver side. Should I replace that hinge, or the pin? I know it is challenging to maintain the body gap lines when you change hinges.... I'm worried.

Question: can someone recommend a steering wheel wrap or cover that works well for these older, thinner wheels? Not pink fuzz thanks.


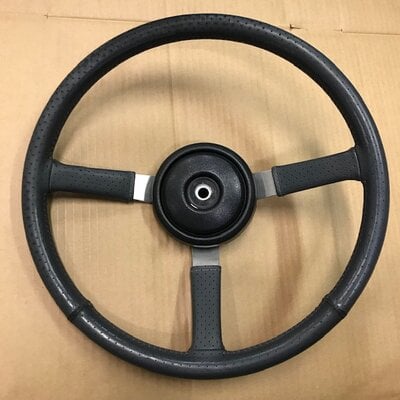
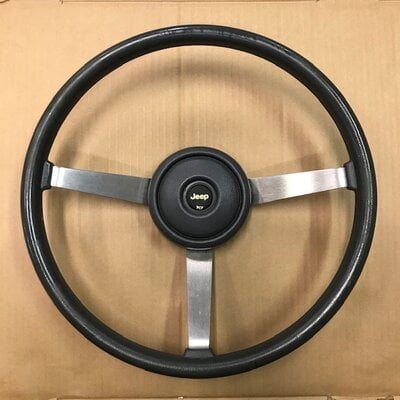
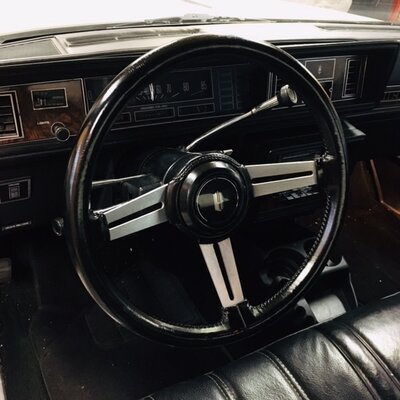
View attachment 231002View attachment 230999View attachment 231000View attachment 231001
One option for the steering wheel would be just replacing it. I have found a couple on Jeep Cherokees in local salvage yards. I used one (center pic) for a while until I found my current '84 Toronado wheel. I had to do some minor mods to get the horn functionality right.
 

Attachments

  • IMG_0834.jpg
    IMG_0834.jpg
    96.8 KB · Views: 60
  • IMG_0833.jpg
    IMG_0833.jpg
    93.3 KB · Views: 62
  • IMG_0149.jpg
    IMG_0149.jpg
    128.2 KB · Views: 66
Love that. They all look good. Going to have to look into how to pull steering wheel.
My '78 Cutlass has 2 screws on the back side that hold the horn button on, I forget but it's around 9mm. Then behind the horn button there's a clip and nut holding the factory wheel on. I used snap ring pliers to remove the clip but you can use screwdrivers if you have to, just be prepared for it to disappear. Try "walking" it up and off as opposed to prying. After removing those (nut was either 3/4" or 5/8", puller was the other) I grabbed a standard universal puller that I've used to remove/install balancers and other steering wheels with.

A problem I ran into was that the bolts supplied with the puller kit weren't long enough to allow the main "bolt" of the puller to be threaded all the way through the base, and that will strip out the threads on the puller as well as prevent you from using the nose cone on the tip that protects the steering column threaded stud from damage. I completely forgot that I'd needed to buy longer bolts on other occasions and decided to wait to pull my wheel.

There are 2 bolts required to hold the puller to the factory steering wheel- they're 5/16"-18 threads and I decided they need to be 5" long. My factory steering wheel is still on because I was ill-prepared.
 
This was not easy. I did get the passenger front hardline installed also... but didn't get a picture before night.

Looks like I will only be keeping the line that runs from the proportioning valve to the rear splitter hose. The others were shot or didn't match the prop valve.

Stupid question: Is the forward most output port on the master cylinder matched to the forward most input port on proportioning valve? I will look it up and figure it out, but if you wanted to comment it would be a help.
20231113_160705.jpg
20231113_153622.jpg
20231113_155038.jpg
 
I just looked at mine and they are as follows: The front port on the proportioning valve goes to the front brakes. The second port on the prop. valve is connected to the REAR port of the master cylinder. The FRONT port of my master cylinder is connected to the 3rd port on the prop. valve, right behind the plug-in electrical connector.
 
  • Like
  • Agree
Reactions: doood and SoFloG
I just looked at mine and they are as follows: The front port on the proportioning valve goes to the front brakes. The second port on the prop. valve is connected to the REAR port of the master cylinder. The FRONT port of my master cylinder is connected to the 3rd port on the prop. valve, right behind the plug-in electrical connector.
Thanks for the info...

To head off comments, the car has 26000 miles; pads were 30% worn, so I kept the rotors... new pads with new calipers just because.
 
  • Like
Reactions: Sweet_Johnny
  • Like
Reactions: Rktpwrd and doood
Rotors are pretty crusty, would be a good idea to turn them.

Your previous caliper wasn't resetting properly and you can see that in the rear facing is thinner than the front. With the new calipers, the issue should resolve.

There's contention on grease or no grease... I always used a little bit (sparingly) of 500°F wheel bearing grease on the pins and any place the caliper slides on the mounting bracket. Also always repack wheel bearing at every brake change.
 
Last edited:

GBodyForum is a participant in the Amazon Services LLC Associates Program, an affiliate advertising program designed to provide a means for sites to earn advertising fees by advertising and linking to amazon.com. Amazon, the Amazon logo, AmazonSupply, and the AmazonSupply logo are trademarks of Amazon.com, Inc. or its affiliates.

Please support GBodyForum Sponsors

Classic Truck Consoles Dixie Restoration Depot UMI Performance

Contact [email protected] for info on becoming a sponsor