

Check out Vintage Air. I think you should be able to find the 45° fitting you need. Call them. They are in San Antonio. Great people. Very helpful.
BUILD THREAD 86 GP 2+2~Blown 6.0
- Thread starter 81cutlass
- Start date
You are using an out of date browser. It may not display this or other websites correctly.
You should upgrade or use an alternative browser.
You should upgrade or use an alternative browser.

Plugged away at a bunch of random stuff today and this week.
Installed a GN heater hose blockoff & replaced the window washer pump Friday last week. The window washer was surprisingly easy to change, I was kinda shocked. Should have done that a while ago (and on my cutlass)
My inner fender extensions are totally destroyed. Have had a hard time finding them at the salvage yards (primarily because there is only 2 81+ GP's at my yard and both were missing most of their noses), and no interchange between any other G bodies or even lemans or bonnies.
I am getting a drivers side from one member on the forum but he only had luck finding the drivers side. Went back to the yard last week and 1 GP had a semi cracked passenger side that I was able to grab, It had a crack but I realized these things are pretty hard to find and usually destroyed. The yard probably had a dozen lemans and bonnevilles and maybe 2 or 3 had intact extensions, so even if I do find another 81+ GP I'd guess 25% that they won't be broken.
New, left, old right.

And started work on the seat swap. These are leather seats out of a 95 ish cutlass SL W body coupe.
The rear seat is a little narrower and has a similar shape but doesn't have much clearance for the driveshaft hump and doesn't form to the floor that great. I might need to build a small filler panel between the floor and seat bottom, but thats for later. The rear cushions are pretty close in shape

The rear top cushion is pretty close in height but again, a bit narrower. The mounting system is very similar to a stock G body rear seat but just different that it won't slide in. It needs the top hooks moved out about 6" on both sides. It does have a nice fold down system so you can put something long through the trunk and into the cabin but of course I have a GP with the rear seat brace so its kinda useless.
I need some hardware to get the rear seat in so on to the front seat!

Stock left, W body right. The stock drivers was mouse poop covered when I got the car and it cleaned up OK, but is starting to fall apart on the headrest and there is some tears. Also, the bolstering is WASTED. The W body seats are a real similar size, are bolstered without being too much, and were a good color, and I like leather so I thought why not. Plus the passenger seat was mouse eaten and I recovered it with some Monte material since thats what I found, but its time to move on.

This seat is power

Drivers tracks were 3/8" wider so they needed to be slotted


And the back brackets on a G body sit about 1.5? lower than the front (they aren't on the same plane unlike the W body stuff)

I had some 1.5x3" alum rectangle section so I made some elevation stands for the rear.


And the front passenger side was mounted a bit differently so I had to drill new holes entirely in the tracks

And whipped up the new rear stands

Overall I'm happy. They match the interior pretty well style wise and I think a dark grey leather shifter boot and steering wheel will help tie it together. They don't look as out of place in my opinion as a later model mid 2000's seat (like a GTO or 4th gen TA) but are still comfy. Not as "plush" as the stock buckets but i'd say more comfortable since they are more supportive. The new tracks also have a lot more front to back movement along with reclining, and having the ability to adjust the bottom tilt with these being power is a lot better.

They fit well to the console and have about 2" to the doors.

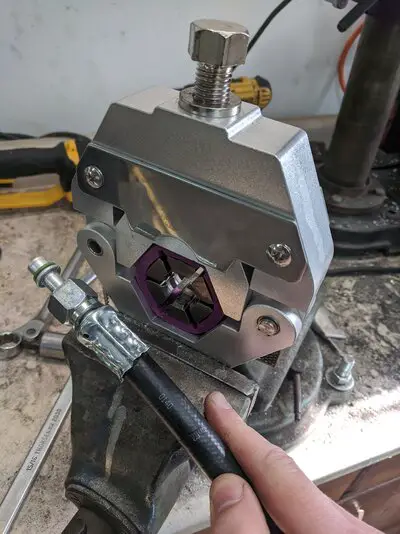
And my AC hose and last fittings showed up so I cut the hose to length and test fit. I have my AC crimping tool on order so I'll crimp them later this week when it shows up.


Installed a GN heater hose blockoff & replaced the window washer pump Friday last week. The window washer was surprisingly easy to change, I was kinda shocked. Should have done that a while ago (and on my cutlass)
My inner fender extensions are totally destroyed. Have had a hard time finding them at the salvage yards (primarily because there is only 2 81+ GP's at my yard and both were missing most of their noses), and no interchange between any other G bodies or even lemans or bonnies.
I am getting a drivers side from one member on the forum but he only had luck finding the drivers side. Went back to the yard last week and 1 GP had a semi cracked passenger side that I was able to grab, It had a crack but I realized these things are pretty hard to find and usually destroyed. The yard probably had a dozen lemans and bonnevilles and maybe 2 or 3 had intact extensions, so even if I do find another 81+ GP I'd guess 25% that they won't be broken.
New, left, old right.
And started work on the seat swap. These are leather seats out of a 95 ish cutlass SL W body coupe.
The rear seat is a little narrower and has a similar shape but doesn't have much clearance for the driveshaft hump and doesn't form to the floor that great. I might need to build a small filler panel between the floor and seat bottom, but thats for later. The rear cushions are pretty close in shape
The rear top cushion is pretty close in height but again, a bit narrower. The mounting system is very similar to a stock G body rear seat but just different that it won't slide in. It needs the top hooks moved out about 6" on both sides. It does have a nice fold down system so you can put something long through the trunk and into the cabin but of course I have a GP with the rear seat brace so its kinda useless.
I need some hardware to get the rear seat in so on to the front seat!
Stock left, W body right. The stock drivers was mouse poop covered when I got the car and it cleaned up OK, but is starting to fall apart on the headrest and there is some tears. Also, the bolstering is WASTED. The W body seats are a real similar size, are bolstered without being too much, and were a good color, and I like leather so I thought why not. Plus the passenger seat was mouse eaten and I recovered it with some Monte material since thats what I found, but its time to move on.
This seat is power
Drivers tracks were 3/8" wider so they needed to be slotted
And the back brackets on a G body sit about 1.5? lower than the front (they aren't on the same plane unlike the W body stuff)
I had some 1.5x3" alum rectangle section so I made some elevation stands for the rear.
And the front passenger side was mounted a bit differently so I had to drill new holes entirely in the tracks
And whipped up the new rear stands
Overall I'm happy. They match the interior pretty well style wise and I think a dark grey leather shifter boot and steering wheel will help tie it together. They don't look as out of place in my opinion as a later model mid 2000's seat (like a GTO or 4th gen TA) but are still comfy. Not as "plush" as the stock buckets but i'd say more comfortable since they are more supportive. The new tracks also have a lot more front to back movement along with reclining, and having the ability to adjust the bottom tilt with these being power is a lot better.
They fit well to the console and have about 2" to the doors.
And my AC hose and last fittings showed up so I cut the hose to length and test fit. I have my AC crimping tool on order so I'll crimp them later this week when it shows up.
Last edited:
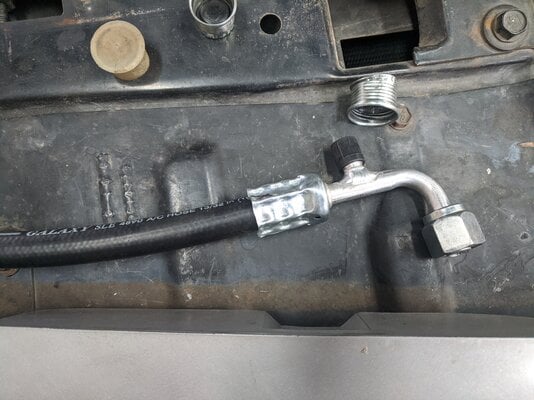
I got my AC line crimp tool in the mail today. eBay listing says it was a mastercool but it didn't say on the box or any of the literature inside so I have a feeling it was a knockoff. It also was really chowdery in the crimping bolt so I wasn't very impressed. Plus the PayPal went to Chinese letters so I'm not impressed. Or mastercool is that cheap of a tool.
I only used it four times and I'm not sure I had the right combo of fitting and hose so I can't blame it entirely but It does feel like a normal harbor freight cheaparse tool.
I think my fittings are for R12 hose and the hose is R134 so the OD on the new hose isn't as large as the old stuff so I had to crimp the fittings way past where they usually go. We will see if it holds vac or pressure. I might need to redo it with actual r12 hose to fit the fittings better or find r134 diameter fittings.
It is all routed and fits ok. I need to run to dad's and have him pull the vac and charge the system and see if I have any luck.
One step at a time!
Attachments

It doesn't sound like a Mastercool tool. I have their hydraulic flaring tool and it is of the utmost quality. The case has their name on it as do the instructions. The hoses look good. I hope it is a success. If I haven't said it already, I love this build.
I got 'lucky'? at about noon on Friday and got an email from the dept. head to go home. All the protests in town were getting close to the University and they sent everyone home so I took the sign to run some errands and get the last supplies for the seat install.
Fiddled this weekend with a lot of yard work, but got some time to wrap up the seats last night and this morning.
Broke out my inner blacksmith on some 1/4" steel rod

Flattened one end out, drilled a hole, and bent it to create the upper mount tab. Used a wire clamp and one of the bolts that holds the rear seat latch on to fasten it to the seat.

I also put a piece down the center to catch the middle hook on the package tray location

And cut up some old stop sign I had laying around and bent and painted to create the rear lower seat brackets

Bolted in

And fabbed up the lower brackets to attach the seat cushion to the lower 'hooks'


And mounted!

Folding too. If I get super ambitious I might take the factory trunk to interior insulation out and carpet the trunk to knock some of the noise out, and then allow me to haul longer parts along with accessing the trunk better. TBD on that. The fact I have a GP with the added bracing makes me not want to do it since its going to be kinda useless.


Overall they fit better than I thought they would. I was a bit disappointed at first when I test fit them last weekend by just propping them up with 2x4's, but when I got the brackets in they actually fit nice, are decently solid and don't move around in a bad way even when you sit in them. They are more decorative than useful since nobody is ever going to sit back there, but its nice to have matching seats in the car.
The only complaints are that the retractors on the rear side lap belts kinda bind in the lower and back cushion crack and don't easily go in and out, but again nobody is ever going to sit back there so the seatbelts are for show. There is about a 2" gap between the bottom of the front lower cushion and the actual floorpan since the driveshaft hump forces the seat up in the middle with no cutout like the stock seat. I might build a small filler panel for that spot.
The seat is also 3" narrower in total in the back so there is a bit more gap between the seat and the inner trim, but it kinda disappears.
For a total of 5 hours to install & clean them and the $120ish to purchase them, I'm happy.
Fiddled this weekend with a lot of yard work, but got some time to wrap up the seats last night and this morning.
Broke out my inner blacksmith on some 1/4" steel rod
Flattened one end out, drilled a hole, and bent it to create the upper mount tab. Used a wire clamp and one of the bolts that holds the rear seat latch on to fasten it to the seat.
I also put a piece down the center to catch the middle hook on the package tray location
And cut up some old stop sign I had laying around and bent and painted to create the rear lower seat brackets
Bolted in
And fabbed up the lower brackets to attach the seat cushion to the lower 'hooks'
And mounted!
Folding too. If I get super ambitious I might take the factory trunk to interior insulation out and carpet the trunk to knock some of the noise out, and then allow me to haul longer parts along with accessing the trunk better. TBD on that. The fact I have a GP with the added bracing makes me not want to do it since its going to be kinda useless.
Overall they fit better than I thought they would. I was a bit disappointed at first when I test fit them last weekend by just propping them up with 2x4's, but when I got the brackets in they actually fit nice, are decently solid and don't move around in a bad way even when you sit in them. They are more decorative than useful since nobody is ever going to sit back there, but its nice to have matching seats in the car.
The only complaints are that the retractors on the rear side lap belts kinda bind in the lower and back cushion crack and don't easily go in and out, but again nobody is ever going to sit back there so the seatbelts are for show. There is about a 2" gap between the bottom of the front lower cushion and the actual floorpan since the driveshaft hump forces the seat up in the middle with no cutout like the stock seat. I might build a small filler panel for that spot.
The seat is also 3" narrower in total in the back so there is a bit more gap between the seat and the inner trim, but it kinda disappears.
For a total of 5 hours to install & clean them and the $120ish to purchase them, I'm happy.
Knockin out interior projects!
I was shut out of work again today and ran out of stuff to do on the computer early afternoon so I spent a few hours getting the console out, cleaned and recarpeted the sides. Also re epoxied the top trim panel where it had been broken (the thing was in like 5 pieces when I bought the car) and sanded the epoxy down and primed it in prep for a repaint.
Of course 35 year old plastic is brittle so I snapped 4 of the 6 studs off. I drilled what was left over and put an 8-32 bolt in place and threaded it in.

And scraped off the factory adhesive goo

Cut some of the carpet to rough shape & traced the back side

Not too bad!

Cleaned the vent, cut the hole in place and installed

Sanded the top of the console lid

And primed it

Looks a lot better

And back in!

I just need to paint the top lid silver once the primer dries.
I was shut out of work again today and ran out of stuff to do on the computer early afternoon so I spent a few hours getting the console out, cleaned and recarpeted the sides. Also re epoxied the top trim panel where it had been broken (the thing was in like 5 pieces when I bought the car) and sanded the epoxy down and primed it in prep for a repaint.
Of course 35 year old plastic is brittle so I snapped 4 of the 6 studs off. I drilled what was left over and put an 8-32 bolt in place and threaded it in.
And scraped off the factory adhesive goo
Cut some of the carpet to rough shape & traced the back side
Not too bad!
Cleaned the vent, cut the hole in place and installed
Sanded the top of the console lid
And primed it
Looks a lot better
And back in!
I just need to paint the top lid silver once the primer dries.
Diddly squat interior update #64
Replaced the passenger door inner window sweep that has been sitting around for like 3 years. I did the drivers side 3 years ago since it was entirely missing but the passenger was semi OK. Like only 20% missing, lol.
Real reason I changed it was because I had to pull the upper door panel to check why the window wobbles so much in and out when rolled up. I need to replace the rear peg guides that rivet onto the window glass for both sides, but I don't own one of those HD rivet guns Rktpwrd said you need in his thread when he changed his. I need to borrow dads giant pneumatic rivet gun next time I go home to do that.
Bolted in my freshly painted console top plate. It looks better and its a decent match between the factory silver dash bezel so I'm not going to complain.
I need to sew a shifter boot but my Wife won't let me use her sewing machine because she says leather or vinyl is too think and I will break it. She says she needs it for quilts and stuff. Bah! I don't have material to start that project anyways so it's on the to do list but not that far up.

Overall I think everything blends in pretty well and it's the nicest, most complete the interior has been since ~1997 when the previous owner parked it from the blown 305.

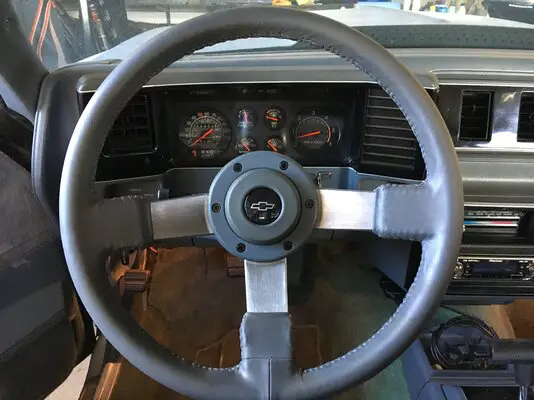
I also went bonkers cleaning my steering wheel. It was so bad I wouldn't even touch it when i bought the car as a roller and did an ok job cleaning it when I reassembled the interior 4 years ago. I tried some wax and grease remover on an equally disgusting shifter handle for my Wagon center console and it did a good job. I was real hesitant to use it on stuff that I might ruin.
The wax and grease remover and warm soapy water cleaned a majority of the nastyness off the wheel. I also rubbed it down with some veg oil to get the sticky out of it.
It's better, but still loose and pretty worn. I have been hunting Ebay and salvage yards for a replacement, but have yet to hunt one down. Later GT fiero's and 87 GTA's shared the same wheel. Ebay gets $400+ for a recovered one and none of the upholstery shops I have called want to do a wheel.
I haven't ruled out recovering it myself but I'd rather not. I might end up since I want to match the shifter boot to the steering wheel in a color that matches the seats.

Replaced the passenger door inner window sweep that has been sitting around for like 3 years. I did the drivers side 3 years ago since it was entirely missing but the passenger was semi OK. Like only 20% missing, lol.
Real reason I changed it was because I had to pull the upper door panel to check why the window wobbles so much in and out when rolled up. I need to replace the rear peg guides that rivet onto the window glass for both sides, but I don't own one of those HD rivet guns Rktpwrd said you need in his thread when he changed his. I need to borrow dads giant pneumatic rivet gun next time I go home to do that.
Bolted in my freshly painted console top plate. It looks better and its a decent match between the factory silver dash bezel so I'm not going to complain.
I need to sew a shifter boot but my Wife won't let me use her sewing machine because she says leather or vinyl is too think and I will break it. She says she needs it for quilts and stuff. Bah! I don't have material to start that project anyways so it's on the to do list but not that far up.
Overall I think everything blends in pretty well and it's the nicest, most complete the interior has been since ~1997 when the previous owner parked it from the blown 305.
I also went bonkers cleaning my steering wheel. It was so bad I wouldn't even touch it when i bought the car as a roller and did an ok job cleaning it when I reassembled the interior 4 years ago. I tried some wax and grease remover on an equally disgusting shifter handle for my Wagon center console and it did a good job. I was real hesitant to use it on stuff that I might ruin.
The wax and grease remover and warm soapy water cleaned a majority of the nastyness off the wheel. I also rubbed it down with some veg oil to get the sticky out of it.
It's better, but still loose and pretty worn. I have been hunting Ebay and salvage yards for a replacement, but have yet to hunt one down. Later GT fiero's and 87 GTA's shared the same wheel. Ebay gets $400+ for a recovered one and none of the upholstery shops I have called want to do a wheel.
I haven't ruled out recovering it myself but I'd rather not. I might end up since I want to match the shifter boot to the steering wheel in a color that matches the seats.
A husband and wife team in Michigan recovered the steering wheel I got out of a 85' T-Type a few years ago, think it was $200 or so, they had/have eBay listings for the service, unless the price went way up. They even sent me some extra material as I expressed interest in having a shifter handle or two recovered with matching stuff. Would have to dig up their info/name, if interested. Turned out really good and has held up nicely I'd say.
Attachments
A husband and wife team in Michigan recovered the steering wheel I got out of a 85' T-Type a few years ago, think it was $200 or so, they had/have eBay listings for the service, unless the price went way up. They even sent me some extra material as I expressed interest in having a shifter handle or two recovered with matching stuff. Would have to dig up their info/name, if interested. Turned out really good and has held up nicely I'd say.
I would appreciate that. Heck, if they would sew me a shifter boot too I wouldn't say no!
GBodyForum is a participant in the Amazon Services LLC Associates Program, an affiliate advertising program designed to provide a means for sites to earn advertising fees by advertising and linking to amazon.com. Amazon, the Amazon logo, AmazonSupply, and the AmazonSupply logo are trademarks of Amazon.com, Inc. or its affiliates.